
Giga Universe
Working on a tool.
- 121
- Posts
- 16
- Years
- Age 29
- South Africa
- Seen Sep 30, 2012
Introduction:
Hello. My name is Giga Universe and I am going to give you a rough tutorial on how to weather hack. This is my first Tutorial, so constructive criticism is gladly welcomed. Ok let's begin with a list of requirements:
List:
- TMA (Tile Molester Alternate) by SnowBro 2003
- APE (Advanced Palette Editor) by HackMew
- VBA (Visual Boy Advance)
- Any advanced generation ROM (Yay, finally)
- You need to know how to use TMA, APE and A-Map
- A-Map (Advanced Map) by LuHo
Now that you have all that, we can begin. First of all, as you may have guessed by the list of requirements, there are two parts to weather hacking: Palettes and Graphics. I will give you some offsets, and if these don't work, use the identification and discovery section. Okay, Lets begin with graphics.
Identification and discovery:
If you are the type who doesn't like the How it Works, you can skip the DIY and go to the next section. Otherwise, stay here. Okay, with my research I can make this easy for you. Open your ROM in A-Map, set the weather you wish to find, save and go to the place where your weather is in your ROM on VBA. In VBA go Tools -> Palette Viewer. Here is what you are looking for: (It's always on the 12 line (if the first line is 0))
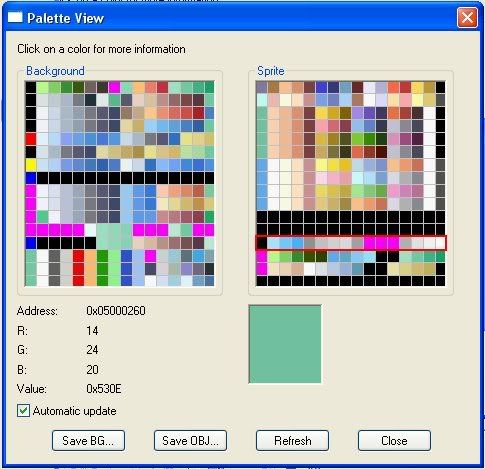
The weather palette is ALWAYS on this line (except when thunderstorm palette edits everything to white) Search this line in a HEX editor or APE. Once you have found the offset (there should only be one) navigate to this in TMA. Thhe reason for doing this is because the picture is usually found at the same position as the palette. Navigate around this point and you'll find the weather. Go to the TMA Section for more instructions.
Decisions:
Before you can start, you have to decide the following: Are you going to edit the palette and are you going to edit the graphics. HOWEVER, there is something I cannot do in weather hacking: Make a completely new weather. This means you are going to have to edit an existing weather. This may not seem like a big problem, but if you take into account all the factors, you will see that it is. I do NOT know how to change the direction of the weather; therefore you have to choose one that is closest to the one you wish to make. Also sometimes if you change one thing, you change the other. E.g. most mist/rain weathers use the same sprite. Therefore you cannot edit one mist and hope the others will stay unchanged. Too bad, they won't. So, you need to decide how you are going to do this...
Step One:
Make an outline of your weather.
Step Two:
Find a weather that is closest to your idea of your weather
Step Three:
Decide if you mind if other weathers are replaced (If any)
Outlining Weathers:
Each weather will be covered here, each with their own section and information.
Let's start with sandstorm:
Sandstorm:
Sand storm has TWO major parts: A Palette and a Sprite. Actually, it has two sprites. The first is an image that is tile with others of its kind over and over. This tile moves diagonally to the top left hand corner of the screen. The second is a small swirly image that moves diagonally to the top left hand corner of the screen and does a little clockwise loop at the same time.
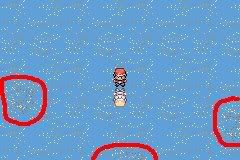
The red circled thingies are the second image; the rest is the first image. Okay, so you can't see it so well. Let's try in OAM viewer:

Ah, much better. Now you can clearly see the two separate images. Now we know what we are dealing with. So that is sand storm done. If you still don't see it. Test it in a Rom Yourself.
Steady Snow:
Okay. This is easy. There are two images again. But this time only the dots change position.
Let's use OAM viewer again. Open up your ROM set to steady snow; go to where it's snowing. Go tools, OAM View, hit automatic update and click VBA to focus the window. Sit back and watch it. See these images? These are what you want to change.
Sunny Weather with clouds in the water:
This is nice and simple – Only one image. This weather is buggy and sometimes displays clouds on tiles other than water...
Rain:
This is the only rain weather I am going to cover, thunderstorm involves a palette change script so I can't help you there... This is pretty easy, you need to change about five fives of small images (16 by 32 pixels), and though this will change other rain weathers.
Mists:
This is one big subject. Even though there are only four types of mist, they use only two images between them. Only Mist from top right hand corner has its only image. Dense bright mist, Steady mist and underwater mist have only one image. So changing the latter will result in not one, but three changed weathers!
Look at my mist table
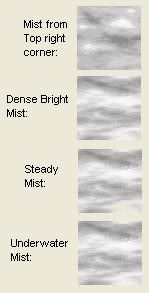
Please note: Underwater mist has not only the mist effect, but two bubbles that float upwards.
Sprites:
Offsets and at the bottom
Well, you need to open your ROM in TMA. Do Navigate -> Go to. Type in your offset and make sure the Hex box and Absolute Boxes are both checked. Hit OK. You will see a couple of images; they can be easily identified as the weather you are going to edit. Go view -> Block Size -> Custom and put 8 in both blocks. Hit Ok and it will look better. Press the right arrow (On the toolbar at the top right, near the + sign) once (Thrice for Ruby/Sapphire, Emerald it's once). (Or here)

In VBA with your corresponding weather set, go Tools -> Palette Viewer. Hit Save OBJ and save it as a 'Windows Palette (*.PAL)' save it somewhere you can find it easily. Go Palette -> Import From -> Another File and import the palette you just saved. At the toolbar (colour toolbar) at the bottom click the right arrow twelve times. This will make it much easier to edit the file. Edit the bit you wish to change and save. Go to A-Map, find a map which you can access easily and change its map weather to the weather you edited, save and test. It should have worked. Now for the Palette!
NOTE: If you edit a weather, other weathers will be reset to the regular weather. Make sure that your weather is correctly set before saying that your ROM is broken. Sometimes the maps will also reset to the default map. To prevent this, use a clean and unedited map, or one you don't mind losing.
Palette:
Ok, the offsets are directly below in the spoiler) Just use APE to edit the palletes.
Offsets (Both palette and images): (Headers supported in the spoiler below)
Fire Red (BPRE):
Palettes:
003C2D20 - Sandstorm
003C2CE0 - Mists (all the same)
003C2CE0 - Snow
003C2CE0 – Rain (and underwater bubbles)
003C2D00 - Clouds in water
Images:
003C2D20 - Mist
003C3D20 - Clouds in water
003C4520 - Underwater Mist's Bubbles/Snowflakes
003C5520 - Rain Drops
003C5B20 - Sandstorm Sand Grains
Leaf Green (BPGE):
Palettes:
003C2D20 - Sandstorm
003C2CE0 - Mists (all the same)
003C2CE0 – Snow (and underwater bubbles)
003C2CE0 - Rain
003C2D00 - Clouds in water
Images:
003C2D20 - Mist
003C3D20 - Clouds in water
003C4520 - Underwater Mist's Bubbles/Snowflakes
003C5520 - Rain Drops
003C5B20 - Sandstorm Sand Grains
Ruby (AXVE):
Palettes:
00396F70 - Sandstorm
00396F30 - Mists (all the same)
00396F30 – Snow (and underwater bubbles)
00396F30 - Rain
00396F30 - Clouds in water
Images:
00399F90 - Sandstorm
00396F90 - Mists (all the same)
00398790 – Snow (and underwater bubbles)
00399790 - Rain
00397F90 - Clouds in water
Sapphire (AXPE):
Palettes:
00396F70 - Sandstorm
00396F30 - Mists (all the same)
00396F30 – Snow (and underwater bubbles)
00396F30 - Rain
00396F30 - Clouds in water
Images:
00399F90 - Sandstorm
00396F90 - Mists (all the same)
00398790 – Snow (and underwater bubbles)
00399790 - Rain
00397F90 - Clouds in water
Emerald (BPEE):
Palettes:
0054C2B0 - Sandstorm
0054C270 - Mists (all the same)
0054C270 – Snow (and underwater bubbles)
0054C270 - Rain
0054C270 - Clouds in water
Images:
0054F2D0 - Sandstorm
0054C2D0 - Mists (all the same)
0054DAD0 – Snow (and underwater bubbles)
0054EAD0 - Rain
0054D2D0 - Clouds in water
Okay. That concludes the tutorial for now. I will add more information when I get it. If you see anything wrong please post and PM me. Thank you.
Credits:
-LuHo for Advanced Map
-HackMew for APE
-SnowBro 2003 for TMA
-TheTheTheThe for his tutorial
On changing the grass animation
As this helped a lot with me finding out
Where everything was in weather
Hacking.
This Tutorial is not to be stolen, used or the like without prior permission. ©2009 Giga Universe.
Hello. My name is Giga Universe and I am going to give you a rough tutorial on how to weather hack. This is my first Tutorial, so constructive criticism is gladly welcomed. Ok let's begin with a list of requirements:
List:
- TMA (Tile Molester Alternate) by SnowBro 2003
- APE (Advanced Palette Editor) by HackMew
- VBA (Visual Boy Advance)
- Any advanced generation ROM (Yay, finally)
- You need to know how to use TMA, APE and A-Map
- A-Map (Advanced Map) by LuHo
Now that you have all that, we can begin. First of all, as you may have guessed by the list of requirements, there are two parts to weather hacking: Palettes and Graphics. I will give you some offsets, and if these don't work, use the identification and discovery section. Okay, Lets begin with graphics.
Identification and discovery:
If you are the type who doesn't like the How it Works, you can skip the DIY and go to the next section. Otherwise, stay here. Okay, with my research I can make this easy for you. Open your ROM in A-Map, set the weather you wish to find, save and go to the place where your weather is in your ROM on VBA. In VBA go Tools -> Palette Viewer. Here is what you are looking for: (It's always on the 12 line (if the first line is 0))
The weather palette is ALWAYS on this line (except when thunderstorm palette edits everything to white) Search this line in a HEX editor or APE. Once you have found the offset (there should only be one) navigate to this in TMA. Thhe reason for doing this is because the picture is usually found at the same position as the palette. Navigate around this point and you'll find the weather. Go to the TMA Section for more instructions.
Decisions:
Before you can start, you have to decide the following: Are you going to edit the palette and are you going to edit the graphics. HOWEVER, there is something I cannot do in weather hacking: Make a completely new weather. This means you are going to have to edit an existing weather. This may not seem like a big problem, but if you take into account all the factors, you will see that it is. I do NOT know how to change the direction of the weather; therefore you have to choose one that is closest to the one you wish to make. Also sometimes if you change one thing, you change the other. E.g. most mist/rain weathers use the same sprite. Therefore you cannot edit one mist and hope the others will stay unchanged. Too bad, they won't. So, you need to decide how you are going to do this...
Step One:
Make an outline of your weather.
Step Two:
Find a weather that is closest to your idea of your weather
Step Three:
Decide if you mind if other weathers are replaced (If any)
Outlining Weathers:
Each weather will be covered here, each with their own section and information.
Let's start with sandstorm:
Sandstorm:
Sand storm has TWO major parts: A Palette and a Sprite. Actually, it has two sprites. The first is an image that is tile with others of its kind over and over. This tile moves diagonally to the top left hand corner of the screen. The second is a small swirly image that moves diagonally to the top left hand corner of the screen and does a little clockwise loop at the same time.
The red circled thingies are the second image; the rest is the first image. Okay, so you can't see it so well. Let's try in OAM viewer:
Ah, much better. Now you can clearly see the two separate images. Now we know what we are dealing with. So that is sand storm done. If you still don't see it. Test it in a Rom Yourself.
Steady Snow:
Okay. This is easy. There are two images again. But this time only the dots change position.
Let's use OAM viewer again. Open up your ROM set to steady snow; go to where it's snowing. Go tools, OAM View, hit automatic update and click VBA to focus the window. Sit back and watch it. See these images? These are what you want to change.
Sunny Weather with clouds in the water:
This is nice and simple – Only one image. This weather is buggy and sometimes displays clouds on tiles other than water...
Rain:
This is the only rain weather I am going to cover, thunderstorm involves a palette change script so I can't help you there... This is pretty easy, you need to change about five fives of small images (16 by 32 pixels), and though this will change other rain weathers.
Mists:
This is one big subject. Even though there are only four types of mist, they use only two images between them. Only Mist from top right hand corner has its only image. Dense bright mist, Steady mist and underwater mist have only one image. So changing the latter will result in not one, but three changed weathers!
Look at my mist table
Please note: Underwater mist has not only the mist effect, but two bubbles that float upwards.
Sprites:
Offsets and at the bottom
Well, you need to open your ROM in TMA. Do Navigate -> Go to. Type in your offset and make sure the Hex box and Absolute Boxes are both checked. Hit OK. You will see a couple of images; they can be easily identified as the weather you are going to edit. Go view -> Block Size -> Custom and put 8 in both blocks. Hit Ok and it will look better. Press the right arrow (On the toolbar at the top right, near the + sign) once (Thrice for Ruby/Sapphire, Emerald it's once). (Or here)
In VBA with your corresponding weather set, go Tools -> Palette Viewer. Hit Save OBJ and save it as a 'Windows Palette (*.PAL)' save it somewhere you can find it easily. Go Palette -> Import From -> Another File and import the palette you just saved. At the toolbar (colour toolbar) at the bottom click the right arrow twelve times. This will make it much easier to edit the file. Edit the bit you wish to change and save. Go to A-Map, find a map which you can access easily and change its map weather to the weather you edited, save and test. It should have worked. Now for the Palette!
NOTE: If you edit a weather, other weathers will be reset to the regular weather. Make sure that your weather is correctly set before saying that your ROM is broken. Sometimes the maps will also reset to the default map. To prevent this, use a clean and unedited map, or one you don't mind losing.
Palette:
Ok, the offsets are directly below in the spoiler) Just use APE to edit the palletes.
Offsets (Both palette and images): (Headers supported in the spoiler below)
Spoiler:
Fire Red (BPRE):
Palettes:
003C2D20 - Sandstorm
003C2CE0 - Mists (all the same)
003C2CE0 - Snow
003C2CE0 – Rain (and underwater bubbles)
003C2D00 - Clouds in water
Images:
003C2D20 - Mist
003C3D20 - Clouds in water
003C4520 - Underwater Mist's Bubbles/Snowflakes
003C5520 - Rain Drops
003C5B20 - Sandstorm Sand Grains
Leaf Green (BPGE):
Palettes:
003C2D20 - Sandstorm
003C2CE0 - Mists (all the same)
003C2CE0 – Snow (and underwater bubbles)
003C2CE0 - Rain
003C2D00 - Clouds in water
Images:
003C2D20 - Mist
003C3D20 - Clouds in water
003C4520 - Underwater Mist's Bubbles/Snowflakes
003C5520 - Rain Drops
003C5B20 - Sandstorm Sand Grains
Ruby (AXVE):
Palettes:
00396F70 - Sandstorm
00396F30 - Mists (all the same)
00396F30 – Snow (and underwater bubbles)
00396F30 - Rain
00396F30 - Clouds in water
Images:
00399F90 - Sandstorm
00396F90 - Mists (all the same)
00398790 – Snow (and underwater bubbles)
00399790 - Rain
00397F90 - Clouds in water
Sapphire (AXPE):
Palettes:
00396F70 - Sandstorm
00396F30 - Mists (all the same)
00396F30 – Snow (and underwater bubbles)
00396F30 - Rain
00396F30 - Clouds in water
Images:
00399F90 - Sandstorm
00396F90 - Mists (all the same)
00398790 – Snow (and underwater bubbles)
00399790 - Rain
00397F90 - Clouds in water
Emerald (BPEE):
Palettes:
0054C2B0 - Sandstorm
0054C270 - Mists (all the same)
0054C270 – Snow (and underwater bubbles)
0054C270 - Rain
0054C270 - Clouds in water
Images:
0054F2D0 - Sandstorm
0054C2D0 - Mists (all the same)
0054DAD0 – Snow (and underwater bubbles)
0054EAD0 - Rain
0054D2D0 - Clouds in water
Okay. That concludes the tutorial for now. I will add more information when I get it. If you see anything wrong please post and PM me. Thank you.
Credits:
-LuHo for Advanced Map
-HackMew for APE
-SnowBro 2003 for TMA
-TheTheTheThe for his tutorial
On changing the grass animation
As this helped a lot with me finding out
Where everything was in weather
Hacking.
This Tutorial is not to be stolen, used or the like without prior permission. ©2009 Giga Universe.
Last edited: