• Our software update is now concluded. You will need to reset your password to log in. In order to do this, you will have to click "Log in" in the top right corner and then "Forgot your password?".
  • Welcome to PokéCommunity! Register now and join one of the best fan communities on the 'net to talk Pokémon and more! We are not affiliated with The Pokémon Company or Nintendo.

[Game Journal] Crawling through games

24,623
Posts
3
Years
  • Age 35
  • Seen today
Spoiler: Pathfinder: Kingmaker Chapter 2

Conquered the Stag Lord's Fort last time. Became the new baroness of the land. Amounts to a large sidegame. Introduces a fair number of mechanics.

Comes to you with Problems and Opportunities each game month. Assigns advisors to handle them. Looks like this:
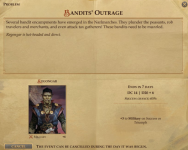
Pathfinder Kingmaker Barony Problem.png
Resolves most in 1-2 weeks. Determines failure or success with something like a skill check. Rolls a d20 and adds any modifiers (from character stats and barony stats, mainly). Succeeds by hitting the target number.

Picks advisors from NPCs and party members. Remains usable in your party as advisors still, thankfully. Limits NPCs and normal companions to certain posts. Fares better or worse based on primary stats (example: Wisdom for religious advisor). Punishes custom companions, sadly. Burdens them with a -4 penalty.

May also build up your barony. Claims nearby land through a project. From there, select a location to build a village. Creates a town on the map at that spot that you can visit.
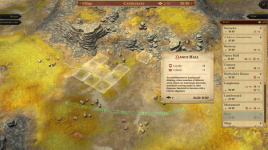
Pathfinder Kingmaker Town View.png
Displays the city construction screen above. Lists constructable buildings, such as shops, walls, and blacksmiths. Improves the stats of your barony, based on the building. (Example: +military for Wooden Walls). Ranks up your kingdom in that stat for every 20 points. Unlocks more buildings and additional advisor slots at certain ranks.

(Note: Can visit these towns like normal locations. Uses the same generic town map, regardless of what you have built.)

Costs Build Points to erect these buildings. Obtains these from barony stats (largely Economy), certain trade deals, problems/opportunities, and purchasing them for gold. Exchanges at a rate of 80 gold per 1 Build Point. Cannot exchange from Build Points to gold.

So, what benefits do you get for a good kingdom?
1. Artisans. Crafts nice gear for you by constructing their workshop and completing their quests. Creates some excellent items, including endgame gear.
2. Teleportation Circles. Zips you from town to town instantly.
3. Regional buffs. Remembers poison immunity in claimed lands. Assumes things like attack roll and save bonuses too.

Forces you to engage with the barony...sort of. Ends in a game over if your kingdom rebels. Stuck an "Auto" option in the difficulty options, fortuntately. Hands everything off to the AI. Cannot lose. Sacrifices artisan quests and their better equipment, though.

Switched Kingdom Difficulty to Effortless, by the way. Succeeds on problems and opportunities on a roll of 8+ guaranteed. Falls into the savescum rut more often otherwise.

Back to the standard roleplaying game part. Points you into new territory through a nymph that wanted your help in Chapter 1. Declined to do that now. Sends you to where a companion will be. Bugged out last game. Missed them. Ventured into other territory.

...Bad territory. Struggled versus a nereid + prankster team. Died horribly (and expectedly) to the monstrous crag linnorm melting half the party in one breath attack.

Killed enough time for Kingdom stuff to start popping up. Swung into Lonely Barrow first. Began with some easy skeletons. Culminated in a stubborn faceoff against the Lonely Warrior (level 13 barbarian, 2 undead) and a surprising number of friends for a lonely skeleton. Funneled buffs into melee due to handling archers better. Cast these spells prior to the fight:
- Aid on all three melee characters (+1 attack rolls, +1 save versus fear, 1d8 + 6 temporary hitpoints)
- Barkskin on Nuyu and Kivon (+3 armor class)
- Bear's Endurance on Nuyu (+12 hitpoints, effectively)
- Protection from Evil (Communal) (+2 armor class and +2 saves against Evil creatures)
- Bless (+1 attack rolls and saves)
- Shield on all three melee characters (+4 armor class)
- Blur on Nuyu and Kivon (20% miss chance against them)
- Protection from Arrows on Nuyu (absorbs 60 arrow damage)
- Summon Nature's Ally III (1d3+1 giant frogs)
- A few personal buffs (Mage Armor, Divine Favor, Bane Weapon, Bramble Armor...)

(Guesses some of that did not stack.) Died a bunch, despite preparations. Ripped through summons with Cleaving Finish (a bonus attack upon killing an enemy). Defeated the Lonely Warrior a few times, only to die to archers. Prevailed after enough patience, however. Walked away with nothing great, honestly.

Picked a fight with two Ancient Golems before leaving. (Still had buffs active and a surprising number of hitpoints.)
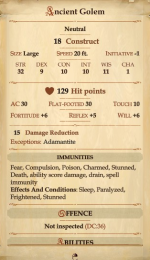
Pathfinder Kingmaker Ancient Golem.png
Two level 18 Constructs versus a level 6 party. Sports a considerable list of immunities and 15 damage reduction. Nullified most of the party's damage, except for one: Sebitza's level 1 Snowball spell. Exploited its 10 Touch armor class. Cannot explain bypassing the spell immunity. Shrugs. Chucked snowballs while everyone else sacrificed themselves. Won after figuring out that strategy.
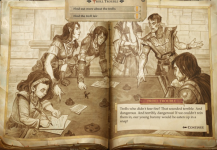
Pathfinder Kingmaker Troll Trouble Start.png
Began Chapter 2 in truth. Revolves around troll attacks. Decided to deal with the nymph's quest first. Requests you to travel to some ruins alone. Dumped excess weight. Set out...and found a lot of scripted random encounters. Sighs. Reloaded with the full party. (Could not handle a single troll alone, let alone multiple.)

Whittled away at some troll quest bits before another try. Made it to the quest site. Met the nymph. Greets you with a lot of nasty monster summons (hydra, chimera, owlbear, and more) along with entanglement traps. Grabbed an area map. Marked it up to illustrate your options of escape.
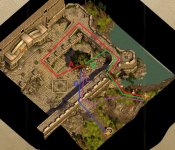
Pathfinder Kingmaker Marked Verdant Chambers.jpg

Red/A route: Run through a chimera, patrolling Redcaps (with Glitterdust), and multiple entanglement traps. Pass a Mobility check at the tree on the wall.
Green/B route: Scale the wall with an Athletics check. Pass by a few Redcaps and traps. Jump down the tree with a Mobility check.
Purple/C route: Skirt past the owlbear at the main gate. Leap across the chasm with a Mobility check. (Falls in the ravine with a failure. Might still be good enough.)
Blue/D route: Run around the owlbear. Run through entanglement traps. Defeat the giant plant at the exit.

Entered with Vanish potions. Expected those to suffice. Realized a horrible flaw: single round duration. Could not get far, even with Expeditious Retreat active (20 feet -> 50 movement speed). Made Red/A route impossible. Could not exit the map in combat. Closed off Blue/D route. Escaped with Purple/C route after a few reloads (from dying to the owlbear's attacks of opportunity).

Checked out a mage's laboratory. Guarded it with anti-troll traps. Studied trolls there too. Brings up the oddity of some trolls: a fire immunity brand on them. Requires acid damage to kill. (Kindly gives you some sources of acid damage. Learns a spammable, low damage acid spell on most (or all?) arcane casters. Placed a few acid-based weapons around too. Is not too bad to deal with.)

Spotted a large dwarven statue on a hilltop. Investigated. Hunted down the three cogs around the area to unlock it. Contained magical full plate armor, a nice physical +stat belt, and...a recipe for Onion Soup. Truly, the greatest dwarven treasure.

Discovered the troll lair of Trobold (a city of trolls and kobolds). Kept an eye out for a particular named troll (from a companion quest). Attached a hidden achievement to it: turn it to stone. Kited it back a room into sunlight. Triggers a Fortitude save on the hardy troll. Stacks every round. Stalled for several turns. Buckled under the damage a few times. Earned the achievement after a few tries.

Cut through Trobold without too many other issues. Fiddles with a sun and moon symbol puzzle for too long. (Stashed loot in a secret room. Placed it about 1-2 screen's worth of distance north from the symbol you set the puzzle to, however. Succeeded without realizing. Walked back and forth a lot.) Met up with Hargulka the Troll King and Tartuccio (as Tartuk the Kobold) in the back.
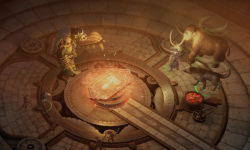
Pathfinder Kingmaker Hargulka Boss.png
Likes this boss fight, despite being very tough. Combines massive physical damage (three 2d6 + 21 attacks and two weaker hits per round) with arcane magic (namely Haste). Rips through the party very quickly. Cannot be cheesed with Hold Person or slows either. (Carries an amazing mace with Freedom of Movement.)

Appreciates this boss fight for other reasons, however. Some possibilities:
- At the start of the fight, convince Hargulka that Tartuccio is controlling everything. Turns around and mashes Tartuccio into paste.
- Defeat Tartuccio first. Lower Hargulka's hitpoints to a critical level. Enters a conversation. Intends it as a trick to heal to full. Does so if you talk too long. Can also recruit them into your barony with a Chaotic alignment.
- Defeat Hargulka first. Either recruit or kill Tartuccio.

Recruited Tartuccio (as part of the "Foes No More" achievement, which is the primary reason for playing a Chaotic Evil character). Spoke with them. Resurrected Tartuccio in a sort of cursed way. Forgot their past life, barring flashes here and there. Became their alter-ego Tartuk the Kobold. Interesting.

Looted Hargulka's ridiculous Mallet of Woe, by the way. +3 Heavy Mace with +2d6 damage and continuous Freedom of Movement. Prizes this as Nuyu's endgame weapon (note: currently level 7). Spams paralysis constantly in the final area.
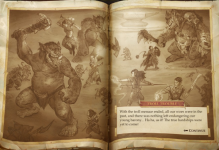
Pathfinder Kingmaker Troll Trouble End.png
Officially ends the chapter. Leaves plenty of time between now and the next chapter's beginning, though. Will fire these off more rapidly:
- Passed through a poison swamp. Saps attributes until you save from it. Can kill people without the no-permadeath difficulty option. Saw at least -25 Constitution on Kivon. (Bottoms out at 5 Constitution.) Works around it with Delay Poison or immunities.
- A group of three Greater Enraged Owlbears on the same map. Level 18 Magical Beast with 261 hitpoints. ...Why? (Still won, admittedly, albeit after multiple tries.)
- Journeyed to a tower on a cursed island. Scattered wisps everywhere that only appear until you approach. Typically surrounds the party.
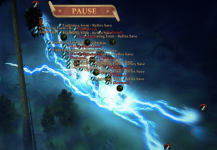
Pathfinder Kingmaker Unlimited Power.png
Unlimited power! (Learned how glorious buff spells can be last playthrough. Shows off Resist Energy here. Resists 20(?) lightning damage on everyone. Turns an impossible situation into a breeze.)
- Saved a kid for an achievement.
- Completed companion quests (for experience). Lost Ekun due to turning the troll to stone without them. Flitted between towns for artisan quests also.
- Forked over 1500 build points for the Trade Agreement with the Surtovas. Dumped at least 80000 gold into that. Yields build points per week. Pays off...eventually. Takes over a year for some trade deals to pay out (if at all).
- Still died to ludicrous damage.
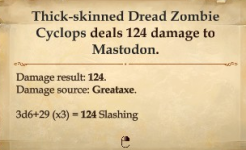
Pathfinder Kingmaker Balanced Crits.png

Caps off this segment. Might respecialize some of the party. Current party impressions:
- Nuyu (Paladin Tank): Not impressed. Holds okay. Feels like an offtank in terms of survivability. Boasts excellent saves, but insufficent armor class. Takes too long to use Dazzling Display. Eyes other feats to accomplish that effect. Requires killing something or hitting with a Power Attack. Eh.
- Kivon (Dual Wield Rogue): Good. Notices their sneak attack damage. Probably contributes the bulk of the party's damage.
- Dolanio (Tripping Teamwork Inquisitor): Bad. Trips a few things, but not enough. Appreciates the nice divine buffs. Could be getting most from Rhys, probably.
- Ecaeris (Grenadier): Fair. Supplies the very useful Blur (20% miss chance), Displacement (50% miss chance), and Haste (extra attacks, movement, and armor class) buffs. Feels a bit let down by Arcane Bomb (tripping).
- Rhys (Druid Healer): Terrible. Heals very little. Devoted most spell slots (and feats) to summoning. Dies instantly. Spends most of the battle hurling darts.
- Sebitza (Arcane Trickster): Decent. Cannot explain why sneak attack is not applying sometimes. Attacked a target engaged with a party member. Should be close enough. Might have been immune to sneak attack or something.

Will play around with builds. May cheat in gold to cover any respecialization costs, if necessary.

Begins Chapter 3: "Season of Bloom" next time. Farewell for now.
 
24,623
Posts
3
Years
  • Age 35
  • Seen today
Spoiler: Pathfinder: Kingmaker Chapter 3

Retooled the party a bit, as previously stated.
- Dolanio: Inquisitor -> Stalwart Defender. Represents the biggest change. Swapped into the tank role. Focused on armor class enhancing feats, with the intention of going into Shield Bashing later. Grumbles about Tower Shields not working with Shield Bash. Wanted to begin as a Tower Shield Specialist Fighter. Chose base Fighter instead.
- Nuyu: Paladin (Divine Guardian) -> Paladin (Hospitaler). Traded the mace and shield to Dolanio for a greataxe. Picked Hospitaler for better out of combat healing. Learns a handful of spells too. Retained high Persuasion for Dazzling Display and Dreadful Carnage (automatic Dazzling Display after everything Nuyu kills) later. Plans to land nasty criticals.
- Kivon: Swapped out two teamwork feats. Cannot spare the feats on others. Remained a master at Trickery. Laughed at a d20 + 34 roll versus a 24 difficulty task.

Kept Rhys as-is. May feel more useful with Dolanio no longer providing buffs. Was tempted to go with a shapeshifting build.

Figured out why sneak attacks were not working for Sebitza. Requires two characters in melee to flank something. Deviates from only one in Dungeons and Dragons.

Pathfinder Kingmaker Season Bloom Start.png
(Note: Gives ~279 days for this main quest.)

Reported monster attacks around the barony. Requested the aid of the Embeth Travelers. Acts as a mercenary band. Organized a hunt with other groups from nearby countries. Awards a prize to whichever group comes back with the most heads.

Runs a Chaotic Evil party. Slaughtered the monsters, competition, and owlbear that ripped out of some person's body. Just a standard Chaotic Evil day.

Gathered information about the surprise owlbear. Coincided with an illness. Performed a quick vivisection, with the help of the troll-killing mage from last chapter. Yanked out a seed. Opens a portal for the monster to come through.

Attributed this to a cult of Lamashtu (the goddess of monsters). Pursued the cult as part of a companion quest. Lead to something annoying: ambush the cult on Moonday.
(Renamed all the days like this.) Problem: Only tells you the day if you mouseover the "Pause" hourglass. Misses that detail easily. Cannot see the day if you are in the overworld or resting (despite the day's timeline at the top).

Stormed the cult gathering. Failed to catch the priestess. Tracked down them down at a nearby inn. Blended in with the patrons. Could solve the mystery by investigating and questioning patrons. Chose the Chaotic-only option (for an achievement) to skip all that. Spared the priestess to become an advisor later (for the Foes No More achievement).

Looked into the goblins next, who worship Lamashtu, but are unrelated to the main (humanoid) cult. Discovered them forcing seed-infected water down prisoners' throats. Rescued the prisoners, only for them to spawn monsters.

Brings up one additional negative to the game: massive save files. Despawns stuff slowly. Expects stuff dropped now to remain there for nearly the rest of the game. Just fought a lot of weenies with trash gear.
Pathfinder Kingmaker Goblin Trash.png
Welcome to save bloat city. Vacuumed up the trash to offload onto a vendor. (Came just shy of grabbing it all.)

Returned to the capital to save it from infected villagers. Styled the Steam splash screen after this moment.
Pathfinder Kingmaker Capital Owlbear.png
Pathfinder Kingmaker Steam Splash.png

Places a giant owlbear skin rug on the tavern floor after this event. Approves of that little touch. Never draws attention to the change either.

Sidenote: Appreciated the new party at this moment. Killed stuff much faster. Loved a 94 critical by Nuyu (a solid 50% higher than any single amount dealt so far). Looks forward to a fully buffed comparison.

Charged into a cave believed to be the source of the infected water. Disliked this area. Brought back swarms (the first since level 2). Possesses far more tools to deal with them, such as non-friendly fire Fireballs. Grimaces more at spiders teleporting in on all sides. Threw the caster backline into disarray.
Pathfinder Kingmaker Surprise Spiders.png

Fell into the First World (see: a world before the previous one, full of fey). Calls this the worst (mandatory) puzzle of the game. Wandered around until finding a gnome. Gives you a lantern to switch between two identical-looking worlds. (Put it on your belt to activate. Does not tell you this.) Needs to do this in order. (Writes this from memory.)
1. Pick up a bird. Put in on a dais.
2. Sleep
3. Grab the bird bones in the other world.
4. Throw the bird bones into some poisoned water...for reasons. Bottle the water.
5. Switch worlds. Brings you to a new area now. Dump the poisoned water on the flower. Opens a portal to the normal world.

Provides pretty much no directions on this.

Learned more about the betraying nymph while here. Tried to become an Eldest (see: powerful fey lord). Punished them for that. Tasked them to destroy one thousand kingdoms to atone.

Must burn the flower in the First World and the normal world simultaneously to kill it. Forces the most questionable act in roleplaying games: splitting the party. Chose Nuyu (Paladin), Ecaeris (Grenadier), and Sebitza (Arcane Trickster) on Team 1 and Dolanio (Stalwart Defender), Kivon (Rogue), and Rhys (Druid) on Team 2. Struggled a bit on Team 1 versus the immensely powerful (but very slow and kiteable) treant-owlbear. Mowed down an insect flytrap in moments on Team 2's side. Burned the flower and joined back up for one final spider swarm.

Pathfinder Kingmaker Season Bloom End.png

Ends the mandatory quest part well before the time limit. (Did not check. Guesses only ten days from start to finish.) Filled the rest of the time with barony management. Quick rundown:
- Annexed several regions. Built towns and workshops for artisans. Completed a ton of their quests.
- Blitzed the Arcane stat. Unlocked and installed Teleportation Circles in every town. Travels between them instantly now. Wasted ~2 days to walk to far-off towns (one way), for reference.
- Swept the Dire Narlmarshes for cash. Squashed areas that the old party setup (two levels lower previously) died horribly to. Aced one memorably nasty lizardfolk tribe. Noticed Will saves being problematic, however. Incapacitated most of the party with various spells.
- Enjoys some of the items in this game. Picked up one such amusing item: Grim Finale, a club. Adds a Vampiric Touch spell onto any criticals with it. Hits the wielder with a Finger of Death (the 150 damage spell from Chapter 1) if they attempt to unequip it.

Draws this section to a close. Leaps into Chapter 4: The Varnhold Vanishing next. Thanks for reading.
 
24,623
Posts
3
Years
  • Age 35
  • Seen today
Spoiler: Pathfinder Kingmaker Chapter 4 and 5

Pathfinder Kingmaker Varnhold Vanishing Start.png
(232 days for this portion.)
Fell silent on the eastern border. Suspected something amiss. Trekked over to find answers.

Met no one at the entrance. Seemed empty, other than spriggans inside Varnhold's stockade. Cozied up there due to it being empty and being driven out of their homes. Sniffed around for more clues. Opened a chest there with unusual contents side-by-side: a Scroll of Chain Lightning, a Scroll of Horrid Wilting, and a recipe for Chocolate Ice Cream. Do not mix those up.

Spoke with a raven just outside. Acts high and mighty. Serves Vordakai, this chapter's antagonist. Goads you into saying your name. (Recalls seeing why in a prior playthrough. Gives them power over you.) Follows you around until it hears.

Rolled up to where the spriggans lived previously. Encountered barbarians from an NPC companion's clan. Visited their main camp. Agreed to help find the ones leading them: the Defaced Sisters. Appears heavily cloaked and far more magical than the barbarians, who barely tolerate their presence.

Tracked down the missing Defaced Sisters. Found one dead. Discovered it to be a nymph. Great. More nymphs.

Wow. Lied to NPCs about a barbarian treasure far to the east in Chapter 2. Just found them. Shared their treasure. Nice touch.

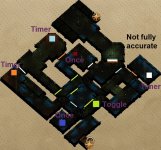
...Oh boy. Forgot about this dungeon. Describes it as a puzzle maze. Open and closes colored doors with colored plates. Comes in three varieties: one-use, toggle open/close, and timed. Attached a map below. Tried to color in doors somewhat accurately. Will not be wholly correct.
Pathfinder Kingmaker Sepulchre Maze Imperfect.jpg

Ultimately aims to press three timed buttons simultaneously. Must leave party members behind to press toggle and timed plates. Was flummoxed on the first playthrough due to not expecting that to be necessary. Cleared this dungeon with less annoyance than anticipated this time.

Saved the other two Defaced Sisters. Returned to the barbarian camp for a reward. Nope. Yells about killing the third sister (despite not doing so and bringing the other two back). Shouts your name for the raven to hear (despite never telling them). Tries to convince the barbarians to attack you. Never trust a nymph (except to earn achievements).

Looted the items the Sisters were searching for off their corpses. Opens the gate to Vordakai. Strolled into a heavily-trapped and debuff-heavy area. What kind of debuffs?
- Constitution damage (from poison traps and blood sacrifices)
- Wisdom damage (from soul eaters)
- Negative levels (from most casters and spectres)

Came prepared with Delay Poison (Communal) and Death Ward. Solved the main problems. Tangled with plenty of tough foes too. One-shot Kivon with a 127 damage critical (out of 123 maximum hitpoints), for reference.

Battled a soul eater one-on-one with Sebitza. (Occurs by knowing your name. Tussles with one of your party members instead if you never say your name. Speaks their own name earlier in the dungeon, in that case.) Thanks one of the artisans for gifting a robe with six free Maximize Spell (maximum damage roll on that spell) charges per day. Smoked them in a single Scorching Ray...after dying the first time. Shh.

Ventured all the way to Vordakai. Battled until Tristian (NPC companion) teleports in, rips out Vordakai's Eye of Abaddon (a relic), and teleports out. Finished the fight with a massive ~135 damage maximized Scorching Ray as Sebitza went down to a ~70 damage Boneshatter. Seemed like a cool ending to the fight.

Did what any true politician would do: offer Vordakai an advisor position. Trapped all of Varnhold in soul jars. (Chose to sell the soul jars off rather than freeing them, by the way.) Needs someone capable of results like that.
Pathfinder Kingmaker Varnhold Vanishing End.png
Chapter complete. Raises an eyebrow at the text. "Vordakai wouldn't be threatening us or anyone else any longer." Rewind one moment.

"[Requires Evil] 'You can still continue what you've started. Become my servant.'" Also tells you, directly, that your descendents will suffer for your foolish choice. Technically occurred without Linzi (the book's author) present, though. Must have fed them a lie. Likes that narrative. (No excuse for Nuyu the Paladin, however.)

Hiked back to the capital of Baldur's Gate. Dealt with a flood of backlogged visitors. And, uh...
Pathfinder Kingmaker Twice Born Start.png
How quick. Planned to deal with barony stuff. Spent 32 days on Varnhold Vanishing. Leaves 199 days for this.

Decides between two routes: find Tristian or deal with the western barbarian threat with Amiri. Used to be a terrible section, game-wise. Killed Amiri if you followed Tristian first, but no consequences for the reverse. Fixed that, fortunately.

Chased after Tristian via portals first. Wound up neck deep in fey territory and one awful area debuff: 50% chance of divine and arcane spell failure. Affects a small area, thankfully. Transitioned to stonework without the debuff.

Caught up with Tristian giving the Eye of Abaddon to Nyrissa, the head nymph that started everything. Evidently worked with Nyrissa, although not entirely willingly. Kept Tristian onboard, rather than killing them. Exited out the front door to discover that was the Verdant Chambers (the location of Nyrissa's ambush where Sebitza was alone).

Turned back to barbarian troubles. Included a very irate Jamandi Aldori (the noble you got the barony from). Understands their irritation, though. Pledged to be with the Surtovas, their enemy. (Could not resist the "[Requires Evil]" choice, despite having that achievement already.)

Psh. Sent in Amiri solo. Engaged Armag one-on-one. Opens the option of Amiri becoming chieftain if they win. Almost died before attacking once. (Missed, for the record.)

Waded through angry barbarians to save Amiri from Armag. Was unnecessary. Teleported out with a Defaced Sister to some centuries-forgotten tomb. Could send scouts or pore over old tomes (both barony projects). Planned to find it manually, thanks to Rhys's massive Perception stat. Forgot precisely where it was. Stumbled upon it on the way to Amiri's companion quest. How did this stay lost for centuries?

Walked into the maws of a truly fiercesome beast: framerate issues. Plummeted on the first floor. Strange. Ran fine on the next floor with the trapped hallway spamming Lightning Bolt, Burning Hands, and Fireball.

Invested hard into Perception for this area. Contains multiple hidden rooms with treasure, alongside tons of traps. Cannot easily redo failed skill checks. Solves it by having a bonus higher than the check.

Smirks. Spoke with someone before the Armag fight. Demanded proof of worthiness before fighting. Included a 71 Bluff check. (Had a +24 or so bonus. Not even close.) Broke out into combat. Melted them in a single Scorching Ray. Felt like the easiest enemy here.

Defeated Armag and became buddies with them for the Foes No More achievement (obtained by 1% of players). Prevents obtaining their sword, Ovinrbaane. Forces stacking Will checks on the wielder to lose control. Outweighs the sword's power easily (not to mention requiring the proficency). Enjoys the flavor, though.

Solved all the problems. Officially became a monarch, rather than a baroness. Promised horrible deaths to everyone who did not obey. Only scared some of the crowd.
Pathfinder Kingmaker Coronation Speech.png
Pathfinder Kingmaker Twice Born End.png
Closes that chapter. Some kingdom management stuff:
- Made a tough choice at Economy 6: earn boatloads of build points or practically guarantee a stable kingdom. Chose the latter, despite Effortless difficulty. Provides very few ways to repair stability. Allows more questionable decisions elsewhere too.
- Always feels behind. Needs more advisor ranks to get Masterwork items from artisans. Requires fourteen days per rank. Burns through time quickly.
- Is not as pleased with selling soul jars as hoped. Yields a solid 250 build points. Ties up an advisor for thirty days every 2-3 months, however. Worthwhile, but a bit grating.

Pushes towards Pitax, Tartuccio's home country, next time for the Rushlight Tournament.
 
24,623
Posts
3
Years
  • Age 35
  • Seen today
Spoiler: Pathfinder Kingmaker Chapter 6 and Ending

Eases off the action after back-to-back chapters. Finished Chapter 5 with 184 days remaining. (Detailed that in the previous update's kingdom management.) Dumps 286 days on you onto the next curse segment. Begins the next chapter after that time period. Essentially dealt with the kingdom for 470 days straight. Welcomed that time. Quick management stuff:
- Raised most advisor ranks to 6+. Completed the project to halve rank-up time immediately after becoming available. Feels somewhat caught up now. Needs Espionage at rank 8 for a masterpiece, annoyingly. Comes in late.
- Acquired one masterpiece: the Grandmaster's Rod. Maximizes (max roll) and empowers (x1.5 damage) three spells per day. Earned a fair amount of cash from artisan items too.
- More companion quests. Swiped the two Kukris from one companion's quest for Kivon. Wields their endgame +4 fire and ice weapons.

Would have been awful with the kingdom on Auto. Means skipping all of those days, one-by-one. (Passes time quickly. Still requires a lot of clicks.)
Pathfinder Kingmaker River Kings Start.png

(210 days for this part.)
Received a Rushlight Tournament invitation. Bounced over without hesitation. Set up stalls with items and some fairground games (lockpicking and bet on a summon fight). Met various powerful people. Seemed displeased with the King Irovetti.

Mentioned stalls with items. Sells no trifles here. Loaded it with very high end items. Forked over 370000 gold for a Ring of Circumstances (four small bonuses from a list of ten) and 200000 for a Belt of Physical Perfection (+6 to Strength, Dexterity, and Constitution). Left about 280000 gold in hand. Eyes three more items. Held off, due to being available after the events of this chapter. Consists of:
- Greater Belt of Perfect Components (auto empower and extend for level 1-3 spells. Includes Scorching Ray and Fireball.)
- Absolver's Cloak (+4 armor class, +4 saving throws, +4 Persuasion, and +1 armor class versus evil. Good characters only. Perfect for Nuyu.)
- Castigator's Cloak (+4 armor class, +4 saving throws, +4 Persuasion for intimidation, and +2 attack/damage against shaken opponents. Evil characters only. Nice for...a few people. Might return there, if possible.)

Participated in the actual tournament part. Won the fishing and storytelling contests, which were all skill checks. Demanded Trickery (some cheating, some not) and Persuasion most of the time.

Ends with the drunken brawl. Removes all your gear and buffs. Prohibits spellcasting. Tosses the main character into a ring with several other people. Sounds bad for a frail spellcaster, right?
Pathfinder Kingmaker Brawl Cheating.png
Summoned a friend before the battle. Zipped in after fifteen seconds or so. Demolished the competition between unarmed sneak attacks and the surprise scythe.

Returned home with victory in hand. Came right back for exploration. Gated off the region until now. Locked a lot of powerful weapons behind this, including Nuyu's endgame greataxe.

Discovered something unpleasant. Tried to combine the following:
- Sneak attack on flatfooted foes for all spells, not just ones with attack rolls
- Sirocco, a fire tornado spell. Deals fire damage, knocks things down, and fatigues them.
- Firebrand. Renders your party immune to fire spells you cast (plus other stuff).

Fails because of Firebrand not protecting from Sirocco. Why? Works for Fireball. Says "Fire" in Sirocco's spell description. Suffered fire damage in the combat log. Sighs. Will have to settle for Prismatic Spray, then.

Barged in on a wizard's lair. Helped them finish a grimoire. Left the standalone, floating door open for devils, unfortunately.
Pathfinder Kingmaker Squirrels.png
Saw no squirrels. Dropped the wizard in seconds, though. Probably disappeared.

Missed a few good screenshots along the way. Ran from a horde of winged demons with Prismatic Spray. Killed a large linnorm. Remembered the F12 key for one classic, nasty beast.
Pathfinder Kingmaker Ilthuliak.png
Meet Ilthuliak, the level 24 dragon. Lives large at 516 hitpoints, 54 armor class, 32 spell resistance, and +28 to +34 to-hit on six attacks.

Handled them pretty okay. Prepared Acid Resist before hand. Negated the acid chip damage. Stacked enough buffs for the rest, apparently. Laid into it with several wicked 120 damage rays and a resounding 137 damage finishing blow from Nuyu. Ended with everyone quite healthy.

Grabbed the cash and items. Could not make good use of most gear. Highlights one glorious (and useful) item: Gentle Persuasion. Loaded this +5 Leather Armor with +6 Dexterity, +10 to Stealth, and a Dominate Person spell. The catch? Reduces your Constitution by 2 for every good deed. Restores it by committing an evil deed (plus a bonus ten temporary hitpoints). Requires a Remove Curse spell (with a massive 33 caster level skill check) to remove. Always struggles to pick evil options. Provides some gentle persuasion to be evil. Loves it.

Backtracked to Lonely Barrow. Imprisoned a lich behind killing strong creatures, such as Ilthuliak. Destroyed the lich without too much fuss. Stashed a ton of amazing weapons with it. Gave Vanquisher to Nuyu (+5, a stacking critical range increase, and +10 damage).

Turned back to the main quest. Split in two directions:
1. Deal with Pitax's aggression. Defended from a three-pronged Pitaxian assault: propaganda, monster teleportation, and bandits. Notes one nice touch: Dovan. Spared them all the way back at the Stag Lord's Keep in Chapter 1. Reappeared among the Pitaxian bandits. Killed them this time.

2. Invade Nyrissa's dream. Mostly rehashed stuff from earlier. Showed Nyrissa pulling the strings behind everything: the Stag Lord, Irovetti (Pitax's ruler), Armag (the barbarian from last chapter), Tristian, and Sebitza. Noticed Nyrissa being torments by familiar wisps during their punishment. Spanned several chapters too (such as the ridiculous wisp from Chapter 1 and one from near the Ultimate Power lightning screenshot).

Learned about the Briar from the dream. Seeks it after losing it during the fey punishment. Contains a bit of Nyrissa's soul. Used to be hidden in the Old Sycamore, right where Tartuccio died (the first time). Sent something off before dying, though. Guess who has it now? Irovetti.

Charged into Pitax proper. Recruited a few Pitaxians, thanks to finding assassinated Pitaxian nobles earlier.

Cut down any resistance. Reached Irovetti. Dogpiled and smoked them in an instant. Triggered a cutscene of Irovetti summoning a pet naga with the power of the Briar. Cue Nyrissa's entrance. Mocks Irovetti for not realizing the Briar they held was fake (and recently taken by Nyrissa). Caused the naga to turn and finish Irovetti off.

(Note: Plays out differently if Tristian gives you the Eye of Abaddon back in Chapter 4. Never hands it to Nyrissa. Never learns where the Briar is, as a result.)
Pathfinder Kingmaker RIver Kings End.png

Other bits:
- Gave the First Crown containing an elf king's spirit (and kingdom) to Shyka, an Eldest. Matters later.
- Tried out Prismatic Spray with Sneak Attack damage. Did...okay. Transformed some enemies into dogs, though.
Pathfinder Kingmaker Prismatic Spray Dogs.png

- Suffered from Insanity from a spellcaster. Lasts until removed. Requires Greater Restoration or Heal to remove. (Also resting, with the difficulty option turned on.) Becoming annoying to control when you attack an ally or yourself 50% of the time.
- Tracked down a goblin thief who stole the throne in a sidequest. Made them cry by being uninterested in wanting it back. Earned an achievement acquired by 0.9% of people. Why is that rarer than Foes No More?
- Learned some fancy spells. Mentions two in one screenshot:
Pathfinder Kingmaker Fancy Spells.png
1. Elemental Swarm from Rhys. Summons several elementals initially. Adds bigger ones after a few rounds. Teleports in an ancient one at the end. Somewhat impractical, but cool.
2. The 532 damage Sneak Attack Disintegrate (reduced) from Sebitza. Yikes. Quadrupled the highest damage number from anyone else. (Utterly failed the first two times, though. Rolled a 1 twice. Sighs.)

Zipped through another long section of kingdom management. Triggered the endgame.
Pathfinder Kingmaker Thousand Screams Start.png

Bid farewell to the kingdom. Hopped into a portal to the House at the Edge of Time. Consists of two (nearly) identical maps. Shifts between them by entering into blue fog without a magic lantern equipped. (Used this mechanic in the First World earlier.)

Separates you from the premade companions, but not custom companions. Spread them throughout the house. Undergoes a trial. Lives or (permanently) dies based on their companion quests. Chose the wrong options during Tristian's quests, for example. Dead forever. (Meets the custom companion creation NPC here too. Will not be forever alone with poor choices.)

Dislikes this area a lot. Inflicts a lot of crippling status effects: paralyze, fear, petrify, and ability drain. Lasts for...maybe a minute in the case of the first three, which is likely the entire battle. Must be prepared with immunities or likely die.

Leads into two more complaints about status:
1. The very quick nature of ability drain. Stacked to -55 Strength on Dolanio from a single swarm fight. (Caps at 5 Strength with the difficulty settings. Would be unable to move otherwise.)
2. Prismatic Spray and maybe unwinnable states, under certain difficulty settings. Ran into one (optional) spot with a swarm of Prismatic Spray monsters.
Pathfinder Kingmaker Enemy Prismatic.png
Causes Baneful Polymorph sometimes. Requires Remove Curse with a 30 dispel check to cleanse. Pulled out a Remove Curse scroll with caster level 5. Tried to hit 30 with d20 + 5. Nope. Enjoy being a dog.

Made good use of Elemental Swarm. Lasts a long time.
Pathfinder Kingmaker Fire Elemental Party.png

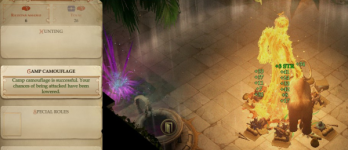
Snapped a good screenshot. Rested somewhere. Camouflaged the camp...technically.
Pathfinder Kingmaker Camo.png

...Picked up the Briar on a random shelf. Why is it here? Explains how Nyrissa lost it before. Be more careful with parts of your soul.

Stumbled through teleporting zones to Nyrissa. Defeated them quickly. (Still got off a single spell: Wail of the Banshee. Insta-killed two party members.) Let them live. Totally fulfilled the punishment.
Pathfinder Kingmaker Thousand Screams End 1.png
Presented the cup to the Lantern King...

Pathfinder Kingmaker Thousand Screams End 2.png
...only for Shyka to free the elf king from the First Crown. Restored their kingdom. Removed one grain of sand from the cup, thus ruining the cup. Killed Nyrissa. Yay trick ending.

Could have gone for a different ending. Extends the game by another chapter. Was not overly enthused about it. Drains your power initially. Slogs through more annoying enemies. Felt satisfied at this (and the achievement).

Ending flavor:
- Supported merchants more than ordinary people. Led to lots of cash and mercenary armies.
- Relied on magic more than soldiers. Repelled an attack by Galt.
- Prioritized others' short-term interests over personal wealth and long-term interests. Failed to pay the bills sometimes. Was loved by the people anyways.
- Supported the Surtovas. Squashed a rebellion led by Jamandi Aldori. Executed them.
- Chose Dugath as the barbarian chief. Stayed friends with the barbarians. Proved to be excellent mercenaries.
- Installed the leader of the Thieves' Guild to lead Pitax. Fell into decline. Remembered Irovetti's rule as a golden age.
- Chose chaotic decisions for Pitax. Closed the Academy of Grand Arts.
- Spared Tartuccio. Co-existed peacefully with the kobolds.
- Sacrificed Maegar Varn for Vordakai. Kept Varnhold a ghost town.
- Spared the spriggans. Spread out across the plains.
- Killed both sides at the Old Sycamore. Became infested with giant centipedes. Blocked it up.
- Turned Oleg's Trading Post into a military outpost. Was not happy. Lived without fear, though.
- Spared the priestess of Lamashtu and helped their ritual. Speaks of a child of Lamashtu somewhere in the Narlmarches. Kills travelers sometimes.
- Saved Darven from the Order of the Rack. Became a good trading partner.
- Killed the lich with the fancy treasures. Fascinated a lot of wizard-types.
- Good times for surviving companions.

Concludes this playthrough of Pathfinder: Kingmaker. Ragged on irritating bits of the game a lot. Really enjoys how everything comes around, story-wise. Loves planning out character builds too. Feels rewarding for it to come together.

Final party thoughts:
- Sebitza (Arcane Trickster): Took a while to get going. Tosses out some nasty spells late-game, though. Prefers Arcane Trickster over a straight wizard. Rates only as decent, due to the weaker early- and midgame.

- Dolanio (Stalwart Defender): Decent tank. Somehow expected more? Never contributed much damage. Missed a bunch. Might be the reason. Performed way better than as an Inquisitor, at any rate. Sacrificed too much for Trip.

- Nuyu (Paladin Hospitaler): Quite nice. Cannot measure how worthwhile a Dazzling build was. Appreciated the out-of-combat healing, occasional divine buff, and some big swings.

- Kivon (Rogue Knife Master): Good from start to finish. Needed some support to not die, however (much like Nuyu). Benefitted a bunch from Greater Invisibility. Wonders about different weapons. Saw some nice immunity-bypassing daggers and short swords. Probably hit mainly through criticals, however, which kukries do better.

- Rhys (Druid): Probably the worst on the team. Contributed mostly through having a pet. Might have been better with a shapeshifter build. Hated to sacrifice feats towards that (which went towards making Perception sky-high).

- Ecaeris (Alchemist Grenadier): Great. Handed out lots of crucial buffs. Tripped stuff better than Dolanio ever did with Arcane Bombs. Contributed decent damage, although very dependent on bombs.

Thanks for reading all this way (or even just this last update).
 
24,623
Posts
3
Years
  • Age 35
  • Seen today
Tales of Vesperia: Definitive Edition

Watched a Let's Play of the original game several years ago. Forgot the bulk of it since then. Wanted to play it for a long time. Became able to with the Switch port.

Reached a hair over ten hours of playtime. (Currently at Dahngrest.) Welcomes the weapon skill and synthesis systems after Zestiria and Berseria. Offers just as much skill choice complexity without a large grind. Built upon Symphonia's battle system nicely with mechanics like triggerable Overlimit, Burst Artes, and Fatal Strikes.

Is not having fun, though. Comes down to combat once again. Hates being interrupted mid-arte or even mid-Burst Arte. Where are the invincibility frames? Never seems to be an issue for enemies. Loves zipping through everyone, smacking you while down, and occasionally stunlocking you. Describes it as unfair (in a bad way).

Could be too accustomed to Symphonia, Zestiria, and Berseria. May be relying on lateral movement and guarding too much, rather than free running and guarding. Acknowledges being half-spoiled as possibly dampening things also. May have lowered willingness to adjust. May just not be in a Tales mood. Shrugs.

(Adds one minor gripe: Rita's AI. Spammed Splash on a boss that heals from water damage. Should have wised up after the Magic Lens. Had to go into the menu to turn it off.)
 
24,623
Posts
3
Years
  • Age 35
  • Seen today
Trashed some less necessary attachments on Page 1. Should load better now. Learned to be more sparing with images.

Grim Fandango: Remastered
Entered this game with uncertainty. Enjoyed Monkey Island as a child. Acquired a distaste for puzzles since then. Handled Day of the Tentacle's puzzle without much issue, though. Remembers Monkey Island fondly due to humor, also, not gameplay.

Praises it for the unique setting. Occurs in the land of the dead. Acts as a travel agent to the newly-dead. Sends people to their final destination on a train...if they were good. Handed a cane with a compass to one bad skeleton.

Contains various complexities as well, including a criminal element. Kills skeletons by "sprouting" them with a flower bullet. Highlighted exploited laborers and prisoners throughout the game. Never felt too dark. Would have preferred something a little more lighthearted, though.

Fared okay on the humor front. Liked most lines where the other characters cut in outside of conversation. Example: Looked at Eva. "It's my boss's secretary, Eva." Responded, "It's my boss's whipping boy, Manny." Informs you of your place in the story right out of the gate. Cannot recall any amusing uses of items, unfortunately. Wanted to hold onto the Robert Frost balloon animal far longer, though.

Felt a little mixed on characters. Warmed up to Glottis, your driver, as a constant, faithful companion. Viewed Manny, the main character, with a bit of sideeye. Seemed unnaturally fixated on Mercedes Colomar. Understands wanting to help, especially with few other options. Felt forced before long. Spoke together for not even five minutes. Waited for a year at Rubacava. Smacked Manny with a bottle and left after that year. Seemed undeterred by this.

Dropped the ball hard on gameplay, unfortunately. Names the Petrified Forest as an awful place. Committed missteps there seen throughout the game.
1. Tasks you with toppling a petrified tree. Hooked machinery up to it. Tricked Glottis into climbing up it. Threw the switch to send them spinning. Was insufficient, however. Needed to pinch the lines to the equipment with a wheelbarrow. Visably changed the timing of the device's four pumps. Caused no other indications of progress, however. Knew what to do solely thanks to a walkthrough.
2. Presents you with a forest clearing. Shows many paths. Goes nowhere. Needed a signpost from a screen earlier. Noticed it due to knocking it over. Could not interact with it at all while driving, however. Never changed the cursor. Assumed it to be background. Had to exit the vehicle.

Grabbed the signpost. Dragged it to the clearing. Set it down. Spun around. Pointed towards one path. Ran down it. Reappeared from one of the other paths. Tried again. Pointed the same way. Carried the signpost along. Same result.

Moved the signpost around. Pointed to different caves. Sprinted down them. Produced no clear results. Wondered if it was correct, but not giving any indications. Does that with mazes sometimes.

Tries to hint at the correct solution. Says, "Well, it's pointing somewhere." Set up the paths as a huge red herring. Actually pointed to a spot already visible in the clearing. Dips downward when you hit the very small magic spot. Opens a huge trapdoor. Must have planted the signpost very close before. Never registered.

Solved some puzzles without understanding the reason behind your actions. Traps you in a ship during one section. Stacked explosives at the door to blow you up. Figured out how to twist the anchor lines together. Reeled one anchor in. Thought it would cause the ship to do a barrel roll and dislodge the explosives. Tore a huge line across the ship instead. Sailed out with that half of the ship.

Brings up one more bit: bugs. Crashed twice. Locked up the computer completely...six times? Lacks an autosave feature too. (Arguably wasted more time hard resetting than from lost progress.) Cannot recall any other game causing issues like that.

Overall thoughts: Considers this game okay with a walkthrough or as a spectator. Would not describe the story and characters as particularly memorable, however. Stands out more for its awful puzzles, poor interaction points (to the point of completely missing several locations and items, despite clicking over there), and rough crashes.
 
Last edited:
24,623
Posts
3
Years
  • Age 35
  • Seen today
Spoiler: Fire Emblem: Three Houses Blue Lions Maddening Chapters 1-6

Completed Fire Emblem: Three Houses twice. Finished Black Eagles (Crimson Snow) and Golden Deer, both on Hard. Skated through Golden Deer's route, thanks to New Game+ and game knowledge. Naturally wanted to try Maddening with the Blue Lions.

Distrusts Fire Emblem games on the hardest difficulty since Awakening. Pinned hopes on New Game+'s advantages to cancel out a potentially rough early-game. Some major benefits:
1. Ridiculously good battalions. Notes Immortal Corps (+8 Strength, +4 Defense, +10 Charm), Supreme Armored Co (+7 Strength, +6 Magic, +6 Defense, +5 Resistance, and +10 Charm), and Holst's Chosen (+7 Strength, +7 Defense, and +3 Charm) at C-rank Authority. Competes with A-rank battalions.
2. Saint Statues at maximum. Appreciates faster skill ranks immensely. Cuts down grinding time.
3. Instant A+ Professor rank. Could completely ignore fishing. (Will not, for meal ingredients. Reduces the necessary amount, however.)

Planned to use almost all the Blue Lions. (Feels right to do so on their route.) Dropped Sylvain due to using them before (and not liking them). Team plan: Byleth (male), Dimitri, Dedue, Felix, Ashe, Annette, Mercedes, Ingrid, Leonie, Petra, Hapi, and Yuri.

Chose Petra for being Black Eagles's all-star and good in Golden Deer. Remembers Leonie being similar, stat-wise. Wanted to include downloadable content characters this time. Found Hapi and Yuri more interesting than Constance and Balthus.

- Chapters 1-3 missions: Lacks much to say. Crushed them with raw battalion stats and the handy Chalice of Beginnings (counterattack at any range). Turned Annette into an invulnerable axe machine, also. Reached Authority Rank C. What can enemies do against Holst's Chosen and a Silver Shield (+11 total defense)?

Witnessed two 1% enemy criticals on a single Skirmish map. Please get that out of your system now.

Grinded up skills like Axe and Faith. Squeezed Heavy Armor and some Reason in too. Why? Minimum class stats. Jumps that unit's stat up to that class's minimum stats permanently. Cannot resist that. Recorded some Armor Knight promotions:
- Mercedes: +2 HP and +3 Def
- Annette and Ingrid: +1 HP and +4 Def
- Hapi: +3 Luck and +6 Def
- Felix: +4 Def
- Ashe: +2 HP and +5 Def

Understands this being too grindy for people. Did not feel too bad, though. Sped it up New Game+'s bonuses. Stalemated enemies with a broken weapon and overwhelming defense. Sniped any problem units (see: mages). Turned on No Animations and Action Skip. Ended turns immediately, without acting. Laughed at the seven enemy units with broken weapons on turn 90.

- Chapter 4 mission (Rite of Rebirth at the Holy Mausoleum): Defeat the boss within 25 turns. Plunked down the Death Knight in the middle. Whatever. Will steal the Dark Seal on the last turn. Blah blah bla-wait. Why is there a red line going to Felix? Moves on Maddening difficulty?

Hung on from the Death Knight slash with 2 hitpoints left. Thank you for not getting your ~28% critical chance. (Occurred before Felix's Armor Knight promotion, for the record. Was not saved by that.) Knocked the Death Knight off balance with Ingrid's gambit (A-rank Cichol Wyvern Co). Sealed the battle—and the map, honestly—with some rallied punches from Byleth.

- Chapter 5 mission (Miklan in the tower): Insisted on saving Gilbert. Expected reinforcements later, however, not on Turn 2. Rescued Gilbert with Dedue's Impregnable Wall gambit. Resulted in Dedue melting to all four 83% hit chance Fires and a finishing 45% hit chance gambit (~21.4% of all hitting). Rewound time to monkey with the rolls.

Sidenote: Really showcased how mean reinforcements are. Appeared from behind and rushed Gilbert (the slow armor knight) in the same turn. Praises and despises Divine Pulse on this note. Thanks Divine Pulse for preventing a dumb death and restart. Allows the developers to create nonsense like this without blowback, though.

Dogpiled Monster Miklan at the end. Annihilated it in a single turn, thanks to Annette's finishing critical.

...Oh. Should not have given the Lance of Ruin back. Whoops. Oh well. Tends not to use weapon relics anyways.

Recruited Petra, Leonie, and Yuri in Chapter 6. Enters with a promoted class's average stat growths, as a result. Beats out levels from earlier classes with weaker stat growths. Briefly lamented how much training the newcomers need. (Bypassed the slowest part for Petra and Leonie. Regained skill levels from a previous playthrough with Renown.) Stopped grumbling after comparing Petra and Ingrid in the same class (Armor Knight).
Petra / Ingrid
- Level: 11 / 13 (+2)
- Strength: 15 / 11 (-4)
- Magic: 6 / 14 (+8)
- Dexterity: 13 / 11 (-2)
- Speed: 16 / 10 (-6)
- Luck: 12 / 11 (-1)
- Defense: 17 / 19 (+2)
- Resistance: 3 / 12 (+9)
- Charm: 11 / 18 (+7)

Practically mistakes Ingrid for a caster.

Scanned downloadable content classes for good base stats. What lazy person designed Dark Flier? 8 Strength and 6 Magic base stats? Why is a level 20 Magic-based class on par with a level 10 Strength-based class in Magic? Why are these the exact same numbers as Pegasus Knight?

- Dedue's Paralogue (War for the Weak): Was never in danger. Felt smart for Repositioning Felix over to the left side of the map with Ingrid. Crossed a wall of rocks which separates them.

Met the qualifications for Fortress Knight on all characters at this point, by the way. Waits on Yuri for the final Warlock/Bishop skill qualification.

- Chapter 6 mission (Death Knight's basement): Loves the Chalice of Beginnings. Littered this area with archers (a strange choice for an underground area, in retrospect). Weakened them enough to ensure easy clean-ups.

Reached the final room. Wanted to beat the Death Knight. Completes the map if all other enemies (one remaining cavalier) die, however. Plugged the hole with Dedue. Ate the Death Knight's 21 damage critical and 7 damage normal hit. Pummelled the Death Knight with an encore of rallied punches. Easy.

- Sylvain's Paralogue: Placed six thieves with loot in the middle of the map. Flees to the four exit points unless that exit point boss dies.

Tackled all the exit point bosses at once. Soloed the archer and caster sections with Byleth and Mercedes, respectively. Started off sketchy with one of the larger teams. Stabilized with a large area effect gambit. Reclaimed all the loot and the Lance of Ruin. (Rectified the earlier mistake.)

- Lorenz's Paralogue: Not much noteworthy here. Flattened the right side of the map with Byleth. Kept healthy thanks to Healing Focus (50% heal Combat Art) and the occasional Crest of Flames heal.

- Dorothea and Ingrid's Paralogue (Volcano Marriage Proposal map): Grew irritated from 4 of 6 ~35% hit chance enemy gambits landing. Tempered those complaints a bit due to Ingrid's critical hit parade. Awarded MVP to Yuri, however, as the new Chalice of Beginnings owner.

Uses awful surprise reinforcements on this map too. Forgot about the ones that appear behind you. Slaughtered Dorothea in a single combat.

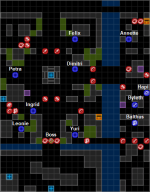
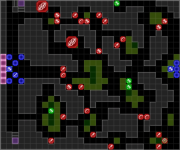
- Balthus and Hapi's Paralogue (Black Market Scheme): The grossest map so far. Grabbed the starting conditions from a Wiki. Forces Byleth, Balthus, and Hapi in the blue Sword, Fist, and Tome circles, respectively.
Black Market Scheme Initial Labeled.png
Forces a lot of solo or duo situations. Manages okay with good pairings, though, right? Complicates things with reinforcements. Spawns three reinforcements if you move Leonie or Yuri from their starting spot. Turned the bottom left into a 2v6 and the bottom middle into a 1v5. Weathered the storm, thanks to those Armor Knight promotions. (Tickled Leonie with 1x4 50% hits while on a bush tile. Becomes a very different story with 3 less Defense.)

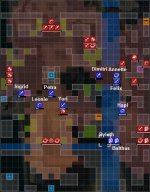
Did not end there, however. Defeated every enemy except one axe and the boss group. Started to breathe again. Ticked over to Turn 5. Screenshotted the start of the turn.
Black Market Scheme Turn Five.jpg
Spawned 19 units at once. Did not immediately move, mercifully. Note how injured everyone is. Could not risk a spellcaster on the left side. Barely reached Yuri with Hapi's Physic.

Proved stronger together than alone. Carried the left side with Yuri on the healing tile (although still dodging a ~30% hit chance that would have killed) along with Axebreaker tanking plus chip damage from the others. Formed a protective wall around Annette (or as well as possible versus Pass Swordsmen) to dole out heals. Rescued Hapi after rushing back with the Brawler duo of Byleth and Balthus.

Considered the boss the easiest part of the map by far. Was not troubled by the monster transformation. Brought a lot of bows this map.

Reached level 20 on several characters after these paralogue maps. Pushed students towards the exam room.

Fortress Knight
Byleth: +2 Defense
Mercedes: +3 Hitpoints, +7 Strength, +3 Defense
Yuri: +2 Hitpoints, +3 Defense
Felix: Not taking it. (Technically would have gained Resistance. Earns more below.)
Hapi: +3 Hitpoints, +4 Strength, +4 Defense

Bishop
Byleth: +2 Magic, +4 Resistance

Warlock
Felix: +3 Magic, +11 Resistance (Introduces you to the original reason for this grind. How can you turn down an eye-popping 11 Resistance?)

Warrior
Mercedes: +2 Strength (Occurred after Fortress Knight. Failed Warlock. Spent the 2000 gold for fun. Chuckles at the idea of Mercedes with Wrath.)

Will cut it off here. Promotes more next time. Recorded everyone's stats in the next spoiler. Farewell for now.

Spoiler: Character Stats

Avoided images. Looks far better with screenshots. Slows the page to a crawl with enough image dumps, unfortunately. Labeled each stat's stars (according to the Mysterious Teacher) in parentheses.
Byleth
Level: 20
Class: Brawler
Overall Rating: B
Hitpoints: 41 (3)
Strength: 23 (1)
Magic: 15 (2)
Dexterity: 23 (5)
Speed: 22 (5)
Luck: 18 (1)
Defense: 17 (4)
Resistance: 14 (2)
Charm: 24 (5)

Dimitri
Level: 19
Class: Cavalier
Overall Rating: C
Hitpoints: 43 (3)
Strength: 23 (0)
Magic: 13 (5)
Dexterity: 15 (0)
Speed: 15 (0)
Luck: 10 (0)
Defense: 17 (3)
Resistance: 6 (0)
Charm: 23 (3)

Dedue
Level: 18
Class: Brigand
Overall Rating: B
Hitpoints: 47 (4)
Strength: 22 (1)
Magic: 9 (4)
Dexterity: 13 (3)
Speed: 9 (0)
Luck: 10 (1)
Defense: 21 (4)
Resistance: 6 (3)
Charm: 12 (3)

Felix
Level: 20
Class: Archer
Overall Rating: B
Hitpoints: 39 (2)
Strength: 20 (0)
Magic: 17 (5)
Dexterity: 17 (2)
Speed: 26 (5)
Luck: 15 (2)
Defense: 17 (5)
Resistance: 15 (5)
Charm: 14 (2)

Ashe
Level: 18
Class: Thief
Overall Rating: B
Hitpoints: 34 (3)
Strength: 12 (0)
Magic: 11 (2)
Dexterity: 22 (5)
Speed: 22 (4)
Luck: 15 (2)
Defense: 14 (5)
Resistance: 14 (2)
Charm: 15 (5)

Mercedes
Level: 20
Class: Priest
Overall Rating: B
Hitpoints: 35 (2)
Strength: 19 (5)
Magic: 19 (0)
Dexterity: 18 (3)
Speed: 21 (5)
Luck: 12 (1)
Defense: 17 (5)
Resistance: 24 (5)
Charm: 17 (1)

Annette
Level: 19
Class: Mage
Overall Rating: C
Hitpoints: 32 (2)
Strength: 10 (0)
Magic: 25 (5)
Dexterity: 13 (0)
Speed: 12 (0)
Luck: 12 (0)
Defense: 12 (3)
Resistance: 13 (4)
Charm: 17 (4)

Ingrid
Level: 19
Class: Pegasus Knight
Overall Rating: B
Hitpoints: 36 (1)
Strength: 13 (0)
Magic: 16 (4)
Dexterity: 16 (3)
Speed: 18 (0)
Luck: 15 (0)
Defense: 15 (5)
Resistance: 17 (2)
Charm: 22 (5)

Petra
Level: 18
Class: Thief
Overall Rating: C
Hitpoints: 36 (2)
Strength: 17 (1)
Magic: 8 (1)
Dexterity: 19 (3)
Speed: 26 (5)
Luck: 14 (0)
Defense: 13 (3)
Resistance: 5 (0)
Charm: 14 (0)

Leonie
Level: 18
Class: Pegasus Knight
Overall Rating: C
Hitpoints: 34 (0)
Strength: 19 (3)
Magic: 8 (0)
Dexterity: 18 (1)
Speed: 24 (5)
Luck: 15 (2)
Defense: 16 (2)
Resistance: 7 (2)
Charm: 18 (4)

Yuri
Level: 20
Class: Archer
Overall Rating: B
Hitpoints: 35 (3)
Strength: 24 (5)
Magic: 12 (0)
Dexterity: 16 (1)
Speed: 22 (1)
Luck: 18 (2)
Defense: 17 (5)
Resistance: 14 (0)
Charm: 24 (5)

Hapi
Level: 20
Class: Mage
Overall Rating: B
Hitpoints: 35 (1)
Strength: 17 (4)
Magic: 22 (2)
Dexterity: 17 (0)
Speed: 12 (0)
Luck: 12 (4)
Defense: 17 (5)
Resistance: 18 (2)
Charm: 14 (5)


Spoiler: Character Impressions so far

As of Chapter 6. Viewed most of the supports available for this section on the game. Lists personality in the first paragraph and performance in the second.


- Dimitri: Positive. Treats others well. Acts patiently (if exasperated) towards standoffish people like Felix. Expresses less for soldiers talking poorly about Dedue (which is great). Knows very little about Dimitri, though. Recounted a story about being shoved out to "go catch a deer" in the cold at night. Described the event, but little of the emotions behind it. (Implies being frightened, though.)

Frets about Dimitri's effectiveness. Tried Great Knights before. Feels like that. Struggled to kill anything while still suffering a lot of damage.

- Dedue: Dull. Began every support about being shunning because of Duscur. Understands why a personality trait or event would dominate first meetings. Makes for dull reading, especially back-to-back-to-back. Winds up being similar to Bernadetta, in that respect.

Manages okay in combat. Acted as a good physical wall. Fires off some decent damage on player phase.

- Felix: Mildly positive. Recruited Felix before. Came off as an ill-tempered grouch to everyone. Provided a little more context in the Blue Lions supports. Loathes the knighthood ideal that most of the house ascribes to. May not intend to sound disgruntled all the time either, such as in Annette's support.

Excels on the battlefield. Runs counter to the first playthrough of being underwhelming. Combines good strength and speed. Worries about Mortal Savant ruining things again. May stick to Assassin and magic weapons.

- Ashe: Positive. Skipped most of the supports here, as a regular team member. (Likes Locktouch.) Behaves kindly towards everyone. Upholds the ideal of knighthood without it overtaking every support.

Holds little hope for Ashe. Usually turns out weak. Feels exceptionally low on Strength this time. Planned for Ashe to be utility as the team's dancer, though. Spent the downloadable content boots on them already. Crosses so much ground with that and the March Ring.

- Sylvain: Negative. Passes on the womanizer. Recalls some okay supports. Still no.

Managed to not die in their paralogue. Good job.

- Mercedes: Okay, but a bit boring. Appeared in the Golden Deer run. Pushes the motherly personality a bit too much. Could be a voice thing as well. Does not hate them, by any means, though.

The best spellcaster on the team by far. Sports good all-around stats, unlike Annette and Hapi. Outperformed the 40% base speed growth, in particular.

- Annette: Marriage candidate. Sees a different side with nearly every support. Becomes protective with Mercedes, scatterbrained with Dedue, studious with Ashe and Sylvain, make-up artist with Ingrid, and goofy with Felix. Strays far from being a single character trait.

Lags behind in terms of combat. Functions okay. Lacks any standout spells and stats besides Magic. Hopes for improvement when Bolt Axes become readily available. Plans to go Wyvern Lord later.

- Ingrid: Pleasant. Shows off a firm side in ideals and knighthood, but also a softer side when apologizing for being too harsh. Hammers knighthood too much, however. Enjoys their voice, also.

Sees an uphill battle for Ingrid. Grew in defensive stats and Magic, but not much else. (Tanked shockingly well in Black Market Scheme, though, so...maybe not too terrible?) May have to rely on Frozen Lance. Synergizes with the Crest of Daphnel (extra might on combat arts), on the plus side.

Overall Blue Lions thoughts: Maybe the best of the three for characters? Rivals the Black Eagles. Relies the least on gimmicks, despite a central theme of knighthood.

- Yuri: Intriguing in Cindered Shadows, but very muted in the main game. Supports with Byleth, Bernadetta, Dorothea, Ingrid, and the other Ashen Wolves only. Will see three of those.

An exceptional unit. Stands among the best on the team. Combines good Strength, Speed, and passable defensive stats.

- Hapi: Same as Yuri, but with a side of kidnapping (and the resulting anti-church sentiment) dominating everything. Mirrors Lysithea's story too much.

Underwhelming. Faces a lot of the same problems as Annette. Loses to or ties Mercedes in every stat except Magic.

- Byleth: Too much of a blank slate.

Tops the list for combat capability. Edges out Felix and Yuri by a bit. (Compares quite closely, though, due to minimum class stat boosts.)

- Petra: Skipped most of the supports. Read them before. Liked them (to the point of marriage) for the lore behind Brigid, the difficult circumstances around it, and the pleasant personality.

Sits in the middle of the pack for combat. Cannot handle hordes of enemies like Felix. Will not flail ineffectively like Ashe.

- Leonie: Ditto on skipping supports. Remembers these a bit worse. Worships Jeralt too much, at least outside of supports. Sticks more.

Again like Petra, although perhaps a bit less effective with the bow. Awaits Point Blank Volley.
 
Last edited:

Nah

15,940
Posts
10
Years
  • Age 31
  • Seen yesterday
Besides that one paralogue map, it sounds like your Maddening run hasn't been too bad so far, which is good. I also played Awakening on Lunatic and while I did finish it+Apotheosis, it was kind of a rough ride. tbh I don't think that I want to try Maddening, that's probably beyond me.
 
24,623
Posts
3
Years
  • Age 35
  • Seen today
Understands being uninterested in Maddening. Becomes a bit tiring optimizing every little detail or finding precise unit configurations to not lose someone. Struggled so much on Chapter 2 of Awakening, where you first get Stahl, Vaike, and Miriel. Did not want rely solely on Chrom and Robin for the playthrough. Cleared the map eventually. Describes winning as more relief than fun. Encountered nothing as bad as that so far, fortunately.

Considered Hard difficulty with anti-grinding restrictions instead of Maddening. Undoubtedly progresses much faster without skill grinding, fishing, tea parties, lost item hunting, and so on. Makes Seminars worth considering.
Spoiler: Fire Emblem: Three Houses Blue Lions Maddening Chapters 7-10

- Chapter 7 mission (Battle of the Eagle and Lion): Breezed through it. Even handled the fliers well. Missed the opportunity to steal Evasion Rings, apparently. Oh well.

Went horribly for the Golden Deer. Stacked two morale boosts on the Black Eagles from kills. Reflected the battle's name accurately, though.

- Sothis's Paralogue (Huge Monsters from Nowhere: The Map): Not bad, surprisingly. Remembers being swarmed in other playthroughs.

Chuckled at a line from Dimitri too. Engaged the boss. Ended the turn. Spawned more reinforcements on Dimitri's northern group. "Blast! More hawks! We should probably take those out before we approach that beast..." Too late for that.

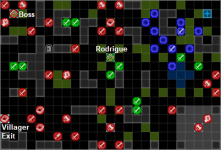
- Felix's Paralogue (True Chivalry): A dumb map, but for (mostly) different reasons than Black Market Scheme. Must rescue all five villagers (green, although indistinguishable from allied guards) for the best reward, including Felix's relic shield. Cannot let Rodrigue die either.
True Chivalry Map.png
Presents two major problems:
1. Rodrigue dying Turn 1. Flops over to two full health enemy swords, and sometimes two injured enemy swords. (Hits with white magic 50% of the time.) Starts within range of three enemy swords.
2. Suicidal villagers. Hides in a corner for a turn or two. Runs towards the enemy force after that. Sprints past their guard without a care. Why? Is this why Felix is so surly?

Struggled on this one. Saw no clear way to save one villager at one point. Leapt in front with Yuri. Would have worked, if not for four enemy swords (with Pass) spawning and pulverizing the villager. Fully restarted the battle to equip positioning combat arts, reclass two units to more mobile classes, and bring Ashe with the Blue Lions Dancers battalion. Lacked more conventional tools like Warp, Rescue, and an actual dancer.

Almost routed the map. High-fives the allied guards for landing three 9% criticals. Realized later that the win condition is to kill the boss. Makes the map more manageable, but no less stupid.

Heavily questions MVP going to Byleth on this map. Beat up...two people? Three? What about Ingrid? Soloed the boss. What about Yuri and Leonie? Must have gotten more kills on the south side.

Smiles at Ashe, also. Stacked the downloadable content boots, March Ring, and Riding's +1 movement skill for a total of +4 movement. Zips around at 8 movement as a Fortress Knight. Outruns all the fliers and cavalry.

- Ignatz and Raphael's Paralogue (Death Toll): Overextended a few times. Grew too accustomed to rushing. Bristles at another 30% enemy gambit landing (which dragged out Petra and forced a rewind).

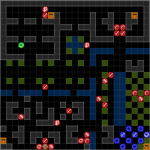
- Yuri and Constance's Paralogue (A Cursed Relic and Map): Dreaded this upon seeing the main map condition: do not let the Duke die.
A Cursed Relic Starting Map.png
Begins on a positive note: decent stats for the Duke. Survives a hit or two. Scored...two criticals? At least one, anyways.

The bad news? 15 reinforcements upon either killing the boss OR getting within two spaces of the Duke. Deals with enemies near the Duke transforming into monsters too.

Beelined to the Duke with both fliers. Dealt with the right-side enemies with a small, slow group. Killed the boss with everyone else on the way to the Duke (not knowing about reinforcements). Screenshotted the resulting mess for Leonie and Ingrid.
A Cursed Relic Struggle.png
Estimates this to be the start of Turn 4. Arrived at Turn 3. Rewound back to before killing the boss.

Wishes to speak about this map for a moment. Punishes you for defeating the boss quickly OR warping a unit in to help immediately. Revolves entirely around the reinforcement trigger. Might make this map easier by doing nothing for the first few turns, rather than help the Duke. Views that as terrible design. Ought to reward you for defeating the boss quickly (with fewer/slower reinforcements or in disarray) or warn you about the trigger beforehand.

Take two. Directed more northward instead of at the boss. Dealt with the boss regardless, due to that group moving. Delayed impending doom by a turn or two with Mercedes's weakest magic, while also attempting to get within Physic range. Directed Yuri + slow team to the western archer reinforcements and Felix towards the northeast archer reinforcements. Tasked Petra and Byleth with supporting the fliers.

Spiraled into another wild mess. Spammed gambits with Ingrid and Leonie to ultimately buy time for Byleth and Petra. Recalls the four of them fending off the three mage team, the four cavalry team, and 3-4 monsters at the same time. Rescued them just in time with Mercedes's Fortify (area effect heal). (Lagged behind. Froze in place for a turn because of the boss's dark magic.)

Notes one final hazard of the map: the Duke. Cannot understand what their destination was. Reached the circle spot, just south of the fountain in the above screenshot. Refused to cross the bridge south to safety. Scooted up and down 1-2 squares several turns in a row. Must have been running to a friendly unit...or something.

- Chapter 8 mission (Remire Calamity): Suffered from the rushing mindset being drilled in. Scattered in every direction to save villagers, unlock chests, and defeat the Death Knight. Rewound a few times from overextending once more. Nabbed all the rewards, though.

Revealed Dimitri's dark side in this chapter. Wondered when it would show up. Manifested in gameplay too. One-shot the Death Knight with the Crest of Blaiddyd.

- Ashe and Catherine's Paralogue (Fighting Fog and Fliers): Defend Rhea in a fog map. Rewards you for Rhea not taking damage. Baited out the immediate threats on Turn 1. (Rewound once due to fliers finding Hapi.) Demolished them after seeing them. Finished in 3-4 turns. Not too terrible. Finally started dodging 30% enemy gambits too.

- Flayn and Seteth's Paralogue (An Ocean View): Stormed the beach with Yuri to get MVP (for motivation to finish the Bow budding talent and Deadeye). Picked off the island-dwellers with fliers. Simple.

- Hanneman and Maneula's Paralogue (Oil and Water): Rescued Maneula with fliers. Skirted around archer ranges to stay safe. Bigger question: Why would you fight the Death Knight again? Beat up the Death Knight three times already. Escaped via silly plot magic every time. What do you expect to happen this time, even if you find them?

- Anna's Paralogue (The Secret Merchant): Loaded every enemy unit with a drop. Flees with warp magic in groups. Struck out with the main group up the middle and a few units on the right side. Met stiff resistance in the form of raw stats. Struggled to one-round any enemy without a critical, even when doubling.

Called in reinforcements all along the edge of the map, as expected of a downloadable content map. Heard about awful Bow Knights popping in. Tended to be far away, though. Spawned in all the reinforcements in singles, rather than groups of 3-4. Cut down on the frustration.

Went surprisingly okay. Spun time back only once, and not due to reinforcements. Missed out on a few rewards (6000 gold and a Venin Lance?), but nothing huge. Continued the positive trend of avoiding low chance enemy gambits.

- Chapter 9 Mission (Monster Students in the Cathedral): A simple mission. Follows the lead of many paralogue maps with rewards for saving students. Pales next to said maps. Threatens students with a single monster, while standing on a healing tile with healing items. No issues at all. Maintained the streak of allied criticals with one from Jeralt.

Knew Jeralt was going to die the first time around. Sighed at all the promises to tell Byleth everything soon. Teased too much information.

- Hilda and Cyril's Paralogue (Dividing the World): Save more people. Splits your army in two.
Dividing the World Starting Conditions.png
Plugged the northwestern chokepoint with Petra. Tasked Leonie with saving the northern allied unit from the two Wyvern Riders. Pitted Dimitri versus fellow cavalry for the southern allied unit. Charged down the middle with everyone else.

Required a few rewinds. Failed to realize how fragile these allied armor knights were. Dies instantly versus a single Wyvern Rider. Drops very low from two archers (6x2 at 50% in woods, 80% otherwise) with Poison Strike. Tossed Yuri from the western bridge to the central allied units with a dance from Ashe on Turn 2. Probably prevented a death by doing so.

Suffered from success in Petra's neck of the woods. Criticaled a few too many enemies. Allowed more cavalry to pour in (likely with Swordbreaker, given 100% hit chances). Threw out a gambit just to freeze enemies and wait for help. Loves how much ground Ashe can cover with 10 movement.

Names this as the best map so far. Presented a definite challenge in saving everyone. Never needed to worry about allied units killing themselves. Called in zero reinforcements. Knew exactly what was coming.

- Chapter 10 mission (Where the Goddess Dwells):
Kronya: "Hello! You're here! Welcome to the forest of death!" Should have said for whom. Noticed good critical rates, especially from Petra (50% sometimes). Counted criticals partway through Turn 1's enemy phase.
Hit 1: Critical. Nice.
Hit 2: Critical. ~25% chance for the double crit.
Hit 3: Critical. Wow, again?
Hit 4: Critical. Uh...good job, Ingrid.
Hit 5: Critical. Um. Sure, Byleth too.
Hit 6: Critical. UM. Dudue also?
Hit 7: Critical. (Player phase now.) Is this okay?
Hit 8: Normal. Finally.
Hit 9: Critical. From Annette. Vicious.

Shamed that mission. Evened out somewhat throughout the rest of the map. Compensated for all those 30% hit chance enemy gambits.

Other bits
- Won the White Heron Cup with Ashe (2 votes). Competed against Hubert (1 vote) and Claude (0 votes). Apparently never expected Ashe to win. Said this in a story cutscene a few days after winning the White Heron Cup: "Actually, I'd much prefer if someone could just teach me how to dance."

- Entered the Bow Tournament with Yuri. Slaughtered the competition. One-shot everyone but Claude. Activated the Crest of Aubin (no counterattack) for a flawless victory.

- Felix at a Tea Party: "Some people like to snack when they take a break. No willpower." Smirks at one of the correct answers being "Sip Tea".

- Recorded more stat gains from promotions. Earned most of these after the Chapter 7 map.

Warlock
- Hapi: +2 Speed
- Annette: +1 Speed, +3 Resistance
- Yuri: +5 Magic, +1 Resistance
- Ingrid: +1 Magic

Bishop
- Dimitri: +1 Magic, +8 Resistance
- Dedue: +6 Magic, +7 Resistance
- Ashe: +3 Magic
- Petra and Leonie: +7 Magic, +7 Resistance

Warrior
- Ingrid: +5 Strength
- Hapi and Annette: +2 Strength
- Dedue: +5 Speed, +2 Resistance (Would have been +9 Resistance above, if not for doing this first.
- Petra: +2 Strength, +3 Resistance (As above, but +10.)

Fortress Knight
- Annette: +3 Hitpoints, +7 Strength, +5 Defense
- Dimitri: +1 Defense, +1 Resistance
- Ingrid: +1 Defense (Why was a Pegasus Knight's Defense as good as Dimitri's?)
- Ashe: +3 Strength, +3 Defense
- Leonie: +1 Hitpoint, +1 Defense, +2 Resistance
- Petra: +2 Defense

Sniper
- Leonie: Resistance +1

Ends this lengthy segment here. Approaches the timeskip and Hunting by Daybreak. Feels quite strong after that last map. Credits all that skill grinding. Farewell for now.
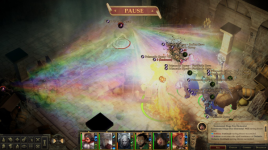

Spoiler: Character Stats

Shot up in stars from class minimum stat boosts.

Byleth
Level: 25
Class: Grappler
Overall Rating: A
Hitpoints: 47 (5)
Strength: 26 (2)
Magic: 16 (2)
Dexterity: 26 (5)
Speed: 25 (5)
Luck: 19 (0)
Defense: 19 (5)
Resistance: 15 (2)
Charm: 33 (5)

Dimitri
Level: 24
Class: Paladin
Overall Rating: B
Hitpoints: 49 (5)
Strength: 28 (2)
Magic: 17 (5)
Dexterity: 18 (0)
Speed: 17 (0)
Luck: 10 (0)
Defense: 23 (5)
Resistance: 17 (5)
Charm: 28 (5)

Dedue
Level: 24
Class: Grappler
Overall Rating: A
Hitpoints: 53 (5)
Strength: 26 (2)
Magic: 15 (5)
Dexterity: 18 (5)
Speed: 18 (5)
Luck: 10 (0)
Defense: 27 (5)
Resistance: 15 (5)
Charm: 18 (5)

Felix
Level: 25
Class: Assassin
Overall Rating: A
Hitpoints: 44 (4)
Strength: 23 (0)
Magic: 18 (5)
Dexterity: 21 (4)
Speed: 35 (5)
Luck: 18 (3)
Defense: 18 (5)
Resistance: 15 (5)
Charm: 19 (5)

Ashe
Level: 26
Class: Dancer
Overall Rating: A
Hitpoints: 40 (5)
Strength: 20 (3)
Magic: 16 (5)
Dexterity: 29 (5)
Speed: 27 (5)
Luck: 18 (2)
Defense: 21 (5)
Resistance: 17 (2)
Charm: 25 (5)

Mercedes
Level: 25
Class: Bishop
Overall Rating: A
Hitpoints: 37 (3)
Strength: 20 (5)
Magic: 22 (0)
Dexterity: 18 (1)
Speed: 23 (5)
Luck: 15 (3)
Defense: 18 (5)
Resistance: 29 (5)
Charm: 20 (2)

Annette
Level: 25
Class: Dark Flier
Overall Rating: A
Hitpoints: 37 (5)
Strength: 20 (5)
Magic: 26 (3)
Dexterity: 18 (0)
Speed: 20 (5)
Luck: 15 (1)
Defense: 18 (5)
Resistance: 21 (5)
Charm: 21 (5)

Ingrid
Level: 25
Class: Wyvern Rider
Overall Rating: B
Hitpoints: 41 (2)
Strength: 25 (5)
Magic: 19 (5)
Dexterity: 17 (1)
Speed: 20 (0)
Luck: 19 (2)
Defense: 21 (5)
Resistance: 16 (0)
Charm: 30 (5)

Petra
Level: 25
Class: Swordmaster
Overall Rating: A
Hitpoints: 43 (4)
Strength: 24 (5)
Magic: 15 (5)
Dexterity: 22 (3)
Speed: 29 (5)
Luck: 17 (0)
Defense: 20 (5)
Resistance: 15 (5)
Charm: 18 (4)

Leonie
Level: 25
Class: Wyvern Rider
Overall Rating: A
Hitpoints: 38 (1)
Strength: 25 (5)
Magic: 15 (5)
Dexterity: 23 (2)
Speed: 29 (5)
Luck: 20 (4)
Defense: 20 (3)
Resistance: 15 (5)
Charm: 24 (5)

Yuri
Level: 26
Class: Sniper
Overall Rating: A
Hitpoints: 35 (2)
Strength: 27 (5)
Magic: 18 (3)
Dexterity: 25 (5)
Speed: 26 (1)
Luck: 22 (4)
Defense: 18 (5)
Resistance: 19 (3)
Charm: 31 (5)

Hapi
Level: 25
Class: Valkyrie
Overall Rating: A
Hitpoints: 38 (2)
Strength: 20 (5)
Magic: 28 (5)
Dexterity: 17 (0)
Speed: 13 (0)
Luck: 14 (5)
Defense: 20 (5)
Resistance: 19 (1)
Charm: 19 (5)
 
24,623
Posts
3
Years
  • Age 35
  • Seen today
Spoiler: Fire Emblem: Three Houses Blue Lions Maddening Chapters 11-17

Finally delves into Blue Lions exclusive sections. But first...

- Alois and Shamir's Paralogue (Sword and Shield of Seiros): Defend the city from pirates. Delayed this map for a battalion you receive if you recruited Alois. (Messed that up with Balthus earlier.) Remembers this map for vicious fliers. Tore it apart this time. Points to playing it later than usual.

- Chapter 11 Mission (Protect the Crest Stones): Nothing exciting on this map, other than the Flame Emperor moving on Maddening. Saved all the Crest Stones. Leveraged mounts and dancing to grab them all.

Amped up Dimitri's dark side a bit. Extended behind just words...sort of? Crushed a few heads. Wore a big slasher smile too. Hardly moves the needle on bloodthirst, honestly. Killed a lot of people on the path here.

Always paints Dimitri as the bloodthirsty one. What about Rhea? Views them as worse, honestly. Executed people multiple times so far. Ranted about Edelgard being a permanent stain on history. Presented a calmer demeanor, but no less dark.

Grins. Finished the cutscene of Dimitri raging at Edelgard. Awarded MVP to Dimitri. "Dimitri's motivation has been maxed out!" Fitting. Coincides with finally setting up Battalion Wrath + Battalion Vantage too.

Skipped two weeks, for whatever reason. Poor Ignatz. No birthday for you.

- Chapter 12 Mission (Defense of Garreg Mach): Throws problems at you very quickly. Charges with a few named characters. Dealt with the Death Knight on Turn 2, probably. (Marks their fourth defeat. Please die.) Threatened to do some harm with a critical, sure. Worried far more about Ladislava in the center, however. Vaporized an allied mage with a 40x4 damage Brave Axe attack. Lacks some of the fancier skills (see: any range counterattack) to be a threat on Player Phase, fortunately.

Handled the map quite well. Benefitted from allied NPCs. Looked juicier than people like Mercedes, for whatever reason. Reduced the amount of important hitpoints lost. (Good thing too. Hates archers with Poison Strike on ballistas.) Rewound once because of Miracle activating on Hubert.

Shouts out the allied reinforcements. (Appears upon defeating Hubert and the Death Knight.) Scored one critical with an archer and four on a Swordmaster with a Killing Edge. Funneled some healing into them for their good work. Injured Edelgard badly with an 11 hit and 33 critical.

"Loses" the battle. Learns about dragon Rhea. Fell into a pit and slept for five years. Blah blah blah. Happened in Golden Deer's route too. Questions why Edelgard is more effective in Blue Lions and Golden Deer than in Crimson Flower. Requires your help to break a stalemate into Faerghus in Crimson Flower. Already steamrolled Faerghus's capital in Azure Moon.

Understands why Dimitri is the dark one. Revenge kill revenge worthless scum revenge.

- Chapter 13 Mission (Hunting by Daybreak): Begins with just Byleth and Dimitri. Heard about a trick to make this map more manageable: do not stand in the northern bush. Aggros both sets of archers, which are the reinforcement triggers. Ran south first instead.

Gives you Annette and Mercedes in the south. Appreciated a healer and Dark Flier for sure. Dropped to half-ish on Byleth and Dimitri before they came in.

Gee, thanks for Ashe and Gilbert in the northwest. Paired weak damage output with no accuracy. Opted not to potentially ruin their lives by attracting trouble. Hid in the corner until the south side was done. (Wanted to keep Gilbert alive. Was not worried about Ashe. Dodges like a boss. Picked up Lethality for fun too.)

Thrust Felix, Ingrid, and Sylvain in the northeast. Sufficed as a team. Promoted Sylvain to Fortress Knight from all their time as an adjutant. Weathered hits okay. Swooped in with Annette for a little more help.

Likes the extra touch of Pallardo being the boss. Appeared as the boss of Anna's paralogue. Escaped back then.

- Chapter 14 Mission (Defense of Garreg Mach 2): Begins split, with Byleth + two others on an overgrown path to escort an NPC for a fire trap.

Missed Dedue here. Fought a lot of lance cavalry and lance pegasi. Farmed axe skill on everyone. Designated Dedue and Annette as the two axe users. Awaits a consistent source of Bolt Axes for Annette. Relied on Dimitri instead.

Prepared to whine about the fire trap messing things up. Moves all the enemy units to preset locations, but not your units. (Caused several enemy armors to sprint three or so turns worth of movement between phases.) Freezes the enemy in place, thankfully, much like with a gambit. Picked them off effortlessly.

- Mercedes and Caspar's Paralogue (A Cursed Relic 2): Launches the map with Caspar and Mercedes far away, staring down a passive Death Knight. Must rescue them from enemies coming in. Cannot easily move them away without one getting destroyed (level 18 Caspar in a suggested level 33 map, in this case).

Conquered the left and right sides simultaneously. Warped in help to save the imperiled pair at the last second...until a gigantic jerk move: reinforcements. Spawned three snipers near the Death Knight, three Dark Knights on the left, and three swords on the right. Ranges most of the top part of the map. Moved upon entering, of course. Smashed Caspar. Forced a Divine Pulse. Sighs.

Fine. Must have been too slow. Rewound to the beginning. Stormed the left side exclusively. Reached Mercedes and Caspar a turn earlier. Great, right? No. Reinforcements. Dead.

Looked up the dumb reinforcement trigger: turn 10 or an allied unit within three spaces of Mercedes or Caspar. Practiced some social distancing. Had to come close to defeat some enemy swords incoming, however. Exited the incoming snipers' range. Ought to be fine. Wrong. Three range Dark Knights straight for Caspar. No chance.

Blew more Divine Pulses to clog up the stairs. Dealt with all the reinforcements. Sauntered up to the Death Knight. Whittled them down with gambits. Gave the final blow to Caspar with a Silver Axe + Helm Splitter. (18 damage at 91% hit chance. Not bad for Caspar's only kill.) Received the Scythe of Sariel for that extra flex.

Only planned to play Maddening once ever. Sealed the deal. Do not misunderstand. Remains motivated to continue. Enjoys seeing how units pan out, as well as the rest of the story. Just...never again on Maddening. Will add difficulty another way.

Hm. Realized which paralogues were coming up: another awful reinforcement map and two fog maps. Upgraded Steel weapons to Silver. Accumulated enough gold from auxillary battles. (Favors Iron+ weapons. Needs more power sometimes.)

- Linhardt and Leonie's Paralogue (Legend of the Fog Turtle): Fog with occasional reinforcements? Joy. Smoked Linhardt twice between those two conditions. Managed some revenge, at least. Scored a kill on a cavalier and a health square from the boss (1 damage) at (initially) level 10.

Let Dimitri loose on this one. Pumped them up with a "counterattack at any range" gambit and a Killer Lance. Ripped through everything but the boss with Battalion Wrath and Battalion Vantage active.

- Petra and Bernadetta's Paralogue (Foreign Land, Familiar Tactics): Not much to say here. Hated the surprise reinforcements, despite knowing roughly about them. Unwisely sent both cavalry through the wooded area. Managed to escape the reinforcements on that side after a rewind and a Reposition.

- Marianne's Paralogue (Forgotten Hero): Oh, hey. Just played this map with Petra and Bernadetta. Added fog and monsters everywhere. Stranded Marianne in the center too, relatively safe from harm. Directed Marianne to a fort with entrances too small for monsters once the map began. (Rewound once after moving to a bad square along the way.)

Triggered Ashe's Lethality here. Finally happened in a real battle. Necessary? No. Amazing? Yes. Outshone the rather routine monster slaying.

- Chapter 15 Mission (Valley of Torment): Travels to unhappy fiery death land to meet allied reinforcements. Mirrors the Golden Deer route, except with Rodrigue instead of Judith.

Muscled through this. Dodged and countered archers fearlessly with Petra on pegasusback. Exploded the right side with Dimitri's Battalion Vantage+Wrath. Kited the boss for time to reach both chests. Distrusted Rodrigue's ability to survive more than one turn after Felix's paralogue. Ended the battle immediately after the last chest.

Unlocked Dimitri's Great Lord class upon winning. Was confused, at first. Thought Dimitri was that class already. Started as High Lord post-timeskip, however. Should have named these differently.

- Annette and Gilbert's Paralogue (Weathervanes of Fodlan): Nearly missed this paralogue. Requires a C-rank support between Annette and Gilbert. Enjoyed the dialogue coming into this map.
Gilbert: "It is entirely possible that we shall be captured in the Dominic region. In anticipation of that... I would ask that you wait outside the region, with an army at your command."
Option 1: "Of course." (Begin paralogue.)

Felt jarring, but humorous.

...Here again? Fought here for Felix's paralogue and Sylvain's paralogue. Recycled this map hard. Bites harder, given all of them are in Blue Lions.

Imprisoned Annette and Gilbert behind four armored guards. Threatens them with units moving towards them. Sound familiar?

Encountered the downside of Dimitri's build. Missed (with a 100% critical chance) from extra avoidance on the enemy's tile. Knocked out the battalion, and in turn, Battalion Vantage+Wrath. Crumpled to the dogpile (unsurprisingly) without those tools.

Acknowledges one helpful, under-the-radar combat art: Reposition. Learned to like it (and other positioning arts) from Fire Emblem Heroes. Lifted Gilbert out of a reinforcement cavalry's range this map. Occasionally uses it to move units closer too.

- Rhea's Paralogue (Eternal Guardian): No reinforcements, no problems. Highlights two Miracle activations by a single Bishop. (Healed between turns.)

- Chapter 16 Mission (Rose-Colored River): Mimics the lead-in for Golden Deer's route, once again. Crosses the Great Bridge of Myrddin into the Empire. Battles Ladislava there. Dropped the Brave Axe for a less intimidating Silver Axe, apparently.

Welcomes Dedue back. Came as a surprise. (Knew some details, but not when. Figured at the end of some chapter, not mid-battle.) Served little purpose this battle between no battalion, still in Warrior class, and ~4 levels lower than everyone else, sadly.

Panicked when reinforcements warped in. Includes the armors in the upper-left, literally at the army's back.
BL Chapter 16 Reinforcements.png
Did not move upon appearing, thankfully. Applied to Lorenz's force also. Totally missed Lorenz not being in the army.

Acheron: "As they say, if you can't beat them, join them. I'm not in for a beating, am I?" Well...yes. Choose a better warp location next time.

Noticed a different cutscene after the battle. Met Fleche, the sibling of the Empire's general from Chapter 14. Wanted to join the army for revenge. Probably meant revenge against Dimitri. Should have been the one who actually scored the final—wait. Makes no difference. Remembers the cutscene of Byleth mercy-killing Randolph over letting Dimitri torture them.

- Ferdinand and Lysithea's Paralogue (Retribution): Considers the map's name quite fitting. Benefitted quite a bit from the Retribution gambit (counterattack at any range for five turns). Tasks you with saving NPCs without saving units on the map. Thank goodness. Simply required you to kill a threatening enemy unit or visit the house.

Leaned hard on Dimitri and Petra. Plugged the north side spewing reinforcements with Dimitri. Secured the far houses with Petra. Dove straight into a mass of enemies. Emerged completely unscathed. (May have been scratched by a magic attack. Dodged literally everything else.) Acknowledges Felix's solid work on the northwest side too.

Frets a bit about Dimitri's hit chances. Saw several in the mid-eighties and a couple in the seventies. Missed two 84% hit chances in a row (and died) at one point. (Whiffed on a 97% hit chance on some map also.) Runs Lance Prowess Level 5 and Hit +20. Hm. Could switch out the Aegis Shield for an Accuracy Ring. Thought about giving the shield to Dedue anyways.

- Chapter 17 Mission (Battle of Eagle and Lion Round 2): Forgives this map for being recycled. Exists to show how things have changed.

Showed how little has changed too. Sent Petra in to capture the center. Apparently triggered Alliance reinforcements from behind. Very close behind. Spliced a map fragment together showing your army's initial placement and the enemy reinforcement spawn location.
BL Chapter 16 Reinforcement Map.png
Occurred on Turn 2's Enemy Phase. Barely left the starting locations. Just began crossing the bridge with the main army.

Fine. Rearranged the formation to protect people. Redirected Dimitri to the Alliance side.

Claude (to Dimitri): "Calm down, Dimitri! What does it achieve, us killing each other here?"

Yes, what does it achieve? Worked with you to cross the Great Bridge of Myriddin. Marches towards the Empire. Planned to leave your side alone. Changed when you sent a nonsense rear attack and killed Byleth and Mercedes. Will exterminate the Alliance after dealing with the Empire now.

Provoked Edelgard with Petra. Expected a gambit at 20-30% hit chance. Nope. 49 damage, 100% hit chance. What? ...57 Charm on Edelgard (and Hit +20). Okay then.

Wishes for more consistency on what you can steal. Ladislava's equipped shield? Sure. An unequipped Sword of Seiros? No.

Won the battle. Revealed an opening for Fleche to get revenge. Failed their assassination attempt due to Rodrigue taking the blow. (Managed to die at the drop of a hat once again.) Asked Dimitri to stop living for the dead and instead go for what he believes.

Snapped Dimitri out of the revenge mindset. Felt too sudden. Deals with a very complex web of guilt, trauma, and perhaps low self-esteem. Blasted through that all in one night. Missed the mark on personal impact. Suffers none of what Dimitri does, fortunately. May hit someone who lives with some (or all) of this more squarely.

Other bits
- Qualified for Trickster with Dimitri for +2 luck. Ran into a small surprise in doing so. Requires passing the Thief exam before Trickster. Why? Never did that for any other classes.

- Other minimum class stat boosts: +2 Speed for Annette (Wyvern Lord), +1 Speed for Ingrid (Falcon Knight) (ouch), +2 Speed for Dimitri (Wyvern Lord), and +1 Speed for Dedue (Wyvern Lord).

- Poor Ingrid. Ties for the second highest Speed growth in the game at 60% (below Yuri's 65%). Stands at 25 Speed at level 30 as a Falcon Knight. Falls well short of Petra's 36 Speed (level 31) and Leonie's 34 Speed (also level 31) in the same class. Mentions Felix leading with 41 Speed (level 31 Assassin, +2 Speed over Falcon Knight).

- Pieced something together while exploring in Chapter 18. Heard about Caspar's uncle. Never knew that was Randolph. Makes Fleche Caspar's aunt. How old are these people?
Von Bergliez Family.png

Cuts it here. Backtracks to reclaim Fhirdiad next time. Should be a shorter update next time, in terms of missions. Cleaned out all the paralogues except Dimitri's. Thanks for reading.


Spoiler: Character Stats

Best Total Stats: 293 (Byleth)
Best Total Stats without Charm: 247 (Ashe)
Best Hitpoints: 67 (Dimitri)
Best Strength: 39 (Dedue)
Best Magic: 32 (Mercedes)
Best Dexterity: 44 (Ashe)
Best Speed: 45 (Felix)
Best Luck: 28 (Ingrid)
Best Defense: 31 (Dedue)
Best Resistance: 32 (Mercedes)
Best Charm: 54 (Byleth)

Worst Total Stats: 248 (Hapi)
Worst Total Stats without Charm: 218 (Hapi)
Worst Hitpoints: 41 (Mercedes)
Worst Strength: 24 (Ashe, Mercedes, and Hapi)
Worst Magic: 16 (Dedue)
Worst Dexterity: 19 (Dedue)
Worst Speed: 21 (Hapi)
Worst Luck: 14 (Dedue)
Worst Defense: 20 (Mercedes)
Worst Resistance: 16 (Dedue and Felix)
Worst Charm: 25 (Dedue)

Listed individual stats below. Placed Mysterious Teacher star rankings in parentheses.

Byleth
Level: 38
Class: War Master
Overall Rating: A
Hitpoints: 59 (5)
Strength: 35 (5)
Magic: 20 (1)
Dexterity: 29 (3)
Speed: 30 (5)
Luck: 25 (0)
Defense: 22 (3)
Resistance: 19 (2)
Charm: 54 (5)

Dimitri
Level: 40
Class: Great Lord
Overall Rating: A
Hitpoints: 67 (5)
Strength: 37 (2)
Magic: 24 (5)
Dexterity: 25 (0)
Speed: 28 (1)
Luck: 16 (1)
Defense: 28 (5)
Resistance: 16 (4)
Charm: 43 (5)

Dedue
Level: 36
Class: War Master
Overall Rating: A
Hitpoints: 66 (5)
Strength: 39 (5)
Magic: 16 (5)
Dexterity: 19 (3)
Speed: 22 (5)
Luck: 14 (0)
Defense: 31 (5)
Resistance: 18 (5)
Charm: 25 (5)

Felix
Level: 37
Class: Assassin
Overall Rating: A
Hitpoints: 51 (5)
Strength: 29 (0)
Magic: 22 (5)
Dexterity: 27 (5)
Speed: 45 (5)
Luck: 23 (4)
Defense: 25 (5)
Resistance: 16 (5)
Charm: 34 (5)

Ashe
Level: 47 (Not a typo)
Class: Dancer
Overall Rating: A
Hitpoints: 51 (5)
Strength: 24 (0)
Magic: 19 (2)
Dexterity: 44 (5)
Speed: 36 (4)
Luck: 26 (2)
Defense: 25 (5)
Resistance: 22 (0)
Charm: 37 (5)

Mercedes
Level: 39
Class: Gremory
Overall Rating: A
Hitpoints: 41 (3)
Strength: 24 (5)
Magic: 32 (3)
Dexterity: 25 (2)
Speed: 32 (5)
Luck: 21 (5)
Defense: 20 (5)
Resistance: 32 (5)
Charm: 34 (5)

Annette
Level: 38
Class: Wyvern Lord
Overall Rating: A
Hitpoints: 46 (5)
Strength: 26 (5)
Magic: 31 (1)
Dexterity: 22 (0)
Speed: 29 (5)
Luck: 22 (3)
Defense: 27 (5)
Resistance: 22 (5)
Charm: 37 (5)

Ingrid
Level: 38
Class: Falcon Knight
Overall Rating: A
Hitpoints: 46 (2)
Strength: 27 (5)
Magic: 24 (5)
Dexterity: 24 (3)
Speed: 30 (0)
Luck: 28 (5)
Defense: 22 (5)
Resistance: 27 (4)
Charm: 46 (5)

Petra
Level: 38
Class: Falcon Knight
Overall Rating: A
Hitpoints: 53 (5)
Strength: 29 (5)
Magic: 19 (5)
Dexterity: 32 (3)
Speed: 42 (5)
Luck: 23 (0)
Defense: 21 (5)
Resistance: 20 (5)
Charm: 35 (5)

(Screenshotted a glorious report with 5 stars for all of Petra's stats except Luck at 0. Expended zero stat boosters on anyone thus far, for the record, not counting the +movement boots on Ashe.)

Leonie
Level: 37
Class: Falcon Knight
Overall Rating: A
Hitpoints: 44 (2)
Strength: 30 (5)
Magic: 19 (5)
Dexterity: 35 (5)
Speed: 40 (5)
Luck: 25 (5)
Defense: 22 (1)
Resistance: 19 (5)
Charm: 39 (5)

Yuri
Level: 38
Class: Bow Knight
Overall Rating: A
Hitpoints: 42 (4)
Strength: 31 (5)
Magic: 23 (4)
Dexterity: 27 (5)
Speed: 32 (0)
Luck: 26 (2)
Defense: 21 (5)
Resistance: 25 (5)
Charm: 42 (5)

Hapi
Level: 39
Class: Valkyrie
Overall Rating: A
Hitpoints: 44 (3)
Strength: 24 (5)
Magic: 31 (3)
Dexterity: 28 (3)
Speed: 21 (0)
Luck: 19 (5)
Defense: 23 (5)
Resistance: 28 (1)
Charm: 30 (5)
 
24,623
Posts
3
Years
  • Age 35
  • Seen today
Spoiler: Fire Emblem: Three Houses Blue Lions Maddening Chapters 18 - Endgame

Resumes at Fhirdiad, the capital of Faerghus.

- Chapter 18 Mission (The King's Triumphant Return): Defends the center with three beefy Titanuses. Criticaled Byleth for 114. Backed them up with three archers (with longbows and the +5 range Deadeye combat art). No thank you.

Directed the main force up the left street with a single Titanus. Disabled the magic turrets with the right side's force (and maybe the Titanus's extra armor?). Prepared to converge the groups at the top of the map to tackle the four Titanuses sprinkled around. Triggered a reinforcement upon doing so: a single thief with a fancy bow. Sent Yuri to deal with it. Struggled to catch up, despite being mounted, due to the thief's large lead. Warped Petra in to help and successfully nab the bow.

...Suspects someone at Intelligent Systems (or a localization team) is giggling madly at slipping "Titanus" in. Noticed after spelling it a few times.

Cut down Cornelia. Blathered about Dimitri's stepmother (Edelgard's biological mother) causing the Tragedy of Duscur. Came off as a way to enrage Dimitri, rather than the truth. Shrugs. Recaptured the capital.

Um. Leveled up Gilbert as Dedue's adjutant during Battle free time. Reached level 35 as a Fortress Knight. Had 3 Speed. How is that possible? Checked promotions. Would gain 11 Speed permanently by passing the Wyvern Lord exam. Wow.

- Dimitri's Paralogue (Penta-Bolting Land): Entered a fortress in an attempt to retake it from the Empire before getting reinforced. Nope. Plunked down five Bolting mages in the north. Loves the Retribution gambit so much. Defeated all five on Turn 1 Enemy Phase.

Offers great rewards for the map: three stat boosters via stealing. Proved to be the major challenge. Appears in three of the map's corners. Took a while to move Felix around. Dealt with a slow, predictable trickle of lance cavalry reinforcements the whole time. Pried all three items from enemy hands successfully before defeating Hubert (who also had Meteor).

Discovered something interesting about the map. Evidently faces Hanneman and Manuela here, if not recruited. Did not expect both to side with the Empire. Always imagined professors following their house.

- Chapter 19 Mission (The Golden Deer's Plea): Received a message from Claude. Requests help. ...And? Appreciates others acknowledging what Claude did a few chapters ago.

Walked into a mess of a map. Overran this place with enemy units. Isolated Judith near the entrance. Notes some enemy cavalry to the side. Wishes to hand-deliver fancy weapons, apparently.

Credits the Empire for wising up. Prepared countermeasures against Dimitri: battalions on 75% of enemy units. Spread out the opening turn's Enemy Phase attacks a bit.

Clogged up the route to Claude. Fended off seven enemy units with a War Master and Sniper at a chokepoint. Backed it up with Elixirs and a Physic healer. Nice. Gave the Alliance allies enough stats to withstand it, thankfully. (Ditto for Judith.)

Planned to assault the chokepoint enemies until Lord Arundel moved. Moved Dimitri into position. Failed to one-shot Lord Arundel with a critical. Responded with a critical of their own. Rewound that. Called in Annette to rally Dimitri's strength. Replayed that turn for the win. Rescued Claude's jerk face. Expects heavy thanks.

...Handed over Failnaught. Dissolved the Alliance. Plans to head into exile. Accepts your peace offering. Technically succeeded at destroying the Alliance.

Hm. Forgot a lot about the Golden Deer's route. Remembers Claude talking about being an outsider, though. Met a lot of prejudice. Wanted a united Fodlan free of that. Feels a bit sad that their path ends in exile in this route. ...Oh well. Do not kill your allies next time.

Hands over information too. Locked up Rhea in the Imperial capital. Wondered why Rhea is captured in Azure Moon and Verdant Wind, but not Crimson Flower. Remembered the cutscene just before the timeskip. Swoops in to (try to) save you. Makes some sense.

- Chapter 20 Mission (The Impregnable Fortress): A more difficult map than expected. Rushed the middle. Ran into trouble on the sides as (fair) reinforcements flooded in. Was a bit restricted in movement due to the ballista and fire orbs scattered around, but not mention the increasingly standard Bolting and Meteor mages.

Stabilized after a few gambits and a few rewinds to reverse Dimitri's failure on either dodging gambits or one-shotting. Probably the latter. Became a slow, methodical push as roughly two reinforcements came in every other turn. Assaulted the ballista with Petra, because why should flying units fear bows?

Punched the Death Knight into oblivion. Only took...five tries(?) to make it stick. Prefers this map's version far more than Verdant Wind's. Chased down a fleeing Death Knight in that one. (Er...why did Those Who Slither in the Dark not nuke this city? Did killing Lord Arundel last chapter in this route change things? Seems so.)

Smirks. Looked at the dialogue for this map. Gives you special dialogue for Flayn against the Death Knight:
- Flayn: "So it's you, Death Knight! Remember me?!"
- Death Knight: "You again. Here to lose more blood?"
- Flayn: "Never! You will not lay a hand on me ever again!"

Interesting. Met with Edelgard to discuss the reasons behind this war. Was unconvinced by both sides, based solely on this exchange. Never explained the victims before the war on Edelgard's side. Ranted about power on Dimitri's side. Spoke on entirely different wavelengths. Enjoyed the history behind those two all throughout the story. Remembers hearing only a smidgen in Crimson Flower.

Approaches the endgame. Calls for doling out all the stat boosters. Knows how to distribute them better now. Tallied up the number of stat points from items. Recorded who they went to.
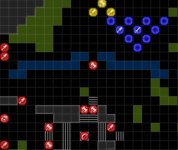
HP: +33
Strength: +19
Magic: +14
Dex: +26
Speed: +15
Luck: +41
Defense: +22
Resistance: +19
Charm: +21
Movement: +1

Byleth: +4 Strength, +2 Dex, +3 Speed, +6 Def, +1 Movement
Dimitri: +4 Strength, +6 Dex, +8 Luck
Dedue: +6 Dex, +8 Luck, +8 Def, +6 Charm
Petra: +5 Strength, +8 Luck, +2 Def, +2 Res, +3 Charm
Ingrid: +5 HP, +4 Strength, +4 Dex, +9 Speed, +2 Def
Felix: +1 HP, +2 Strength, +3 Luck, +2 Def, +4 Res, +4 Charm
Mercedes: +5 HP, +3 Magic, +3 Luck, +4 Res
Annette: +5 HP, +5 Magic, +4 Dex, +3 Luck, +4 Res
Ashe: +2 Charm (solely to cap it)
Leonie: +7 HP, +2 Def, +2 Res
Yuri: +5 HP, +4 Dex, +3 Speed
Hapi: +5 HP, +6 Magic, +8 Luck, +3 Res, +4 Charm

- Chapter 21 Mission (Our Chosen Paths): Chose the center path, straight to Hubert.

Functioned much like the previous map. Fended off the initial burst of enemies. Sent Petra and Ingrid after the long range weapons. Dealt with the boss after emptying the map. Fought a lot more monsters this time, though. Was surrounded by six monsters at one point (four in a perfect horizontal line). Ripped them apart with gambits.

Noticed the stat difference immediately on Ingrid. Rivals Petra now. Worries a bit against Lancebreaker axes, though.

Was not fond of the reinforcements on this map. Lucked out on a rear attack against Yuri. Canceled out a follow-up attack with their crest. Wheeled out more reinforcements near Hubert too. Thought Hapi was toast. Must not have been in range of a second enemy or something.

- Chapter 22 Mission (Oath of the Dagger): Begins right after the previous mission. Shows Edelgard doing a partial monster transformation. Never tipped their hand on anything like this in Crimson Flower.
FE16_Map_Oath_of_the_Dagger_Maddening.png
Scanned the battlefield for long range magic, as usual. Noticed an unfamiliar weapon: Bohr X. Range 3-10. Leaves the enemy at 1 hitpoint if it hits. Fun. Remembers a tome like that in Echoes too.

Sized up Hegemon Edelgard. Stands on a super healing tile (+40% evade, +5 to defenses, +30% heal). Has four health bars total. Main attack: range 1-32. Oh boy. Does not look forward to Vantage either. Seems to have a spammable ranged gambit. ...Twin Crests skill: Allows unit to act twice. Why does this seem far harder than the other final bosses?

Carted out a bunch of fancy weapons: Areadbhar, Crusher, Failnaught, Luin, Thunderbrand, Vajra-Mushti, and the Inexhaustible. Saved up all this for today.

Choked the left doorway with Felix and the center-left with Petra. Placed Dimitri in range of Myson, the Bohr X mage. Grouped up everyone else to race down the center.

Smashed Myson immediately. Appears to be with Those Who Slither in the Dark. Caused several of their units to leave the field. Cannot recall every seeing Myson in Crimson Flower. (Googled it.) Oh. Was the boss in Yuri's awful paralogue to save the fleeing duke. Shows up in one Verdant Winds map, but not in Crimson Flower.

Worried when the camera panned to Edelgard to attack on Turn 1. Never counted out the tiles. Figured the opening room would be safe. Covers the entire map except some of the far corners. Targeted two different people, fortunately: Mercedes for 27 damage (60% hit) and Dimitri for 12 damage (25% hit). Whittles away at Dimitri's battalion, however. Must take advantage of it now.
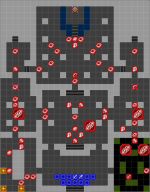
Hey! Warns you about the central stairs and reinforcements. Good job, game. Only took you until the last mission to be more transparent.

Met surprisingly few problems on the way to Edelgard. Cleaned the left side with Felix, minus the monster. Never bothered with anything on the right side. Did not appreciate four Boltings popping in near Edelgard to zap Byleth, however.

Important update: level 41 for Gilbert. Still at 3 Speed.

Gathered up everyone near Edelgard. (Blocked off the sides spamming reinforcements with Petra and Felix.) Prevents armor breaks. Does that still allow the barrier to fall? Yes. Okay. Feels winnable. Fired off Dimitri's Atrocity, Annette's Dust, and Yuri's Falling Star Heroes' Relic combat arts. Chipped in with others. Closed it out with Byleth and some dancing.
BL Final Boss Finisher.png
Downed Edelgard in a single round. Handled that so much better than expected.

Found Rhea. Crowned Dimitri as king of all Fodlan. Declared Byleth the new archbishop. Married Annette. Yay victory.
No Nose Annette.png
Where did Annette's nose go?

Final thoughts on Azure Moon
Rates it as "okay". Hinges on how much you connect with Dimitri, similar to other routes. Never resonated with Dimitri's struggles. Fell a bit flat. Felt like the war was almost a subplot also. Served more as a roadmap of Dimitri's mind. Never questioned a dragon's appearance at Garreg Mach. Served up an unsatisfying explanation for the war at the end.

Enjoyed one part of the main plot barely present in others: the connection between Edelgard and Dimitri. Propped up Dimitri's defeat in Crimson Flower as an emotional moment. Provided almost none of the necessary backdrop. Filled it in during this route.

Liked the story and investigation behind the Tragedy of Duscur. Melded with several Blue Lions supports well. Takes center stage more than the war, honestly. Would have preferred a more satisfying conclusion than implicating Dimitri's stepmother. Engaged with the current situation of Duscur too little too. Saved some Duscur people in Dedue's paralogue. Did nothing else.

Considers this the best house for characters. Discusses knighthood and ideals a lot in their supports. Presents the shining knight ideal with Ingrid and Ashe. Pushes against that with Felix and arguably Dimitri (with Dedue). Probably falters a bit with people outside their house, however. Viewed Felix as very critical and standoffish in Crimson Flower. Paints a better picture with Glenn's death in the Tragedy of Duscur and throwing your life away. Definitely considers Felix to be the best surprise in this playthrough.

Final thoughts on Maddening
No. Entirely comes down to reinforcements moving immediately. Hates that in any Fire Emblem game. Adds the wrong kind of difficulty. Would rather play on Hard and introduce restrictions.

Welcomed the extra stats and skills of enemies. Got off the ground easily enough, unlike some high difficulty modes. (Could have been the New Game+ benefits.)

Concludes this playthrough. Thanks for reading.


Spoiler: MVPs, Kills, Playtime, and Final Stats

Recorded all the MVPs in order. Did not catch the maps, other the the timeskip's place.
Byleth
Dedue
Felix
Byleth
Felix
Byleth
Felix
Byleth
Byleth
Byleth
Yuri
Yuri
Byleth
Dedue
Byleth
Yuri
Felix
Felix
Felix
Yuri
Petra
Felix
Petra
Yuri
Petra
Felix
Dimitri
Byleth
(Timeskip)
Byleth
Yuri
Byleth
Dimitri
Felix
Byleth
Petra
Dimitri
Byleth
Dimitri
Dimitri
Dimitri
Byleth
Dimitri
Dimitri
Byleth
Felix
Petra

By total number of MVP awards:
Byleth: 15
Felix: 10
Dimitri: 8
Yuri: 6
Petra: 5
Dedue: 2

Expected more Byleth MVPs than that, honestly. Forgot how good Felix was early. Regained some of that glory after grinding out a few skills late.

Character: Battles/Victories
Constance: 0/0
Balthus: 0/0
Anna: 0/0
Cyril: 0/0
Catherine: 0/0
Manuela: 0/0
Hanneman: 0/0
Flayn: 0/0
Hilda: 0/0
Ignatz: 0/0
Lorenz: 0/0
Bernadetta: 0/0
Ferdinand: 0/0
Shamir: 1/0
Alois: 1/0
Gilbert: 1/0
Lysithea: 1/1
Dorothea: 1/1
Seteth: 2/0
Marianne: 2/2
Linhardt: 2/2
Caspar: 3/2
Raphael: 6/2
Mercedes: 764/157
Felix: 812/330 + Sylvain: 8/3
Hapi: 995/187
Leonie: 999/241
Petra: 999/298 + Ashe: 999/131
Ingrid: 999/307 + Yuri: 999/298
Dimitri: 999/383 + Dedue: 999/254
Byleth: 999/354 + Annette: 999/279

Order by victories of the main team:
1. Dimitri: 383
2. Byleth: 354
3. Felix: 330
4. Ingrid: 307
5. Petra/Yuri: 298
7. Annette: 279
8. Dedue: 254
9. Leonie: 241
10. Hapi: 187
11. Mercedes: 157
12. Ashe: 131

Aw. Stops counting after 999 battles. Cannot believe Felix got so few battles.

Gleans only so much information from this, sadly. Spent tons of free time battling. Fed Ingrid kills. Sped through some with Dimitri to end it quickly.

Still gives Petra the overall MVP, despite not being highest on anything. Handled objectives and tanking more reliably than Dimitri (the honorable mention). Could not use Dimitri's gimmick much around monsters (possibly uncrittable and too much health) or ballista/fire orbs (not counterable). Outweighs Dimitri's killing power.

Notes a strong anti-marriage bias in these random pairings. Generally selects even numbers of male and female units (6/6, in this case) for supports. Is not sad about Dimitri + Dedue. Did not see Felix + Sylvain coming. Sank most marriage opportunities between those two pairings. (Wishes for a few more same gender pairings, solely for more paired endings. Probably would have gotten Annette + Mercedes, though, if not for marrying Annette.)

Total playtime for this route: 91 hours, 3 minutes. Completed Crimson Flower in 65 hours, 13 minutes and Verdant Winds in 81 hours, 18 minutes, for comparison.

Grabbed everyone's stats at the start of the last mission.

Byleth
Level: 45
Class: War Master
Hitpoints: 64
Strength: 43
Magic: 22
Dexterity: 35
Speed: 36
Luck: 29
Defense: 32
Resistance: 21
Charm: 66

Dominated the early game with the Chalice of Beginnings. Could not keep up with enemy stat gains, however. Fulfilled the role of monster slayer exceptionally late-game. Appreciates a strong gauntlet user.

Dimitri
Level: 47
Class: Great Lord
Hitpoints: 74
Strength: 48
Magic: 25
Dexterity: 35
Speed: 29
Luck: 26
Defense: 33
Resistance: 18
Charm: 53

Spent most of the early game being fed kills. Became monstrous after finally setting up Battalion Wrath and Vantage. Felt like a very bad Dimitri. Estimated a few stat averages. Performed reasonably close. Moral of the story: never go cavalry. Drops your Speed like an Armor Knight.

Dedue
Level: 45
Class: War Master
Hitpoints: 75
Strength: 45
Magic: 18
Dexterity: 27
Speed: 23
Luck: 23
Defense: 44
Resistance: 20
Charm: 44

Began as a weak to middling unit. Earned little in Dexterity and Speed. Absorbed hits okay. Compared poorly to those dodging it completely. Turned it around with Quick Riposte. Leaned more into Defense too. Became a viable tank. Would have been a good gauntlet user as well.

Reached S-Rank after the stat boosters, also. Was one of two units to do so.

Felix
Level: 45
Class: Assassin
Hitpoints: 57
Strength: 39
Magic: 25
Dexterity: 33
Speed: 51
Luck: 30
Defense: 29
Resistance: 16 (5)
Charm: 34 (5)

Followed a U-shaped curve, in terms of power. Began strong. Dropped off without Alert Stance. Wanted a more mixed-phase unit. Never materialized. Grinded out Alert Stance and Weight -5 near the end. Improved massively.

Hm. Base value of 46 Speed without the Assassin modifier. Begins with 9 Speed at level 1. Earned 35 Speed level ups in 44 levels (79.5%). Beats Felix's average, even when assuming Assassin for all 44 levels (Felix's base 55% + Assassin's 20%). Spent the first 19 levels as a Commoner (0%) or Thief (10%), plus a few odd levels while grinding skills.

Ashe
Level: 54
Class: Dancer
Hitpoints: 54
Strength: 25
Magic: 22
Dexterity: 48
Speed: 39
Luck: 29
Defense: 28
Resistance: 24
Charm: 43 (Capped)

Salvaged a very poor unit. Zipped to anyone with ease with the +movement boost and a March Ring. Dodged the rare threat reliably.

Base 24 Strength without the Dancer class. Starts with 8 Strength. Earned 3 Strength from Fortress Knight. Picked up 13 Strength level ups in 53 levels (24.5%). Figures a 30% Strength growth (Ashe's 35% - 5% from Dancer) at worst. Absolutely chose the correct person for Dancer.

Mercedes
Level: 45
Class: Gremory
Hitpoints: 47
Strength: 27
Magic: 39
Dexterity: 29
Speed: 36
Luck: 25
Defense: 22
Resistance: 39
Charm: 43

Healed for the majority of the game. Filled that role well. Ran across too few groups of mages to be handy for combat.

Annette
Level: 45
Class: Wyvern Lord
Hitpoints: 56
Strength: 33
Magic: 40
Dexterity: 28
Speed: 32
Luck: 27
Defense: 29
Resistance: 28
Charm: 43

Underwhelming. Hit very hard at the end. (Remembers some 72 damage normal hits on Fortress Knights.) Fell short of the kill often, however. Struggled on the defensive. May have been better off as a Dark Flier.

Ingrid
Level: 45
Class: Falcon Knight
Hitpoints: 56
Strength: 36
Magic: 25
Dexterity: 31
Speed: 44
Luck: 32
Defense: 25
Resistance: 34
Charm: 56

Terrible before the stat boosters. Distrusted Ingrid against swords, even with Swordbreaker on. Faced a lot of high damage double attacks at 50-50 odds.

Petra
Level: 45
Class: Falcon Knight
Hitpoints: 58
Strength: 38
Magic: 21
Dexterity: 37
Speed: 49
Luck: 35
Defense: 25
Resistance: 22
Charm: 47

Reclaimed the title of All-Star (and the literal All-Star of S-Rank with five stars in everything after the luck boosts). Completed every task asked of them. Flew in the face of arrows and ballista multiple times. Cannot recall Petra ever dying. (Probably did once or twice.)

Leonie
Level: 44
Class: Falcon Knight
Hitpoints: 55
Strength: 32
Magic: 20
Dexterity: 36
Speed: 47
Luck: 26
Defense: 28
Resistance: 22
Charm: 47

Eh. Planned to use Point-Blank Volley. Rarely did. Lacked reliable defenses, especially without Alert Stance+ in the build.

Yuri
Level: 45
Class: Bow Knight
Hitpoints: 51
Strength: 35
Magic: 26
Dexterity: 35
Speed: 39
Luck: 31
Defense: 23
Resistance: 27
Charm: 51

Excellent in the early game. Middling in the late game. Dropped off hard in Speed. Expected better of the highest base Speed growth in the game (65%). Received no favors from Bow Knight, admittedly (-5% growth).

Hapi
Level: 45
Class: Valkyrie
Hitpoints: 52
Strength: 26
Magic: 39
Dexterity: 30
Speed: 23
Luck: 27
Defense: 25
Resistance: 35
Charm: 42

Amounted to magical artillery. Stacked +4 dark magic range from Valkyrie, a skill, and Thyrsus. Failed to shine with such terrible Speed.
 

Nah

15,940
Posts
10
Years
  • Age 31
  • Seen yesterday
I take it since Hanneman and Manuela teach a different house depending on the route, they didn't want to bother having varying post timeskip scenarios depending on which house they were with if not recruited. There's plausible reasons as to why both of them would side with Edelgard/the Empire if not recruited I think.

....it also took me a moment to get what you were saying about the mech names lol

But anyway congrats on making it through a Maddening playthrough
 
24,623
Posts
3
Years
  • Age 35
  • Seen today
Pokemon Moon Challenge Run
Recorded a custom challenge run of Moon here. Short explanation of the challenge: Begins with heavy restrictions. Buys (semi-random) Pokemon and lighter restrictions with in-game money.

Enjoyed the playthrough. Made some tough calls between getting more Pokemon, lighter restrictions, and saving for better odds/deals. Outpaced the prices in the last third of the game, unfortunately. Fixes that easily enough for future runs, at least. Succeeded at forcing different Pokemon than usual too.

Voice of Cards: The Isle Dragon Roars (Demo)
Was drawn in by the aesthetic. Suggested decent combat mechanics. Deserved a shot.

Controls a party from the Ivory Order. Tasks you with retrieving an important vial. Chases the thief to a cave. Recovers the vial. Ends the demo with the titular Isle Dragon...roaring.

Fizzled badly from a story standpoint (for a demo, anyways). Introduced three completely different people in the Direct. Presumably plays as them for the entire game. Ought to draw in your audience with them. Never appeared once. Understands nothing about the looming conflict either.

Gives the combat some sideeye. Seems simple. Lists your hero's attack and the enemy's defense. Assumes "Attack + Modifiers - Defense = Damage". Cannot trust that, however. Found an example from a video:
Hero: 11 Attack
White Light: "Deals ATK + 10 Light damage"
Enemy: 2 Defense
Result: Strikes for 9 damage, then for 10 damage. Worded that attack a little poorly. Expected only one hit. Makes sense still.

A little later, versus some mushroom monsters...
Hero: 12 Attack
White Light: "Deals ATK + 10 Light damage"
Enemy: 4 Defense
Result: Strikes for 10 damage, then again for 10. ...What? Should be 18 total damage, not 20. Signaled no kind of weakness, resistance, or critical on that attack. Is there a hidden damage variance? If so, then why present the information? Undermines it.

Hoped for more complexity via different equipment or skills. Holds little hope on that front.

Refrains from complaining about difficulty. Expects none from a demo. (Blazed through. Probably never fell below 75% health on anyone.)

Passes on this. Commends it for style. Utters little praise beyond that.

Earthbound Challenge Run
Returned for another playthrough. Probably broke into double digits for playthroughs of this game. Describes it as a comforting experience. Wishes to add a bit of new life into it with restrictions. Tried to disincentivize strong abilities or tie them to unused strategies. With that in mind:

1. Ness's restriction: Must eat a Bag of Fries (with Ketchup upon reaching Twoson) before every use of PSI Rockin'. Slows down the move on top of clogging up inventory space. Made "Fries" Ness's favorite food, of course.

2. Paula's restriction: Must Pray before every use of PSI Freeze or PSI Thunder. Allowed free use of PSI Fire, as the least used offensive move.

3. Jeff's restriction: Cannot use any kind of Bottle Rocket, Bomb, or Bazooka. (Applies to other characters too.) Sees Bottle Rockets banned commonly. Joined the bandwagon.

4. Poo's restriction: Must use Mirror before every use of PSI Starstorm, PSI Freeze, and PSI Thunder. Permits free use of PSI Thunder two ranks below their maximum (minimum Alpha). Never uses Mirror. Slows down more powerful PSI too, much like the other restrictions.

5. An unofficial restriction: Cannot despawn enemies to clear a path. Avoids more dangerous enemies with this trick. Turns longer dungeons back into tests of endurance with this rule. Decided to add this shortly after starting up the game.

Notable bits:
- Died to the first or second enemy. Landed maybe one hit on a Spiteful Crow in four turns between Ness and King. Tried to run for a few turns. Nope. (Tip: Do not attempt to run. Increases your odds for each passing turn. Depends on your speed too. Gave Spiteful Crows 77 Speed for some reason. Beat the game with 56 Speed on Ness, for comparison.)

- First kill for the "no despawn" rule: two Ramblin' Evil Mushrooms outside Onett. Stuck a mushroom on Ness's head. Beaned himself for over half his health.

- Curses these Spiteful Crows. Stole some of Ness's fries and ketchup. So much for PSI Rockin'.

- Remembers why Pray is so bad again. Made everyone feel strange on the first one. Tried PSI Freeze anyways. Resulted in a self one-shot (easily).

- A great case of all the rules in tandem: the Gold Mine. Ran far lower on PP than usual. Left the dungeon twice to replenish, rather than one attempt. Discovered how vicious the Guardian Diggers are as well. Usually drops them with PSI Freeze on turn 1 (or nearly). Dealt with multiple Smaaaash hits that take out Paula or Jeff in one blow.
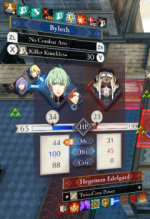
- Hates Pray so bad. Confused everyone on the Kraken fight en route to Scaraba. Could not land Lifeups on the right people. Wound up with Paula alone at 9 hitpoints at one point. Clutched a comeback with more prayers. Eventually got the one that resurrects everyone. (1 in 16 chance for the Resurrect Pray. Equals the Confusion Pray's odds, supposedly. Got the latter a lot more often.)

- Tossed a PSI Flash Beta at the Plague Rat of Doom (Sanctuary 5 boss). Turn 1 insta-kill. Nice. Compensates for some of the bad Flash luck from enemies doing the same.

- Remembers why Mirror is garbage. Knew about the bad odds of success beforehand. Did not know about it removing current shields or breaking from Neutralizer-type moves. Finished several fights before accomplishing anything.

- Picked up a Sword of Kings. Only took 15-20 Starman Supers. Not bad for a 1 in 128 drop. Helps Poo considerably, given how much Bash will be used.

- Soured on PSI Freeze with the Starman Deluxe fight (Stonehenge base boss). Confused everyone with Pray again. Healed Starmen multiple turns in a row. (Dealt with Homesickness too.) Lost after the party killed themselves without breaking confusion. Never even saw PSI Starstorm from the boss (on that attempt). Calls it a restriction success, on the plus side.

- Lost a Packet of Ketchup on the road to Giygas. So much for PSI Rockin' again.

Gives the challenge a thumbs-up. Slowed down battles. Allowed mean monsters to do their thing. Tried uncommon tactics more, such as PSI Brainshock, Defense Shower, and PSI Defense Down. Met some success with Brainshock. Noticed no difference from defense changes.
 
24,623
Posts
3
Years
  • Age 35
  • Seen today
Commander Keen (Episode One: Marooned on Mars)

Chose this game for this month's Game-Along. Played it as a child, along with several others in the series. (Probably fiddled more with the fifth game. Guesses this to be second-most played in the series.) Revisited it a few years ago as well. Released it in late 1990. Shares a release year with the original Monkey Island, King's Quest V, and Super Mario World.

Describes this as a very basic platformer. Jumps and enters stages with Ctrl. Whips out the pogo stick with Alt. Fires a ray gun (with limited shots) with Ctrl + Alt. Pauses with Spacebar. Nothing else. Contains enemies simple enough to walk into death pits.

Commander Keen 1 Monster.png

Seeks four ship parts to repair your "Beans with Bacon Megarocket": Everclear, a Joystick, a Vacuum Cleaner, and a Car Battery. Scattered the pieces across Mars. Appears next to the exit in certain levels. May opt to skip multiple locations, as a result. Probably only requires you to beat about half the levels.

Discovered one big hazard with the pogo stick. Bounces higher by holding Ctrl while on the pogo stick. Held Alt and an arrow key at first. Flips your screen by holding Ctrl + Alt + Arrow Key, however.

Blazed through the game without too much issue. Beat it in maybe an hour. Hits you with a few tight, dangerous jumps from time to time, but not many. Died once or twice to a monster (surprisingly) lunging or getting locked down by a robot's push before getting fired upon. Booked it for the last level after running low on lives, also.

Highlights one part of the last level. Grabbed a level map from a wiki for better visibility. Cropped it to the relevant part.

Commander Keen Last Level.png

Provided a hint about this earlier. Told you your raygun was needed at the end, but not for the commander. Looks identical to the guards in earlier levels, however. Bet on some way to make the cement block fall. Could not see much of the ceiling. Missed the solution.

Lacked the shots to defeat a normal guard. (Good thing, too. Takes four shots for normal guards, but 105 for this commander.) Risked jumping over the boss (who randomly jumps also) instead. Escaped death. Snagged the Everclear before automatically exiting too.

Preserved one amusing bit in the Steam collection: the advertisement for the other two games in the trilogy. Lists instructions for how to order them. Sounds strange to mail a game company nowadays.
 
24,623
Posts
3
Years
  • Age 35
  • Seen today
Celeste

Played Celeste for this month's Game-Along. Heard positive things about it. Lost interest upon learning its genre: precision platformer. Caught glimpses of games like Super Meat Boy. Never looked particularly fun. Received Celeste as a gift, however. Prompted a try.

Controls Madeline. Decided to climb Celeste Mountain partly to overcome mental health issues and partly as a self-challenge. Encounters strange occurrences on the mountain, such as a reflection of Madeline becoming real. Quickly realized how everything is a metaphor for Madeline's struggles. Finds feather power-ups after learning a calming trick involving a feather, for example. Enjoyed watching the story unfold. Always awaited more dialogue.

Cared less for the gameplay. Lays no blame on the controls. Worked as expected. Planted checkpoints everywhere too. Retried portions with minor time loss. Simply never felt any pleasure from grabbing a tough strawberry (a collectible), ferreting out secrets, or moving forward. Would not call it unpleasant either (generally). Describes it in duller terms: jump, dash left, hold neutral, fall into stamina gem, dash up-left to wall, climb, and then jump to safety.

Nearly forgot one bit, fittingly: the music. Supposedly features a great soundtrack. Remembers none of it. Definitely had sound. Likely tuned it out from concentration. Happens fairly often in games. Experienced little downtime during levels to hear anything. Focused on figuring out how to move forward, actually moving forward (with a plan or not), or searching for breakable walls/secrets.

Seems like a good precision platformer game. Recommends it to people who like that genre or wish to try it. May not change your opinions if you do not, however.

Final stats
Strawberries: 104/175
Deaths: 812
Time: 5:46:54.477

Acquired three B-Side tapes and a yellow, circular gem. Missed all the crystal hearts. Saw two crystal hearts (one at the hotel and one behind six gems).
 

Ivysaur

Grass dinosaur extraordinaire
21,082
Posts
17
Years
Commander Keen (Episode One: Marooned on Mars)
.

I'm super-late but seeing this has a ridiculous nostalgic value for me... even if I did play the game once I already was a PC member, so like, a decade and a half after it was released. Still, I did not expect to hear about it anywhere in the internet I visit nowadays!
 
24,623
Posts
3
Years
  • Age 35
  • Seen today
FTL​

Themed this month's game along on ships. Followed it with this roguelike spaceship game. Helms a spaceship with information vital to the rebellion's defeat. Travels through eight sectors in space. Culminates in a final battle versus the Rebel Flagship.

Played this game before. Always gravitated towards one of two strategies: stacking lasers/flak or boarding crews. Offers so many weapons and ship systems, however. Sought a different experience. Banned laser and flak weapons (until able to defeat a ship otherwise) and boarding crews.

Attempt 1: Drone Focus
Tetragon Ship.png
Set off on Tetragon (Engi Ship Layout C). Begins with a Beam Drone and a laser weapon. Selected this ship for its augment: Defense Scrambler. Prevents enemy drones from disabling your offensive drones or shooting down missiles. Counters the drone counter, essentially. Viewed this as essential, given drones as the primary damage source.

Could not escape using the laser weapon, due to the Beam Drone being unable to pierce shields. (Bought an Ion weapon at the first chance. Excels at disabling systems, such as shields.) Tore out across the vast expanse of space in search of more scrap (currency) and drones.

Notes one shortcoming of drones: limited resources. Expends one drone part per deployment. Costs 8 scrap each at the store. (Comparison: Sells laser weapons for 50-95 scrap, depending on power.) Lasts the whole battle, barring getting shot down. Loots drone parts from defeated ships, however. Winds up with tons on non-drone playthroughs.

Quickly discovered another flaw in the drone tactic. Controls what the ship's weapons target. Cannot command drones beyond attacking the ship. Buzzed around without any sense of priority, such as damaging weapons or shields. Suffered a lot of damage as a result. Reached Sector 7 before exploding from a severe lack of good drones and weapons.

Hates the Clone Bay, as well. Rarely played with it. Was caught offguard by the Clone Bay getting hit. Purges your clone banks very quickly until repaired. Preserves them with a specific augment. Did not have that. Lost three crew between two battles.

Attempt 2: Missile Focus
Bulwark Ship.png
Captained the Bulwark (Rock Ship Layout A) next. Begins with two missile weapons and a massive stockpile of 28 missiles. Beats all other ships on the starting number of missiles.

Never used missile weapons for a reason. Ignores enemy shields, which is great. Expends a missile for every shot, however. Occasionally misses too. May have come out negative in scrap from missile costs for the first sector dogfights. Risks running out as well. (Spent maybe four missiles per ship. Receives some back from the enemy ship's remains, though.)

Bought a very important upgrade in the shop: Explosive Replicator. Saves a missile 50% of the time. Cuts down on both consumption and ammunition costs.

Aced the middle sectors. Realized a burgeoning problem too late: increasing enemy ship health, but not a corresponding damage increase. Cost more and more missiles to win each fight. Earned more than enough scrap to pay for missiles. Became a problem of ammunition scarcity now.

Reached the final sector. Engaged the Rebel Flagship. Blasted off a chunk in Phase 1 (of 3). Pursued for Phase 2. Ran dry on missiles. Never bought any non-missile weapons. (Considers other weapons useless without planning around them.) Broke off in hopes of resupplying. Found none. Lost as the flagship captured the Federation Base.

Attempt 3: Beam Focus
Nisos Ship.png
Soured on missiles. How about beam weapons? Sat in the command chair of the Nisos (Federation Cruiser Layout B). Features an Artillery Beam. Rips across ships every 40 seconds (upgradeable down to 20 seconds). Ignores shields, unlike other beam weapons.

Avoided beam weapons in general. Requires the enemy shields to be down to work, usually. Packs on a lot of shield charges late-game. Works okay in tandem with ion weapons. Winds up with poor damage because of filling most weapon slots with ion weapons, though. Could improve with drone support. Costs a lot of scrap to set up a mediocre payout.

Begins with a laser weapon, a weak missile weapon, and the Artillery Beam. Banned the laser weapon. Costs maybe 7 missiles to take down an early-game ship with just the missile launcher. Pays scrap to down a ship, essentially. Waited on the Artillery Beam instead. Literally got up and walked around while waiting for it to charge. Went further south as weapon upgrades failed to show up. Nope nope nope.

Attempt 4: Back to Drones
Torus Ship.png
Dropped the difficulty from Normal to Easy by this point. Returned to drones. Seemed the more reliable (and less infuriating) method of success. Switched to The Torus (Engi Ship Layout A). Sacrifices the Defense Scrambler. Begins with a solid ion weapon and a Combat I drone. (Fires lasers with the Combat I and II drone. Allows that.) Launches with a much more solid start.

Was starved so hard. Absolutely refused to sell any offensive drones or ion weapons until over halfway through the game. Finally bought another Combat I drone and two more ion weapons. Rejoiced as hope dawned.

Ran into disaster shortly after: a stream of enemies with Anti-Drone defensive drones. Shot down the combat drones immediately. Fled from one fight to the next. Exploded from the tsunami of hard counters.

Attempt 5: More Drones

Stuck by The Torus. Hoped to translate better luck into lower operational costs. Received some in the form of a second Combat I drone.

Foresaw a potential problem: the ship's drone part reserve. Threatened long-term success by deploying all drones every fight. Held back to prevent a catastrophe like the missile run.

Flitted from store to store. Desperately sought the Defense Scrambler augment. Bought a second ion weapon and the final Combat I drone. Happily forked over 50 scrap for the Drone Recovery Arm. Recovers your drones (and thus, the drone part) at the end of battles. Unleashed the ship's full potential with that. Never found the vaunted Defense Scrambler or even the Cloaking system (a short-term damage dodge).

Reached the final sector. Stumbled across no Anti-Drone drones thus far. Remembered the Rebel Flagship popping out drones for Phase 2. Might include Anti-Drone drones. Upgraded Weapons to allow bringing the Fire Bomb online. Teleports a fire bomb onto the enemy ship. Serves as a possible way to disable any Anti-Drone drones.

Cannot recall ever fighting the Rebel Flagship without Cloaking. Prioritizes it on this battle in particular. Fires tons of weapons in Phase 1, a temporary swarm of drones in Phase 2, and a 7-laser burst in Phase 3. Dodges most of that with a well-timed Cloak.

Disabled the Rebel Flagship's major weapons in Phase 1. Suffered maybe 15% damage only. Caught up for Phase 2. Never sent any Anti-Drone drones out. Perfect. Took a bit more damage--perhaps 20%--mostly from the drone swarm ability. Pursued the fleeing ship for Phase 3.

Struggled versus Phase 3. Forgot to repair some systems damage between phases. Still went well...until the laser burst. Carpeted the Torus's systems with laser fire. Damaged the shields, weapons, and drones. Became a standstill as both ships raced to repair weapons, drones, and shields. Won that on the back of four Engies (faster repair speed crew). Endured another laser blast at the cost of more hull and systems damage. Finally brought the Rebel Flagship down.
FTL Torus Victory.png
Scored 3224 points. Wound up being a good challenge. Really emphasizes how weak this build is to others, though. Supplements a traditional build, sure. Works poorly by itself.
 
Last edited:
24,623
Posts
3
Years
  • Age 35
  • Seen today
Tactics Ogre: The Knight of Lodis

Dug up this old Gameboy Advance game a few years ago. Never played it back in the day. Probably belonged to a sibling. Paid less attention to tactics-style games then.

Opens with a Fortune Teller. Asks questions to develop your character. Answered the following:
1. Bear which burden? Truth.
2. Walk which path? Longevity.
3. Design which plan? Wisdom.
4. Swear which oath? Fruition.
5. Share which vision? Bliss.
6. Shape which future? Peace.

Resulted in a Water-elemented, Chaotic main character with balanced stats and a starting Ninja and Cleric. Uh...okay. Tried to pick good-oriented decisions. Evidently chose all Chaotic answers. Should have walked the path of Wealth, swore an oath of Purity, and shared a vision of Peace or...Terror...for a Lawful alignment. Whatever, game.

Set off on the first few missions. Expected something like Fire Emblem between recruiting most enemies and permadeath. Turned to X-Com vibes after discovering friendly fire and 60% hit rates. Influences hit rate heavily by angle of attack. Suffers hit rates like 60% (and worse) for head-on attacks. Fares better on side attacks. Jumps up to 99% for most rear attacks. Will not counterattack on rear attacks either.

Hunted for basic information quickly. Felt starved on knowledge. Presented things like this:
Tactics Ogre Terrain.png
Indicates the element adjustments for the tile. (Gave you some information in the tutorial and in a Tips section. Did not realize Select brought up a tooltip either. Cycled through item information like Physical/Magical Attack without tooltips. Figured that was it.)

Proceeded further. Noticed two worrying trends:
1. Underleveled. Bumped up enemy levels by 2 every map. Earned that much experience on maybe one character per map. Recruited higher level enemies on the battlefield to try to alleviate it. Simply reset the problem.
2. Low funds. Costs 540 Goth for Hard Leather Armor, the most basic. Charges 400 for basic damage and healing spells. Forked over ~1500 Goth for a low level Hawkman already. Gives you 3600 Goth before the 9th map. Struggled just to outfit units.

Solved the above two problems in curious ways.

- Training Battle: Accesses this at any time on the overworld. Pits your own units against each other. Grants experience like a normal battle. Cannot die here. Might as well call it "Grind Mode".

- Quest Mode: Picks this before choosing "Story Mode" on the main menu. Unlocks this after Battle #4. (Good luck fighting level 15 units with your level 5s when unlocking this, though.) Fights a 5 on 5 battle. Earns rewards based on the objective (Defeat All / Defeat Leader) and a self-imposed turn limit. Turned off perma-death here too. Replays this as many times as desired.

Rewards stupidly good items in Quest Mode. Beats some equipment sold in endgame shops. Awards even stronger items with later Quest Mode maps also.

Praises this game for containing some meaningful story choices. Missed it so much. Features one very outsized decision at the end of Battle #6. Discusses trying to find the home of the mermaids. Suggests capturing one, then following it home. Your choices:
A: "I've no better ideas..."
B: "It doesn't seem right."

Amounts to Fire Emblem: Fates's decision between Hoshido and Nohr. Sends you down one of two routes from here. Sides with entirely different people.

Progressed onward. Noticed more flaws with more familiarity.

1. Map and encounter design
Designed most of these maps with the highest elevation in the top-left or top-right. Understands this decision. Eliminates blind spots in the map. Created most maps with a few levels of elevation.

Becomes problematic when you almost always start at the bottom of the map. Increases attack range for ranged units (or maybe just bows) by 1 for every elevation level. Hurts your back row while significantly boosting theirs. Effectively turns archers into an enemy-only class. Stitched together some screenshots to convey this.
Tactics Ogre Bow Range Complete.png
Sniped the bottom-left fairy from the top edge of the castle ramparts. (Probably could have hit the fairy a few more tiles away too. Plinked the healers ~4 tiles further back from a center rampart position.) Shows the fairy's attack range in brown. Comes nowhere close. Often lacks the defense to approach the battle. Compares their defense to spellcasters.

Adds one more point on encounter design: repetitive objectives. Recalls two "Protect X" maps. Defeated the leader or all enemies for the remainder. Supplements this one bit of praise: decent AI on protect maps. Ran away from enemies. Screws this up in so many games somehow.

2. Underused and hidden mechanics

Favored weapons: Will simply quote the in-game tip.
Weapon Proficiency:
Some characters have particular weapons they are good at using. They may be able to damage an opponent more severely with that weapon than with a more powerful one. Since this information will not be displayed, you'll have to experiment in Training Mode to discover the best weapon for each character.

Tells you a class's favored weapon in the class's tooltip. Simply chooses not to display the damage boost on your character's stats page. Acts similarly obstinent with weapons matching your character's element.

Elemental mechanics: Devoted time to these. Showed the terrain elemental advantages earlier. Developed spells to affect weather. Burns away snow with fire spells. Amounts to little difference in damage. Noticed a possible difference in receiving damage from, say, Fire on Fire versus Fire on Water. Swings from maybe 110 damage on a weakness to 90 on a resistance? (Knows no damage calculations.)

Mental Gauge: Ranges from -2 to 2. Affects hit rates and damage slightly. Influences this via emblems. (Emblems: Sort of like character achievements. Allows you to access other classes too.) Never even noticed it. Typically affects units within three spaces. Displays no lens for this.

Biorhythm: Goes through ups and downs in Luck. Discovers your character's spot in your biorhythm through fortunes.

Luck: Finds no good information on this. Never tells you your Luck directly. Affects a lot of things, supposedly, from stat gains to finding better items. Includes hit rates without telling you. May say 99% accuracy for an attack. Could be actually less than that with bad luck.

Leads to a serious question: what is the point of giving information if it is wrong?


3. War Trophies

Places a bag at the feet of most defeated enemies. Contains unique weapons, armor, and spells sometimes. Cannot discern its contents before picking it up. Must stand on that space to do so. Automatically receives any war trophies remaining on the battlefield after the fight.

Loses these war trophies if picked up by an enemy. (Sounds familiar to Triangle Strategy players, at this point.) Will not drop it if defeated either. Effectively deletes it. Missed out on a best-in-slot(?) spear and Petrifying Cloud because of it. Could have missed out on Resurrection and some set piece armor too. Hates this mechanic a lot for including unique items.

_______________


Rambled enough about the finer details. Deviated from the usual map-by-map description of a game. Remarks on little else regarding that, though. Ran out of steam for interesting bits after the first third of the game. Threw a curveball twice by forcing you to split your army. Turned into a slog between tanky enemies (with healing spells), fewer strong units, and extra caution against high-range archers.

Ended the game on a sour note as well. Barely called in reinforcements all game. Reared its ugly head against the final boss. Combined two awful problems: randomly-placed reinforcement units which act immediately and an instant-death chance weapon. (Never saw any other enemies with such a weapon. Could have gotten this weapon in Quest Mode, however.)

Sees no "good" ending in this game either. Winds up with a major character sacrificing themselves to save the evil angel in every ending. Wound up an exile in the A route ending. Missed the A+ ending by not beating the game in under 25 hours. (Only adds an extra scene. Calls back to an earlier Tactics Ogre game.)

Final verdict: Calls this an okay game, despite the complaints above. Appreciated the different class options and emblem system. Added great replayability with two separate routes. Flubbed too many mechanics to seriously consider a second playthrough, however.

Final stats:
Tactics Ogre End Stats.png
(Savescummed deaths away, for the record. Happened very rarely outside the final boss and trying for Angel Knight. Credits running two healers.)
 

Lycanthropy

[cd=font-family:Special Elite;font-size:16px;color
11,037
Posts
10
Years
I remember playing Tactics Ogre back in high school. I don't recall the level curve being that steep (but then again, I played it like a decade ago), but I do indeed remember how repetitive the game was, to the point that I got bored and dropped the game entirely. A shame, really.

I loved reading your in-depth thoughts btw!!

2. Underused and hidden mechanics

Ugh, I hate it when games do this. What even is the point of showing stats and numbers if nobody ever explains what any of it means???
 
24,623
Posts
3
Years
  • Age 35
  • Seen today
Rune Factory 5​
(Mentions a few spoilers. Deals mostly with completion times and unlocking stuff.)

Entered this game with tempered enthusiasm. Loved Rune Factory 4 Special (as evidenced by multiple posts here). Heard about various framerate issues. Dreaded the jump to 3D too. Favors the graphics and control of 2D games. Tends to be rough on the initial transition too (see: Sonic's camera, Golden Sun's worse graphics, less colorful Pokemon models).

Found a lot of familiarity. Functions under many of the same systems at 4: crop leveling, soil stats, tons of little skills, crafting (including most inheritance rules), taming monsters, and request progression. Introduced a few new things, like the Catching Skill, Farm Dragons, and three large, open areas not unlike the Wild Area in Pokemon. Retained what made 4 great...kind of. Might be easier to go through positives and negatives.

Positives
1. Combat. Easily tops the list. Provided far more movement space in boss arenas than in 4. Added two more crucial bits: attack warning areas and invincibility frames to dashes. Gives the players the ability to react and react meaningfully.

2. Camera. More of a relief than a positive. Never really fought with the camera. Mentions one good use of the camera: hidden items. Stuck fruits in trees and farm dragon crystals in non-obvious spots (sometimes). Rewards you for looking around. Would have been plainly obvious in 2D.

3. Better Town Events. Hated resetting to obtain a specific town event for marrying someone. Made it far easier to pick and choose.

4. Taking multiple requests at once. Why was this not a thing before?

5. Giving human companions more of an edge. Dominated with monsters throughout most of 4. Probably holds true here too. (Stuck with humans whenever possible.)
Added special Link Attacks for humans in 5. Deals good damage while also interrupting a boss's attack.

6. Some other little nice things: easy weapon skill farming with punching bags, extra drops from wood/stone, and auto-pick-up.

Negatives
1. Pacing. Highlights this as the top issue. Beat the main story in Summer 9 of Year 1. Vanquished the postgame boss on the morning of Summer 19. Played this on Normal difficulty, admittedly. May turn out differently in Hard.

Contains plenty of content. Breezed through the majority of it. Enforced a wait time or a jump in enemy difficulty in 4. Allowed you to jump from dungeon to dungeon in 5. Wore some equipment for a long time. Focused on weapon and body armor when crafting. Sufficed.

What is the problem, then? Gated farming progression behind time. Waits for crops to grow. Unlocks new crops with that. Stockpiles useful cooking materials from tamed monsters. Beat the game before those came to fruition (as with fruit trees, ironically).

What does this mean? A loss of one of 4's strengths: the usefulness of many skills. Always felt like a balancing act of what to focus on in 4. Why bother with Medicine in 5? Provided nearly zero benefit. Why bother with Cooking? Never got enough materials to really make money with it. As a result...how useful is the actual farming part? Not entirely useless, but not that important. Only started dating someone until postgame too.

Missed some mechanics entirely, as a result. Never experienced a typhoon or meteor shower.

2. The late flower shop. Unlocks it maybe a third of the way into the game. Gates you from building up flowers for Medicine's benefits: faster, better, and larger crops. Pushes you into buying from the vendor instead. Lengthens your time to obtain 4-Leaf Clovers for a Happy Ring (increased drop chances) as well. Missed this particular item very badly.

3. Monster items. Lodges two complaints here: drop chances and high skill difficulty. Struggled to get many of some items (like Poison resist Insect Carapaces) for upgrading. Outpaced Forging and Armor Crafting skills very quickly. Turned to crops for cheap upgrades. Stockpiled plenty of them.

4. Item Sizes. Why are dropped items so small? Does not apply to every item. Really squinted to find some, like the aforementioned Insect Carapaces. Relied on the drop noise and running around blindly for auto pickup most of the time. (Does not feel like grabbing a screenshot. Apologies.)

5. Framerate issues. Was not bothered by this as much as others, most likely. Chugged quite noticeably with all villagers at a festival spot, however.

_____

Verdict: A good game, but not as good as 4. Enjoyed the longer-term thinking and more balanced skills of 4. Wants to play 5 again on a higher difficulty, however. Featured enough differences from 4 (notably combat) to feel like a different game instead of Rune Factory 4.5.

________

Rodent's Revenge​
Filed through the list of games for this month's theme of animals. Passed on Spore. Could not find ChuChu Rocket for the Gameboy Advance. Brought another, far older game to mind: Rodent's Revenge. Played this a loooooong time ago. Did not care for it much then. Held some nostalgia, though.

Rodent Revenge 1.png
Plays as a mouse. Moves in all 8 directions. Pushes blocks by running into them. Aims to completely trap cats. Turns cats into cheese (for points) when all cats cannot move. Adds more cats after a certain amount of time of not clearing all of them.

Seems easy. Turns grim quite fast. Screenshotted level 4 above. Shows level 5 below. (Added more cats or so from the original set.)

Rodent Revenge 2.png
Hinges on creating repeatable cat traps, most likely. Did not feel like figuring out an efficient method of doing that. (Cannot pull blocks, for the record.) Continues on for 50 levels, also. Declined to pursue this game further. Got a dose of nostalgia, at least.
 
Back
Top