• Our software update is now concluded. You will need to reset your password to log in. In order to do this, you will have to click "Log in" in the top right corner and then "Forgot your password?".
  • Welcome to PokéCommunity! Register now and join one of the best fan communities on the 'net to talk Pokémon and more! We are not affiliated with The Pokémon Company or Nintendo.

Fake Card Tutorials

Adept-eX

A Adobe Photoshop Veteran ;P
125
Posts
18
Years
Hi guy! In fact, I will share some of my technic used in one of the freaking programs for done illustrations: Adobe Photoshop
Here I will post some technic, please feel you free of comment or share your own methods to ;)
So let going!

Tutorials:
1) Lineart color change method

Ok, guys, this is a technic very useful than allow change the color of the lineart easily, this is really useful if you wish give to your drawings a soft feeling, and the good is than allow do degrades and use different hues and color in the same line. Here you can find a example done with this method:
>>http://www.deviantart.com/deviation/29865333/

Step 1: Clean the drawing
First, you have to consider than this technic can be apllied for drawing than have a solid lineart like inked drawings with pens, permanent makers. Also the drawing have to be the most clean possible before of beggin with the nexts steps (you can complete the cleanage digitally painting with white any imperfection like bluers or spot than appears after the scanning). A good Tip is try to do your pic the biggest possible, so in that way if you resize it the little mistake almost can be visible and will be easier for clean them
Here is my image than I will use like example
bad_ass_jigglypuff_xD.jpg


Step 2: Becoming trasparent the drawing
Now you have to unlock your drawing, for that you have to go in the superior menu and select in Layer>New Layer>From Background.... With that you will be capable of work the layer more freely for the next step in wich we will become it trasparent your drawing.
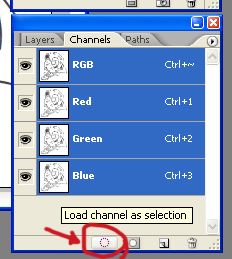
For that go to the Channel windows and do click in "load channel as selection".
1.jpg


With that you will select the white color in your pic, now only delete the selection and you will have the next:
2.jpg


Step 3: Adding the color to the lineart
Now the last step... now you have to create another layer,this one put it below the lineart layer (the one wich have your drawing) and paint it completely with black. Now go to the Layer window menu and do click with the right button of the mouse on the name of the layer painted in black, it should appears you a menu, do click in the option than say: create clipping mask
3uu3.png


Now you can beggin to add color in the lineart, for that you have to go in the "Clipped Mask Layer" and beggin to paint following the path of the linart, doing this you will see than the lineart beggins to change of color.
4.jpg


Working in the "Clipped Mask Layer" yo can create many effects using the different tools, like in this example in I create a degrade using the brush tool, differents colors and the blur tool
5.jpg
6.jpg


I hope than this technic be useful for you. Soon I will post more methods for do your own ilustration for the cards! See you later ;P
 
Last edited by a moderator:

willypiggy

パンケーキ! Yum!
191
Posts
17
Years
  • Age 31
  • Seen Apr 3, 2010
Great tuturial but where can I get Gill Sans Condensed Bold from? All the websites ive seen want me to pay 20 quid for it please help!
EDIT: Sorry it was at the bottom of the page XD
 
Last edited:

willypiggy

パンケーキ! Yum!
191
Posts
17
Years
  • Age 31
  • Seen Apr 3, 2010
I did edit my first post.... oh well allmost finished making my first fake of Jirachi lol
 

Lordpenguin

Pokémon: Lodestone
244
Posts
17
Years
  • Seen Apr 5, 2012
Looking at the timestamps, Flame Claw replyed before you edited the post.

Anyway, good luck.
 

willypiggy

パンケーキ! Yum!
191
Posts
17
Years
  • Age 31
  • Seen Apr 3, 2010
Sorry there flame claw, I've made a jarichi fake that isn't that great but oh well and i'm just finishing a Chikorita great tutorials guys!
 

Gokey Shuckle

Bisexual and Proud
2,582
Posts
19
Years
Is anyone going to make a tutorial for the D/P blanks? I would really like to put that in here so people can make those too.

Pokeant, Pokemon Zeo has a tutorial.
 

Firemaker

Pokemon Master
496
Posts
20
Years
I give you the one, the only, DP Guide for Fake Cards e americano! Credit to Cipher DSX and Cascade Gonpory who holds the blanks.

DP Series Tutorial: By Cascade Gonpory

NAME: 10 pixels across (right), 8 pixels down from the Border
Lv. : 5 pixels from the name. Same level
X symbol: 3 Pixels from the Full stop on Lv.
HP: Up 5 pixels from the Picture frame, across to your left 4 pixels
Evolves from: 1 pixel up from the level of "stage?" then 10 pixels right
Level up from: 12 pixels from the end of the GOLDEN holo bar (which LEVEL UP is written in), then 6 pixels up from the bottom of the silver bar.
Flavour Text: Make the font CENTERed and then place it in the VERY middle of the bar, just guess! or you can be TECHNICLE! - While transferring the layer from the symbol sheet, hold down "SHIFT" while dragging the text layer to the BLANK, it should then appear suscessfully in the middle of the blank, and the in it is simply 10 pixels down!
Any ENERGY symbol or POKE-???: anywear above 10 pixels from the "text bar", and 10 across, any extra energy symbol should be placed abon the first energy, and then another 10 pixels to the right. With the Poke-??? name, just link the name and the oval symbol when transferring smile.gif! and other attacks should be no less than 10 pixels under the effect
DAMAGE!: alight it with the attack text then draw it to the right border, it is 10 pixels from there!
Attack text: on the symbol sheet, i have handily added the right sized text boxes, and they should be either 10 pixels below the attack name (which when making the attack name "Centered" drag it down using the same sort of techneque as "flavour text" but just lower) - and your text should be 10 pixels from the left (which will end up being 10 pixels from the left as well, wither side you do 10 pixels, it'll work perfectly smile.gif!
POKEDEX flavour text info (paragraph):align this with the line to divide the region of attacks and pokedex entry. then 10 below the line smile.gif!
Illustrator: 2 pixels up from the bar, and 20 pixels from the right border.
Weakness, Resistance and Retreat Cost: Centre them to the are in the middle of the text, and it's 1 pixel below the text or Weakness, Resistance or Retreat cost
Set number: 2 pixels up from the border, and 30 pixels from the RIght border.
Rarety: 2 pixles up, 20 pixels from the right border.
Set symbol: make the size fit into atleast 17x17 pixels. And it is 1 pixel from both bottom and right border.
 
559
Posts
18
Years
  • Seen Oct 1, 2008
^ To be fair, I only pointed you in the direction of it. That's all Cascade's work. ;)
 

Firemaker

Pokemon Master
496
Posts
20
Years
srry for 2x post, but the sizes and fonts for the cards of Diamond and Pearl have not been shown yet, to my dissapointment. Also, Cascade has reuploaded the diamond and pearl cards.
 

Puddle Fish

Non-conforming Fishie!
87
Posts
16
Years
Hi, I can't get my hands on the fonts needed for Fang's Tutorial. Could someone give me a hand because Pokemon Palace is down at the moment (if I'm wrong I would love to be corrected) So, I would really appreciate the help.

Thanks,

Puddle Fish
 
Back
Top