
You are using an out of date browser. It may not display this or other websites correctly.
You should upgrade or use an alternative browser.
You should upgrade or use an alternative browser.
Spriting Tutorials - Pokemon and Trainer
- Thread starter Chesu
- Start date
More options
Who Replied?
Chesu
Boss Carrot
- 583
- Posts
- 15
- Years
- Where The Carrots Be
- Seen Apr 10, 2019
Thanks! Even if you feel that you failed, that doesn't mean that you have to give up. I actually made sprites of all three of them back in 2006 using nothing but parts taken from Pokemon sprites.

...Actually, it looks like I cheated a bit on Espeon/Karasuneko's tail, but whatever point I was trying to prove back then is long forgotten, so eh.
...Actually, it looks like I cheated a bit on Espeon/Karasuneko's tail, but whatever point I was trying to prove back then is long forgotten, so eh.
- 5,256
- Posts
- 16
- Years
- Age 26
- Leicester, UK
- Seen Apr 30, 2024

I don't like it. :/ He looks all stiff.
I like those sprites. I need concept art to sprite. SOOO bored!
Do your homework!
Screw you! XD
Chesu
Boss Carrot
- 583
- Posts
- 15
- Years
- Where The Carrots Be
- Seen Apr 10, 2019
Let its arms hang more naturally, like in the front sprite... I think the main problem is how round the shoulders are. If you don't like it, why not make the back more interesting? If it's a stuffed animal, why not put a rip or stitches on the back? If it's supposed to be an animal, well... do something else. Oh, and the right ear is kind of small and messed up.
...Also, wow, that was fast.
...Also, wow, that was fast.
Chesu
Boss Carrot
- 583
- Posts
- 15
- Years
- Where The Carrots Be
- Seen Apr 10, 2019
GBA/DS Trainer Overworld Tutorial
GBA/DS Trainer Overworld Tutorial
by Chesu
Overworld trainer sprites are usually
considered to be the easiest of the Pokemon
games' sprites to make, but that's not completely
true. They are incredibly easy to modify, but that doesn't
count as making your own sprite, and most people do it
with little or no regard to the style they're supposed
to be spriting in. Each modern style has its
own distinct traits, as illustrated here:

Here we have sprites of the Camper trainer class,
from FireRed/LeafGreen, Ruby/Sapphire/Emerald, and
the DS games. The DS version is clearly much bigger than
the other two, which allows for more detail, but there are
also differences between the two GBA versions. Actually,
there are too many differences... The R/S/E Camper
overworld sprite is also used for Rangers, giving
it the dimensions of an adult sprite. Let
me find a better example...
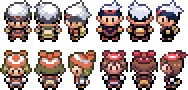
Here we go! There are three major differences
you should note between the two styles: the FR/LG
sprites (left) have a more subdued color palette, large,
round heads for a cuter, more cartoonie look, and are viewed
more from above. What I mean is that you can see more of
the tops of their heads, less of their thoraces, and unlike
the R/S/E sprites, they don't seem to be looking at you.
Now that you're aware of the differences, we can
start making overworld sprites from scratch!

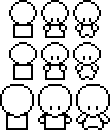
After my usual bout of research and
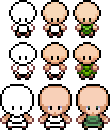
experimentation, I've created these sprite bases.
Don't worry, they're just circles sitting on top of squares,
you can use them and still say your sprites are made from
scratch. The red ones are for FR/LG-style sprites, blue is R/S/E,
and green is quite obviously for DS sprites. The small frames on
the right are for small children; School Kids, Tubers, that type.
On the left we have adults, and in the center are frames for
older kids and teenagers- protagonists, rivals, anyone
that doesn't fit into the other two sizes.

I'll be basing my sprite on Ringo here. I have
a reason for choosing her, but I'll get to that later. For
the sake of making every paragraph a long, complicated
mess, I'll be making three sprites at once.
The first step is shaping the sprite.
The arm positions I gave mine are the most
common for their respective styles, but you can
do yours however you want. Reference sprites in
the style you're emulating can be used, so long as
you don't follow them too closely. The leg positions
I went with are also common for each style. Once
you're happy with your outline, it's time to color!
Unless you're creating a new style, DO NOT
use the palettes found on in-battle sprites; the
GBA and DS can only process so many colors, so
the overworld palettes are pretty limited. I'd like
to direct your attention to the arms of my sprites.
While the FR/LG and DS sprites are only brown (the
darkest skin palette color) on the outside, the R/S/E
arms are brown all over. This is because the other
two are viewed more from above, so you see the
outlines of their torsos rather than their arms.
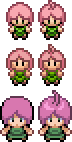
Moving on, you can start coloring
and shading your sprite's skin. I have,
again, gone with the most common style in
each... uh, style. The light source on overworld
sprites is above, and slightly toward you. Every
other character with exposed arms in the DS games
has them shaded a different way, so I went with the
style used by a character with similar hair. With that
out of the way, you can mark the waistline and start
dressing your sprite. R/S/E sprites show equal parts
torso and legs, while the others show more torso, so
keep that in mind. You should also stick to colors
found on other overworld sprites and objects. Oh,
and don't forget to draw some ears, if you need
to. Ringo's will be covered by her hair, but I've
included ears in the size of the head; just
remove a few pixels as needed.
As I've said in the past, hair is a tricky
subject to tack down... There are just so
many variables! The main things to remember
are that hair is usually shiny (especially in the DS
games), unless it's spiky or there's some other structure
breaking the flow, and that it's okay to simplify
a hairstyle to fit in the sprite if need be.

There you have it, overworld sprites
easily made from scratch, strictly adhering
to their respective styles. I hope this tutorial
has helped you understand why overworld sprites
are assembled the way they are, so that even if
you're just editing existing sprites, you'll
have the tools to do it right.
...Oh, wait, the tutorial's not done yet.

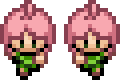
From here on, I'll be working in
FR/LG style, since I prefer it to the other two.
Starting with the same empty doll thing, shape
your the body and draw a body coming directly from
the bottom of the head. I couldn't tell you why FR/LG sprites
have such bad posture, but sprites in the other two styles definitely
stand up straighter than this. Since the outline of the face is exposed
to the light source in this side view, you can go ahead and make it brown.
If you look closely at the arm, you'll see that its outline is both brown and
black; this is to keep colors from flowing together. It can't be all black
since it touches the black body outline, and it can't be all brown
because it touches the brown shoe. As for the hair... Well, just
do your best to envision how it looks from the side. Do your
best to make your sprite the same height and width
as the front-facing one, I'll explain why later.
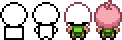
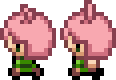
The back sprite is basically the same as
the front, with two key differences: the head
ends higher, and the arms are covered by hair if it's long
enough. The back of your head flows into you neck around
around where the bottom of your nose is on the front, which
is reflected in the sprite. Another thing worth noting is that any
features of your sprite's hair visible from the front will be farther
up when seen from the back, if in view at all. Once you have
all three orientations of your sprite done, it's time to
animate! For that, I'm going to switch to super
big, every-pixel-is-sixteen-pixels mode.
(Note: The following techniques used for
animating the sprites only apply to the FR/LG
style; as their bodies are much bigger, the other
two styles are animated completely differently. If
enough people request it, I'll amend this section
with R/S/E and DS-style animation techniques.)
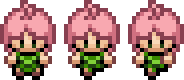

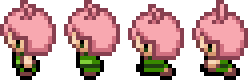
Diving right in, start by erasing one of
the legs, leaving just the outline from the
bottom of the foot in its place. Move the hand
on that same side one pixel inward and give it an
outline on the inner edge. Move the other hand three
pixels up (two pixels for young children) and recolor half
of it to form the arm. To avoid an overlap between the very
similar colors of my sprite's hand and hair outlines, I've just
hidden the whole arm behind the hair. Finally, make a copy
of your sprite and mirror it horizontally, making sure not
to mirror anything that isn't symmetrical (like Ringo's
bangs and... uh, stem). If you can find a way to add
bounce to your sprite's hair or any hanging cloth,
go for it! I've straightened the stem thing
out... You'll see why in a minute.
Right, moving on to the side view!
Erase the arm, but don't worry too much
about drawing in everything under it, since
we'll be changing the shape of the sprite. Move the
leg one pixel up and three back, then move your sprite's
back... well, back, one pixel. Your upper body twists a bit
as you walk, so more of the sprite's back should be visible
in this frame of the animation. Add a bit of the other foot's
outline to the front of the body, then draw the arm back on
as I did. It doesn't have to line up with the front of your
sprite's body, but that's how it looks most of the time
with FR/LG sprites, so that's what I'll be going with.
Starting with the armless body you
made before, move the leg one pixel up and
two forward, then make it one pixel shorter horizontally.
Draw in any details of the leg that are missing at this point,
then add the other leg (all in black, to show that it's in the background)
in about the same shape to the back of the body. The upper body twists
in this frame as well, but it will be covered by the arm, so you don't
need to draw it. Animating the back view frames is mostly
the same as the front view, so I'll skip right to
the good part- actually animating!

So, what's this bounce I referred to earlier?
Well, take a look at the two sets of animation
frames above. The green set is one pixel taller than
the blue one, and the sprites in motion are set lower
in their frames than the ones that are standing still. While
there's nothing wrong with the blue animation, I think the
green animation is more fun, and even looks better. Why?


Bounce! While the difference isn't as
noticeable when the sprites are moving through
an environment, most animators will still go with
the green animation, since it has more personality and
looks more natural. Unfortunately, moving one pixel down
makes Ringo's stem look like it's retracting rather than
bouncing, so I may have to make it a bit longer in the
motion frames. Since the side view sprites become
one pixel shorter during animation, there's no
need to add bounce to them in this way.
One of the most important parts in animating
a sprite is making sure that all the frames are the
same size. You should also try to make the sprites used
by a character in your game the same size as well, for
proper collision detection and all that good stuff.

There you have it, overworld sprites easily
made from scratch, AND properly animated! I
hope this tutorial has helped you understand why
overworld sprites are assembled the way they are, so that
even if you're just editing existing sprites, you'll have the
tools to do it right. The tutorial is over for real this time,
but if enough people ask for it, I'll add sections
for animating R/S/E and DS sprites.
---
If you have any questions or would like to give feedback
on the tutorials, click here to leave me a visitor message!
by Chesu
Overworld trainer sprites are usually
considered to be the easiest of the Pokemon
games' sprites to make, but that's not completely
true. They are incredibly easy to modify, but that doesn't
count as making your own sprite, and most people do it
with little or no regard to the style they're supposed
to be spriting in. Each modern style has its
own distinct traits, as illustrated here:
Here we have sprites of the Camper trainer class,
from FireRed/LeafGreen, Ruby/Sapphire/Emerald, and
the DS games. The DS version is clearly much bigger than
the other two, which allows for more detail, but there are
also differences between the two GBA versions. Actually,
there are too many differences... The R/S/E Camper
overworld sprite is also used for Rangers, giving
it the dimensions of an adult sprite. Let
me find a better example...
Here we go! There are three major differences
you should note between the two styles: the FR/LG
sprites (left) have a more subdued color palette, large,
round heads for a cuter, more cartoonie look, and are viewed
more from above. What I mean is that you can see more of
the tops of their heads, less of their thoraces, and unlike
the R/S/E sprites, they don't seem to be looking at you.
Now that you're aware of the differences, we can
start making overworld sprites from scratch!
After my usual bout of research and
experimentation, I've created these sprite bases.
Don't worry, they're just circles sitting on top of squares,
you can use them and still say your sprites are made from
scratch. The red ones are for FR/LG-style sprites, blue is R/S/E,
and green is quite obviously for DS sprites. The small frames on
the right are for small children; School Kids, Tubers, that type.
On the left we have adults, and in the center are frames for
older kids and teenagers- protagonists, rivals, anyone
that doesn't fit into the other two sizes.
I'll be basing my sprite on Ringo here. I have
a reason for choosing her, but I'll get to that later. For
the sake of making every paragraph a long, complicated
mess, I'll be making three sprites at once.
The first step is shaping the sprite.
The arm positions I gave mine are the most
common for their respective styles, but you can
do yours however you want. Reference sprites in
the style you're emulating can be used, so long as
you don't follow them too closely. The leg positions
I went with are also common for each style. Once
you're happy with your outline, it's time to color!
Unless you're creating a new style, DO NOT
use the palettes found on in-battle sprites; the
GBA and DS can only process so many colors, so
the overworld palettes are pretty limited. I'd like
to direct your attention to the arms of my sprites.
While the FR/LG and DS sprites are only brown (the
darkest skin palette color) on the outside, the R/S/E
arms are brown all over. This is because the other
two are viewed more from above, so you see the
outlines of their torsos rather than their arms.
Moving on, you can start coloring
and shading your sprite's skin. I have,
again, gone with the most common style in
each... uh, style. The light source on overworld
sprites is above, and slightly toward you. Every
other character with exposed arms in the DS games
has them shaded a different way, so I went with the
style used by a character with similar hair. With that
out of the way, you can mark the waistline and start
dressing your sprite. R/S/E sprites show equal parts
torso and legs, while the others show more torso, so
keep that in mind. You should also stick to colors
found on other overworld sprites and objects. Oh,
and don't forget to draw some ears, if you need
to. Ringo's will be covered by her hair, but I've
included ears in the size of the head; just
remove a few pixels as needed.
As I've said in the past, hair is a tricky
subject to tack down... There are just so
many variables! The main things to remember
are that hair is usually shiny (especially in the DS
games), unless it's spiky or there's some other structure
breaking the flow, and that it's okay to simplify
a hairstyle to fit in the sprite if need be.
There you have it, overworld sprites
easily made from scratch, strictly adhering
to their respective styles. I hope this tutorial
has helped you understand why overworld sprites
are assembled the way they are, so that even if
you're just editing existing sprites, you'll
have the tools to do it right.
...Oh, wait, the tutorial's not done yet.
From here on, I'll be working in
FR/LG style, since I prefer it to the other two.
Starting with the same empty doll thing, shape
your the body and draw a body coming directly from
the bottom of the head. I couldn't tell you why FR/LG sprites
have such bad posture, but sprites in the other two styles definitely
stand up straighter than this. Since the outline of the face is exposed
to the light source in this side view, you can go ahead and make it brown.
If you look closely at the arm, you'll see that its outline is both brown and
black; this is to keep colors from flowing together. It can't be all black
since it touches the black body outline, and it can't be all brown
because it touches the brown shoe. As for the hair... Well, just
do your best to envision how it looks from the side. Do your
best to make your sprite the same height and width
as the front-facing one, I'll explain why later.
The back sprite is basically the same as
the front, with two key differences: the head
ends higher, and the arms are covered by hair if it's long
enough. The back of your head flows into you neck around
around where the bottom of your nose is on the front, which
is reflected in the sprite. Another thing worth noting is that any
features of your sprite's hair visible from the front will be farther
up when seen from the back, if in view at all. Once you have
all three orientations of your sprite done, it's time to
animate! For that, I'm going to switch to super
big, every-pixel-is-sixteen-pixels mode.
(Note: The following techniques used for
animating the sprites only apply to the FR/LG
style; as their bodies are much bigger, the other
two styles are animated completely differently. If
enough people request it, I'll amend this section
with R/S/E and DS-style animation techniques.)
Diving right in, start by erasing one of
the legs, leaving just the outline from the
bottom of the foot in its place. Move the hand
on that same side one pixel inward and give it an
outline on the inner edge. Move the other hand three
pixels up (two pixels for young children) and recolor half
of it to form the arm. To avoid an overlap between the very
similar colors of my sprite's hand and hair outlines, I've just
hidden the whole arm behind the hair. Finally, make a copy
of your sprite and mirror it horizontally, making sure not
to mirror anything that isn't symmetrical (like Ringo's
bangs and... uh, stem). If you can find a way to add
bounce to your sprite's hair or any hanging cloth,
go for it! I've straightened the stem thing
out... You'll see why in a minute.
Right, moving on to the side view!
Erase the arm, but don't worry too much
about drawing in everything under it, since
we'll be changing the shape of the sprite. Move the
leg one pixel up and three back, then move your sprite's
back... well, back, one pixel. Your upper body twists a bit
as you walk, so more of the sprite's back should be visible
in this frame of the animation. Add a bit of the other foot's
outline to the front of the body, then draw the arm back on
as I did. It doesn't have to line up with the front of your
sprite's body, but that's how it looks most of the time
with FR/LG sprites, so that's what I'll be going with.
Starting with the armless body you
made before, move the leg one pixel up and
two forward, then make it one pixel shorter horizontally.
Draw in any details of the leg that are missing at this point,
then add the other leg (all in black, to show that it's in the background)
in about the same shape to the back of the body. The upper body twists
in this frame as well, but it will be covered by the arm, so you don't
need to draw it. Animating the back view frames is mostly
the same as the front view, so I'll skip right to
the good part- actually animating!
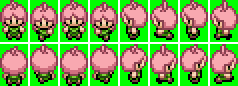
So, what's this bounce I referred to earlier?
Well, take a look at the two sets of animation
frames above. The green set is one pixel taller than
the blue one, and the sprites in motion are set lower
in their frames than the ones that are standing still. While
there's nothing wrong with the blue animation, I think the
green animation is more fun, and even looks better. Why?
Bounce! While the difference isn't as
noticeable when the sprites are moving through
an environment, most animators will still go with
the green animation, since it has more personality and
looks more natural. Unfortunately, moving one pixel down
makes Ringo's stem look like it's retracting rather than
bouncing, so I may have to make it a bit longer in the
motion frames. Since the side view sprites become
one pixel shorter during animation, there's no
need to add bounce to them in this way.
One of the most important parts in animating
a sprite is making sure that all the frames are the
same size. You should also try to make the sprites used
by a character in your game the same size as well, for
proper collision detection and all that good stuff.
There you have it, overworld sprites easily
made from scratch, AND properly animated! I
hope this tutorial has helped you understand why
overworld sprites are assembled the way they are, so that
even if you're just editing existing sprites, you'll have the
tools to do it right. The tutorial is over for real this time,
but if enough people ask for it, I'll add sections
for animating R/S/E and DS sprites.
---
If you have any questions or would like to give feedback
on the tutorials, click here to leave me a visitor message!
Last edited:
Laidjon*
An eternal equilibrium~
- 74
- Posts
- 16
- Years
- The Netherlands
- Seen Nov 22, 2020
Really nice, and everything is so easy to understand. Thank you for contributing =D
Ow's are now a piece of cake :P
I would love to wear your Support Bar xD Just to let people know that I'm not one of those ROM-hackers :P
Ow's are now a piece of cake :P
I would love to wear your Support Bar xD Just to let people know that I'm not one of those ROM-hackers :P
Train rides by
current challenge:bug monotype
- 102
- Posts
- 14
- Years
- in ur closet
- Seen Jan 9, 2013
thanks for the tut ill post some new sprites ltr
Death Strike
a.k.a Minions123
- 50
- Posts
- 14
- Years
- Age 27
- Somewhere...
- Seen Aug 3, 2010
Great tutorial, you've definitely spent a whole lot of time on it, now everyone else who isn't good at spriting can sprite! (including me!)
Train rides by
current challenge:bug monotype
- 102
- Posts
- 14
- Years
- in ur closet
- Seen Jan 9, 2013
heres one of my newest sprites what do you think?


Chesu
Boss Carrot
- 583
- Posts
- 15
- Years
- Where The Carrots Be
- Seen Apr 10, 2019
I've seen much, much worse, but it isn't without fault. The outline is jaggy in places, and too light... especially on the skull. The sprite may be facing too much to the left, but it's hard to tell. More importantly, the... I want to say shredded cloth, at the bottom is too uniform. with the same shape over and over. I love the concept of the sprite though, bird skulls are something that I've never seen sprited.
Laidjon*
An eternal equilibrium~
- 74
- Posts
- 16
- Years
- The Netherlands
- Seen Nov 22, 2020
Btw, Chesu, are you also going to teach us how to make the running frames? 'Cause that would just be plain awesome! =D
Train rides by
current challenge:bug monotype
- 102
- Posts
- 14
- Years
- in ur closet
- Seen Jan 9, 2013
heres the edited version 

Chesu
Boss Carrot
- 583
- Posts
- 15
- Years
- Where The Carrots Be
- Seen Apr 10, 2019
The running animation is basically the same, but with the character leaning forward... I guess I could add it.
Train, you didn't really address the problems I mentioned. You actually made the skull more jaggy, and the original color was better. Where the outline needs worked on is the body, especially around the tail. Look at sprites of Pokemon like Duskull, Misdreavus, Mismagius, and Darkrai for examples of how the body should look.
Train, you didn't really address the problems I mentioned. You actually made the skull more jaggy, and the original color was better. Where the outline needs worked on is the body, especially around the tail. Look at sprites of Pokemon like Duskull, Misdreavus, Mismagius, and Darkrai for examples of how the body should look.

Yume Tsuki
(/ ゚ヮ゚)/彡 ┻━┻
- 1,192
- Posts
- 15
- Years
- She/Her
- In a cardboardbox aside the main highway
- Seen today
With this tut I gonna remake my horrible OW of the girl in purple x')
Chesu
Boss Carrot
- 583
- Posts
- 15
- Years
- Where The Carrots Be
- Seen Apr 10, 2019
The one with the crazy-long hair? I don't remember there being anything wrong with it...
Well, to make this post actually worth something: what should I do for my next tutorial? Pokemon overworlds, trainer backsprites, overworld objects, background tiles, or something else from the "coming soon" list? Click here to vote!
Well, to make this post actually worth something: what should I do for my next tutorial? Pokemon overworlds, trainer backsprites, overworld objects, background tiles, or something else from the "coming soon" list? Click here to vote!
Train rides by
current challenge:bug monotype
- 102
- Posts
- 14
- Years
- in ur closet
- Seen Jan 9, 2013
heres a frame fora new sprite what do you think? 
and ill take a look at those sprites now

and ill take a look at those sprites now
Chesu
Boss Carrot
- 583
- Posts
- 15
- Years
- Where The Carrots Be
- Seen Apr 10, 2019
I really don't want this thread filled up with random conversations... If you want my opinion, could you just PM or VM me? Since I'm posting anyway though, it's good! It looks like a sheep with a ton of wool or something. A few things, though; the outline is kind of jaggy on the wooly parts, one of the legs doesn't look like the other two, and if those things above the head are horns, they look like they're coming from behind the head.

Logan
[img]http://pldh.net/media/pokecons_action/403.gif
- 10,417
- Posts
- 15
- Years
- Age 29
- Salisbury, England
- Seen Nov 23, 2023
Well, Pokémon ow's aren't that much different to normal ow's. Nor would they be any more difficult. I think someone could make a Pokémon ow using your method from the people ow's. I'd say trainer backsprites, because it'll be fun to see how your fine self figures how to do them. Also, I need to work on backsprites more, so gogogo.
- 38
- Posts
- 14
- Years
- Vernon, CT
- Seen May 30, 2013
Very useful, clean and easy to learn
Chesu
Boss Carrot
- 583
- Posts
- 15
- Years
- Where The Carrots Be
- Seen Apr 10, 2019
Hrm... Would anyone be interested in a tutorial on FR/LG-style establishing shots? An establishing shot is something used in film to introduce the audience to the setting of a scene, before focusing on the characters.
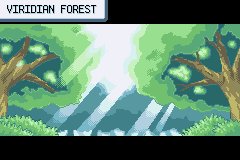
Even though it looks like a big, complicated image, it's actually pretty simply-drawn, and uses the same number of colors as Pokemon and trainer sprites. So, would anyone here be interested in a tutorial on the subject, or is it too obscure?
Even though it looks like a big, complicated image, it's actually pretty simply-drawn, and uses the same number of colors as Pokemon and trainer sprites. So, would anyone here be interested in a tutorial on the subject, or is it too obscure?