takyon
Villain
- 17
- Posts
- 6
- Years
- Seen yesterday
Going into this guide I will assume you already know how to compile pokeemerald and you have a 256x160 png of your region that you wish to insert into the game. Sorry for the terrible formatting.
PREREQUISITES
We will be needing:
We will be making:
Gamefreak, in all their wisdom, decided to have two different instances of the region map, one for the Pokedex (graphics/interface) and the other for every other instance (graphics/pokenav). There is another called region_map_affine but it doesn't seem to be used, so we can skip it. If for any reason it has to ever be used, just repeat the steps for the other two tilemaps.
We can use region_map.png and region_map.pal for both instances, however the tilemaps are very different.
MAKE THE MAP
If you haven't already, make your region map, making sure that you have 32 colours maximum, and in the end have 256 tiles or below being used.
I usually use Asesprite because of its reference layer, but I'll make a quick region map through GIMP for this tutorial. Set the dimensions to 256x160, and Image->Configure Grid so that the grid is 8x8, and check View->Show Grid. Make sure the brush has anti-aliasing disabled.
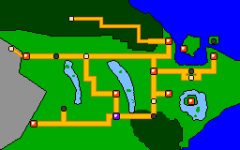
For this tutorial I decided to make Bangladesh into a Pokemon region.

MAKE THE TILESET
Go to Tilemap Studio, Tools->Image to Tiles
Your input should be the map that you just made.
The output should be region_map.png or any other name you want. I named it tileset.png but it will have to renamed later.

Leave the other options (Tilemap/Palette) as is. Until Tilemap Studio is updated to include region map functionality we will have to do most of it manually.
At this point Tilemap Studio should've automatically generated region_map.png. It will fail if you have more than 256 tiles, at which point you would have to go back to your picture editing software and simplify the map/reuse tiles. If you are dead set on using more tiles, check this out.
MAKE THE PALETTE
Use GIMP to open up the newly made region_map.png tileset. Go to Colors -> Map -> Rearrange Colormap

Your colors should exist from 0 to 31 (if they happen to cross 31 then that color probably won't show up in-game). You'll have to now manually move the colors so they occupy the second half of the palette, namely instead of 0-31, it'll occupy 112-143. Sadly I only know how to do it manually one by one, but I'm sure there might be an easier method I don't know of.

Save this change and save the tileset.
Open IrfanView, Image->Palette->Export Palette... and save it as region_map.pal.
However, even though the palette starts from 112, the .pal file needs it to be at the beginning of the file.
Here's what that change would look like:
 - >
- >

And with that we have the two easy parts done. Time to head back to Tilemap Studio and make the two tilemaps. Your canvas should basically look exactly like the map you just made.

However the tilemap that the game uses is strangely different. That being said, go to File->Save As… and save default.bin. This won't be used in the game but will be useful in a bit.

MAKE THE TILEMAP PT.1 - GRAPHICS/POKENAV/REGION_MAP_MAP.BIN
Go to Tools -> Resize. Resize to 32x128.

This is fairly simple, you basically need to separate each horizontal line by a straight line of the first tile. This sounds tedious, but with holding right-click on the canvas you can extend your selection.

Slowly but surely you'll have the same region but doubled in size with the first tile in each other line. Do File->Save As… and save as region_map_map.bin.
This is what it should more or less look like:

MAKE THE TILEMAP PT.2 - GRAPHICS/INTERFACE/REGION_MAP.BIN
Load the default tileset to get back to your normal canvas. (If you forgot, do Image to Tiles again)
Go to Tools -> Resize. Resize to 64x32.

This is also fairly simple, you will need to separate each vertical line by a straight line of the first tile. The same advice from PT.1 applies, hold right-click on the canvas to extend your selection.

This is what it should look like at the end:

Once done, do Tilemap->Save As… and save as region_map.bin.
INSERTING TO THE GAME
The only thing to be changed now is region_map.png. It needs to be 128x120 pixels. If it is smaller, like my one, you'll get this error:
This is a simple fix, just expand the canvas and fill the new empty spaces with black.
The inverse can also happen, where you see black tiles near the end of your region map. At that point you'd have to cut off some tiles so there are only 233 tiles.
At this point everything should be completely done, bar any mistakes made in the process.
You should have the tileset (region_map.png), the palette starting from index 112 (region_map.pal), and the two tilemaps for pokenav (region_map_map.bin) and pokedex (region_map.bin).
Here's what I have:

Go to graphics/interface and paste and replace these three files:
region_map.png
region_map.pal
region_map.bin
Go to graphics/pokenav and paste and replace these three files:
region_map.png
region_map.pal
region_map_map.bin
And you should have a completely new region map in both your pokedex and everywhere else! You can edit this more through PoryMap with the Region Map Editor, but that's out of scope for this tutorial.


Hope this helps.
PREREQUISITES
We will be needing:
Asesprite, GraphicsGale, GIMP, or any other software you are comfortable making your region map in (it is preferred to have a grid overlay of 8x8 to show off different tiles.)
GIMP (only for changing up the indexing, if there is a better software don't hesitate to share with a reply below!)
IrfanView (only to export palette, it might be possible to export through GIMP or some other software, but the palette export options there don't seem to support JASC-PAL)
Tilemap Studio
PoryMap (for later)
mGBA or your choice of emulator
We will be making:
region_map.png
region_map.pal
region_map.bin
region_map_map.bin
Gamefreak, in all their wisdom, decided to have two different instances of the region map, one for the Pokedex (graphics/interface) and the other for every other instance (graphics/pokenav). There is another called region_map_affine but it doesn't seem to be used, so we can skip it. If for any reason it has to ever be used, just repeat the steps for the other two tilemaps.
We can use region_map.png and region_map.pal for both instances, however the tilemaps are very different.
MAKE THE MAP
If you haven't already, make your region map, making sure that you have 32 colours maximum, and in the end have 256 tiles or below being used.
I usually use Asesprite because of its reference layer, but I'll make a quick region map through GIMP for this tutorial. Set the dimensions to 256x160, and Image->Configure Grid so that the grid is 8x8, and check View->Show Grid. Make sure the brush has anti-aliasing disabled.
For this tutorial I decided to make Bangladesh into a Pokemon region.
MAKE THE TILESET
Go to Tilemap Studio, Tools->Image to Tiles
Your input should be the map that you just made.
The output should be region_map.png or any other name you want. I named it tileset.png but it will have to renamed later.
Leave the other options (Tilemap/Palette) as is. Until Tilemap Studio is updated to include region map functionality we will have to do most of it manually.
At this point Tilemap Studio should've automatically generated region_map.png. It will fail if you have more than 256 tiles, at which point you would have to go back to your picture editing software and simplify the map/reuse tiles. If you are dead set on using more tiles, check this out.
MAKE THE PALETTE
Use GIMP to open up the newly made region_map.png tileset. Go to Colors -> Map -> Rearrange Colormap
Your colors should exist from 0 to 31 (if they happen to cross 31 then that color probably won't show up in-game). You'll have to now manually move the colors so they occupy the second half of the palette, namely instead of 0-31, it'll occupy 112-143. Sadly I only know how to do it manually one by one, but I'm sure there might be an easier method I don't know of.
Save this change and save the tileset.
Open IrfanView, Image->Palette->Export Palette... and save it as region_map.pal.
However, even though the palette starts from 112, the .pal file needs it to be at the beginning of the file.
Here's what that change would look like:
And with that we have the two easy parts done. Time to head back to Tilemap Studio and make the two tilemaps. Your canvas should basically look exactly like the map you just made.
However the tilemap that the game uses is strangely different. That being said, go to File->Save As… and save default.bin. This won't be used in the game but will be useful in a bit.
MAKE THE TILEMAP PT.1 - GRAPHICS/POKENAV/REGION_MAP_MAP.BIN
Go to Tools -> Resize. Resize to 32x128.
This is fairly simple, you basically need to separate each horizontal line by a straight line of the first tile. This sounds tedious, but with holding right-click on the canvas you can extend your selection.
Slowly but surely you'll have the same region but doubled in size with the first tile in each other line. Do File->Save As… and save as region_map_map.bin.
This is what it should more or less look like:
MAKE THE TILEMAP PT.2 - GRAPHICS/INTERFACE/REGION_MAP.BIN
Load the default tileset to get back to your normal canvas. (If you forgot, do Image to Tiles again)
Go to Tools -> Resize. Resize to 64x32.
This is also fairly simple, you will need to separate each vertical line by a straight line of the first tile. The same advice from PT.1 applies, hold right-click on the canvas to extend your selection.
This is what it should look like at the end:
Once done, do Tilemap->Save As… and save as region_map.bin.
INSERTING TO THE GAME
The only thing to be changed now is region_map.png. It needs to be 128x120 pixels. If it is smaller, like my one, you'll get this error:
Code:
The specified number of tiles (233) is greater than the maximum possible valueThe inverse can also happen, where you see black tiles near the end of your region map. At that point you'd have to cut off some tiles so there are only 233 tiles.
At this point everything should be completely done, bar any mistakes made in the process.
You should have the tileset (region_map.png), the palette starting from index 112 (region_map.pal), and the two tilemaps for pokenav (region_map_map.bin) and pokedex (region_map.bin).
Here's what I have:
Go to graphics/interface and paste and replace these three files:
region_map.png
region_map.pal
region_map.bin
Go to graphics/pokenav and paste and replace these three files:
region_map.png
region_map.pal
region_map_map.bin
And you should have a completely new region map in both your pokedex and everywhere else! You can edit this more through PoryMap with the Region Map Editor, but that's out of scope for this tutorial.
Hope this helps.
Last edited: