
You are using an out of date browser. It may not display this or other websites correctly.
You should upgrade or use an alternative browser.
You should upgrade or use an alternative browser.
Spriting Tutorials - Pokemon and Trainer
- Thread starter Chesu
- Start date
More options
Who Replied?PokeHackers
Spriter
- 37
- Posts
- 14
- Years
- Seen Sep 24, 2010
It's really good, I have nothing bad to say about it except,
I hate unfinished things.
=(
I hate unfinished things.
=(
0m3GA ARS3NAL
Im comin' home...
- 1,816
- Posts
- 16
- Years
- Age 31
- Superjail Penitentiary
- Seen Oct 4, 2023
It's really good, I have nothing bad to say about it except,
I hate unfinished things.
=(
Give Chesu some time, he'll get it done.
Chesu
Boss Carrot
- 583
- Posts
- 15
- Years
- Where The Carrots Be
- Seen Apr 10, 2019
Yeah... eventually... e_e
Llennoccm8
The Sprietenator
- 87
- Posts
- 15
- Years
- In the Isshu Region
- Seen Mar 2, 2014
Thanks! this will help me in the future.
Tried your Algamation tut, very helpful! Thanks.
I came out with this:
 It's obviously a wip, as I just changed the lower body and hair (and crapped up the face, xD).. I'll post the rest when I finish.
Edit: just finished it. Wow, the old version looks really bad.. xD.

I came out with this:
Edit: just finished it. Wow, the old version looks really bad.. xD.
Last edited:
mama luigi
It's freakin' Mama Luigi!
- 28
- Posts
- 14
- Years
- Age 26
- Hungary
- Seen Mar 24, 2010
yay! thaks for this tutorial,it is really helpful! ^.^ I look forward for the back sprite tutorial! I'll try the scratch spriting,and post it if it comes out good! ^.^
~*!*~Tatsujin Gosuto~*!*~
Buffalo State College
- 12,049
- Posts
- 18
- Years
- Age 32
- Bronx, New York
- Seen Sep 4, 2014
Tried your Algamation tut, very helpful! Thanks.
I came out with this:It's obviously a wip, as I just changed the lower body and hair (and crapped up the face, xD).. I'll post the rest when I finish.
Edit: just finished it. Wow, the old version looks really bad.. xD.
in my eyes, nice job with the shading and the coloring of this sprite.
:t354:TG

~*!*~Tatsujin Gosuto~*!*~
Buffalo State College
- 12,049
- Posts
- 18
- Years
- Age 32
- Bronx, New York
- Seen Sep 4, 2014

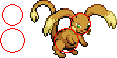
mew and celibii fusion with very little scratch work
Celebi or Serebii
You did a great job with the coloring and shading with this but the head may need to be positioned in a different way
:t354:TG
The Smell
Doof-Man
- 212
- Posts
- 17
- Years
- Melbourne, Australia
- Seen Nov 14, 2013
OK, so I did a trace-over trainer. I used this anime art here:

And came up with this:

What can I improve?
Spoiler:
And came up with this:
What can I improve?
Last edited:
shortdan1998
Rawr! I'm back, baby!
- 82
- Posts
- 15
- Years
- California
- Seen Mar 28, 2016
when is the next update coming?
Chesu
Boss Carrot
- 583
- Posts
- 15
- Years
- Where The Carrots Be
- Seen Apr 10, 2019
The next update? Well, that's going to be... ahaha... Well, you see...
My, a convenient distraction! Wait, didn't that post used to be about the fusion/recolor topic? Well, anyway. The Smell, you could touch up the outline a little, maybe add a bit of shading if you want... The face looks a little off, you should work on that too.
Oh, and shortdan, your signature is about three times larger than the maximum allowed size, you should do something about that before a mod gets to it.
What can I improve?
My, a convenient distraction! Wait, didn't that post used to be about the fusion/recolor topic? Well, anyway. The Smell, you could touch up the outline a little, maybe add a bit of shading if you want... The face looks a little off, you should work on that too.
Oh, and shortdan, your signature is about three times larger than the maximum allowed size, you should do something about that before a mod gets to it.
The Smell
Doof-Man
- 212
- Posts
- 17
- Years
- Melbourne, Australia
- Seen Nov 14, 2013
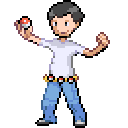
Haha, yes it was. Anyway, this is a trainer I made by throwing together different parts of trainers and editing them. What can I improve?
Chesu
Boss Carrot
- 583
- Posts
- 15
- Years
- Where The Carrots Be
- Seen Apr 10, 2019
The torso is kind of boring.. maybe add a design or the shirt or something? The legs also seem a bit short. You'll get more help if you post in one of the large stickied threads.
The Smell
Doof-Man
- 212
- Posts
- 17
- Years
- Melbourne, Australia
- Seen Nov 14, 2013
The torso is kind of boring.. maybe add a design or the shirt or something? The legs also seem a bit short. You'll get more help if you post in one of the large stickied threads.
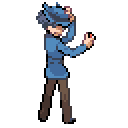
That's what I was thinking about the torso. Also, the legs had to be shortened so it could fit in the 64x64 space. ;)
Thanks for the review.
What about this pose of Riley I did?
Last edited:
Chesu
Boss Carrot
- 583
- Posts
- 15
- Years
- Where The Carrots Be
- Seen Apr 10, 2019
GBA/DS Pokemon Back Sprite Tutorial
GBA/DS Pokemon Back Sprite Tutorial
by Chesu
If you have any questions or would like to give feedback
on the tutorials, click here to leave me a visitor message!
by Chesu
While sprites viewed from the front are by far the most popular,
especially when it comes to Pokemon, the large sprites representing your
team in battle are just as important. With that in mind, let's get right to it!

You may recognize Marchare from my original spriting tutorial.
It's the first Pokemon sprite I ever made from scratch, and allows
me to bring up a few points in the process of making a back sprite, so
it's what I'll be spriting. If you don't have your own sprite and want to give
this tutorial a try, why not make your own back sprite of an existing
Pokemon and see how close to the real deal it turns out?

The first thing we need to do is figure out how big the
sprite will be. Since back sprites are closer in the player's
perspective, they will always be bigger than the front sprite
versions. Most front sprites fill up a good portion of the area they're
allowed to take up (64x64 for third generation, 80x80 for fourth
generation), so the back sprites of all but the smallest/floatiest
Pokemon will have their lower halves cut off. However, seven of
the ten Pokemon I checked had back sprites that were the height
as their front sprites, like Banette up there. This only applies to third
generation sprites; most back sprites from the fourth are much larger
than the front sprites. So, how do we determine how much bigger the
features of the back sprite need to be? Well, through a bit of research
and experimentation, I've discovered that third gen sprites are forty
percent larger, and that fourth gen sprites are usually fifty to
seventy percent larger. We can apply that thusly:


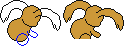
First, take your sprite and flip it horizontally, then
increase the size by the desired percentage. In MS
Paint, you would right-click the sprite or click the Image
tab, select "Stretch/Skew", and replace the 100% in both
boxes under Stretch with 140; in Paint Shop Pro, click the
Image tab, select Resize, and do the same thing in the Pixel
Dimensions box, while making sure that it's set to Percentage
rather than Pixels. It may be a little blocky, but don't worry, this
image won't make it into the final sprite. As you can see in the
Banette animation, while the resized sprite is a blocky mess,
all of its features are almost exactly the same size as
the ones in the back sprite. With this, we can
begin working on the sprite itself.

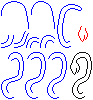
Using the method from the original scratch tutorial, create
some shapes around the same size as the important parts of your
enlarged sprite's body, then fit them together in an approximation
of the front sprite's pose and start reshaping them. The circles are
placed on top of the sprite in the image on the left only to show the
size comparison; since the back sprite is viewed more from above,
you shouldn't try to put the shapes together exactly as they sit on
top of your resized sprite. I set them about the same way I did
when making the original sprite, and will work from there.
Once you're reasonably happy with the basic shape
of the body, we can move on to limbs and
deciding where to cut off the sprite.


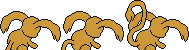
Here's a selection of parts I made based on the
resized sprite, and my first attempts at assembling
them. Like I said before, one reason that I chose Marchare
was to point out some important aspects of making a back sprite;
one of them is budgeting your available space. Marchare's front sprite
is one pixel short of the third generation's maximum width, meaning
that a larger version will have to be a bit different from the original
to fit. My first thought was to perk the ears up so that there would
be room for the tail, but that looked kind of... terrible. Also,
between the positions of the ears and arm, the sprite
seems to be facing straight to the right, which
we want to avoid if at all possible.
By making the ears just a bit shorter than in
the front sprite, I'm able to make much better-looking
ears that make the sprite only a few pixels wider than it
was with them perked up. Unfortunately, the left ear being
down means that the tail overlapping it will be almost unavoidable.
There are only ten pixels between the back of the body and the edge
of the area I have to work with, so I definitely won't be able to draw the
tail the same way it appears in the front sprite. Don't worry though, if
you fiddle with it enough you'll always find a way around things like
this. I cut the sprite off around the middle of the hip, to make
sure that there's at least one pixel between the bottom of
the foot and where the battle menu would be.
This brings me to the next point I chose Marchare
in order to bring up: whether or not to show certain
body parts. I could get away with lowering the majority
of the tail below the cut off point, saving me from having
to deal with the overlapping of tail and ear, but after a bit
of experimentation I decided that it wouldn't look very good.
That doesn't mean that you shouldn't try something similar if
you think it would work though, every sprite is different. I ended
up going with a more curvy version of the front sprite's tail, with the
dimensions based on the resized sprite. If you overlap parts like
this, make sure that the shapes work well together. If this tail
were moved one pixel in any direction, its outline would
touch the outline of the ear or body and look... Well,
not so good. Once you're happy with your limbs,
it's time to move on to one last point worth
considering, then the final stage, shading!

The last reason I chose Marchare is the shape of
its face. Because of the way Rattata's face is shaped,
its eyes aren't visible from this angle, while Banette's
are. Marchare's eyes are spaced farther apart than Rattata's
but not quite as much as Banette's, so how much of its face I
show is down to a judgment call. There's really no golden rule for
this, you'll just have to make a choice based on the shape of your
sprite's head and face. Once you've worked that out, it's time to shade!
As shown in the second and third generation Rattata sprites (official
revamps of back sprites are pretty common... who knew!), the
light source is almost directly above. How much
dithering you use is completely up to you.

With a little modification to the head and
back, it's looking even more like the front sprite.
That's one last thing I would like to bring up; don't
be afraid to make changes like this at the last minute.
No matter how much work you've done on a sprite, you're
not committed to the current look. If you think it could
look better, go ahead and try! So long as you keep
backups of all important revisions of your
sprite, it never hurts to experiment.
Well, there you have it. Back sprites may seem
intimidating, what with their large size and divergence
from the familiar rules of Pokemon spriting, but in reality
all you need is to know a few useful techniques. I hope
you've found this tutorial useful! Until next time...
Keep spriting!

---especially when it comes to Pokemon, the large sprites representing your
team in battle are just as important. With that in mind, let's get right to it!
You may recognize Marchare from my original spriting tutorial.
It's the first Pokemon sprite I ever made from scratch, and allows
me to bring up a few points in the process of making a back sprite, so
it's what I'll be spriting. If you don't have your own sprite and want to give
this tutorial a try, why not make your own back sprite of an existing
Pokemon and see how close to the real deal it turns out?
The first thing we need to do is figure out how big the
sprite will be. Since back sprites are closer in the player's
perspective, they will always be bigger than the front sprite
versions. Most front sprites fill up a good portion of the area they're
allowed to take up (64x64 for third generation, 80x80 for fourth
generation), so the back sprites of all but the smallest/floatiest
Pokemon will have their lower halves cut off. However, seven of
the ten Pokemon I checked had back sprites that were the height
as their front sprites, like Banette up there. This only applies to third
generation sprites; most back sprites from the fourth are much larger
than the front sprites. So, how do we determine how much bigger the
features of the back sprite need to be? Well, through a bit of research
and experimentation, I've discovered that third gen sprites are forty
percent larger, and that fourth gen sprites are usually fifty to
seventy percent larger. We can apply that thusly:
First, take your sprite and flip it horizontally, then
increase the size by the desired percentage. In MS
Paint, you would right-click the sprite or click the Image
tab, select "Stretch/Skew", and replace the 100% in both
boxes under Stretch with 140; in Paint Shop Pro, click the
Image tab, select Resize, and do the same thing in the Pixel
Dimensions box, while making sure that it's set to Percentage
rather than Pixels. It may be a little blocky, but don't worry, this
image won't make it into the final sprite. As you can see in the
Banette animation, while the resized sprite is a blocky mess,
all of its features are almost exactly the same size as
the ones in the back sprite. With this, we can
begin working on the sprite itself.
Using the method from the original scratch tutorial, create
some shapes around the same size as the important parts of your
enlarged sprite's body, then fit them together in an approximation
of the front sprite's pose and start reshaping them. The circles are
placed on top of the sprite in the image on the left only to show the
size comparison; since the back sprite is viewed more from above,
you shouldn't try to put the shapes together exactly as they sit on
top of your resized sprite. I set them about the same way I did
when making the original sprite, and will work from there.
Once you're reasonably happy with the basic shape
of the body, we can move on to limbs and
deciding where to cut off the sprite.
Here's a selection of parts I made based on the
resized sprite, and my first attempts at assembling
them. Like I said before, one reason that I chose Marchare
was to point out some important aspects of making a back sprite;
one of them is budgeting your available space. Marchare's front sprite
is one pixel short of the third generation's maximum width, meaning
that a larger version will have to be a bit different from the original
to fit. My first thought was to perk the ears up so that there would
be room for the tail, but that looked kind of... terrible. Also,
between the positions of the ears and arm, the sprite
seems to be facing straight to the right, which
we want to avoid if at all possible.
By making the ears just a bit shorter than in
the front sprite, I'm able to make much better-looking
ears that make the sprite only a few pixels wider than it
was with them perked up. Unfortunately, the left ear being
down means that the tail overlapping it will be almost unavoidable.
There are only ten pixels between the back of the body and the edge
of the area I have to work with, so I definitely won't be able to draw the
tail the same way it appears in the front sprite. Don't worry though, if
you fiddle with it enough you'll always find a way around things like
this. I cut the sprite off around the middle of the hip, to make
sure that there's at least one pixel between the bottom of
the foot and where the battle menu would be.
This brings me to the next point I chose Marchare
in order to bring up: whether or not to show certain
body parts. I could get away with lowering the majority
of the tail below the cut off point, saving me from having
to deal with the overlapping of tail and ear, but after a bit
of experimentation I decided that it wouldn't look very good.
That doesn't mean that you shouldn't try something similar if
you think it would work though, every sprite is different. I ended
up going with a more curvy version of the front sprite's tail, with the
dimensions based on the resized sprite. If you overlap parts like
this, make sure that the shapes work well together. If this tail
were moved one pixel in any direction, its outline would
touch the outline of the ear or body and look... Well,
not so good. Once you're happy with your limbs,
it's time to move on to one last point worth
considering, then the final stage, shading!
The last reason I chose Marchare is the shape of
its face. Because of the way Rattata's face is shaped,
its eyes aren't visible from this angle, while Banette's
are. Marchare's eyes are spaced farther apart than Rattata's
but not quite as much as Banette's, so how much of its face I
show is down to a judgment call. There's really no golden rule for
this, you'll just have to make a choice based on the shape of your
sprite's head and face. Once you've worked that out, it's time to shade!
As shown in the second and third generation Rattata sprites (official
revamps of back sprites are pretty common... who knew!), the
light source is almost directly above. How much
dithering you use is completely up to you.
With a little modification to the head and
back, it's looking even more like the front sprite.
That's one last thing I would like to bring up; don't
be afraid to make changes like this at the last minute.
No matter how much work you've done on a sprite, you're
not committed to the current look. If you think it could
look better, go ahead and try! So long as you keep
backups of all important revisions of your
sprite, it never hurts to experiment.
Well, there you have it. Back sprites may seem
intimidating, what with their large size and divergence
from the familiar rules of Pokemon spriting, but in reality
all you need is to know a few useful techniques. I hope
you've found this tutorial useful! Until next time...
Keep spriting!
If you have any questions or would like to give feedback
on the tutorials, click here to leave me a visitor message!
Last edited:
Time Shift Dialga
Son of a Pachizel!
- 44
- Posts
- 15
- Years
- Seen Oct 1, 2011
Just out of interest (Heh, that's a common phrase in my life xD), is there any quick way of taking out the palettes, I'm using the eyedropper and pencil still. Is I missing something here?
Haz
Haz ya seen my hack?
- 698
- Posts
- 15
- Years
- Australia- Aussie, Aussie, Aussie!, Oi, Oi, Oi!
- Seen Aug 16, 2011
Great tutorial Chesu! This will help me and alot of other people a lot!
Chesu
Boss Carrot
- 583
- Posts
- 15
- Years
- Where The Carrots Be
- Seen Apr 10, 2019
Thanks Haz!
There really isn't a faster way... and no other way in Paint, really. What I like to do is grab colors with the eyedropper tool, then use the four-pixel brush to make palettes like this:

is there any quick way of taking out the palettes, I'm using the eyedropper and pencil still.
There really isn't a faster way... and no other way in Paint, really. What I like to do is grab colors with the eyedropper tool, then use the four-pixel brush to make palettes like this: