• Our software update is now concluded. You will need to reset your password to log in. In order to do this, you will have to click "Log in" in the top right corner and then "Forgot your password?".
  • Welcome to PokéCommunity! Register now and join one of the best fan communities on the 'net to talk Pokémon and more! We are not affiliated with The Pokémon Company or Nintendo.

Graphics & Photography Tutorials Thread

1,594
Posts
17
Years
Textures are pretty simple, there's no need for a tutorial really. It's just creating a new layer and putting an image onto it, so if you searched on google or again, Appendix Squared, and found say a rust texture, you'd just paste that on, and set it to a blending mode that looks nice, or turned down the opacity.
 

THIRTY-SIX

Banned
8,174
Posts
19
Years
  • Age 36
  • Seen Nov 18, 2015
You can also search Color me evil's posts… I remember he/she/it posted a link to stock textures…
v…… Yeah… I knew that… xD
 
Last edited:
1,594
Posts
17
Years
C4Ds don't take much to get used to using. The extremely hard part is learning how to make them, but you could just go to planet renders and find a few good ones there.
 

Pikabloo

...
4,628
Posts
19
Years
  • Seen Sep 8, 2010
Actually... it is hard to learn how to apply them correctly to signatures, without making it look over-the-top, or making it look weird and unblended o___o There's also the different types of C4D.... It's mainly about knowing when to use them, and when to just use something else. I wrote something on C4Ds just before the forum wipe out thing (where all the posts were from five days back, or something) ;-;

Ah, but yes, making them is probably hard. Not that I would know. I don't use Cinema 4D o.o

EDIT: I had to delete my old post to update it, just in case people didn't notice >.>

Naruto banner tutorial
Program Used: Adobe Photoshop CS (will probably work with other versions)
Required: Some spatter brushes, effect C4Ds, some PSD files, a general knowledge of the tools.
Skill Level: Hard-ish.
Outcome:
narutorasengan-1.png

Tutorial: CLICK HERE. (WARNING: It's pretty darn big >.>)

PLEASE tell me if there are any errors, or any bits where I made no sense. I never read through the whole thing o.o

EDIT-
These are not the smudge settings I used for the Naruto one. But it is similar to what I used for this banner.
Smudge settings
Program Used: Adobe Photoshop CS (will probably work with other versions)
Required: --
Skill Level: --
Tutorial: click.
 
Last edited:

Renyui!

ascender
1,402
Posts
16
Years
Well, I'm bored, so I decided to make a Userbar Tutorial. I'm too lazy to make it.
Userbar Tutorial
Program Used: Photoshop Elements, but I know it will work with any other version.
Required: Scanlines, Sprites,
Skill Level: Easy, I guess.

Tut:
Start off with a 350x20 or 350x23 new document. Get your 2 colours that you want to use in the Userbar, and do a Linear Gradient Directly across with them.

Next, Duplicate the Layer and lower the opacity of the Original layer to 83%.

Do an Elliptic select just across the top, so it looks like a semi circle on the top of the Userbar.

Delete the selection, and you should have a shine effect.

Then add your Scanlines. Set them to about 19% Opacity. For a Tut on Scanlines, visit the first page.

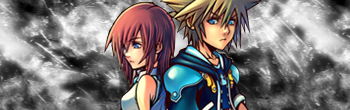
Put in your Sprite(s). Add as much as you want, but leave space for the text.

Now for the text. I didn't really know how to do this, so i did this.
Get out Your Pencil tool, grab a White, go to This page and copy the pixels of the letters you need.
Outline them in Black and thats your text.

Put on a black border and You are done!
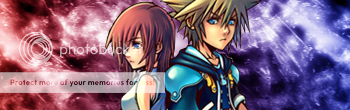
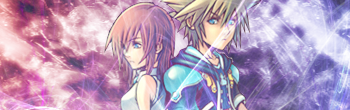
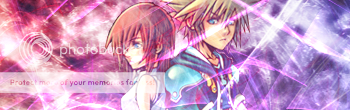
my result:
roy.png

Sources:
Sprites: Photobucket, or PlanetRender
 

Loki

x
6,829
Posts
18
Years
  • Seen Apr 4, 2024
Have fun deciphering this tutorial. xD;;

Program Used: Adobe Photoshop CS2
Required: Listed in the tutorial.
Skill Level: Average Difficulty, depending on your skill level.
Outcome:
imagination.png


Ah, and um... Basically, add layers with every new step, or as you see fit. <3

Tutorial: The REAL Rainbow. xD
 
Last edited:

Pikabloo

...
4,628
Posts
19
Years
  • Seen Sep 8, 2010
Mugen tutorial
Program Used: Adobe Photoshop CS
Required: A render, stocks (a paper stock, and a stock for the background), general knowledge of the tools, knowledge to make clipping masks, spatter brushes (optional), ability to decipher my confusing instructions :D
Skill Level: Medium to hard. Depends on how good you are.
Outcome:
elcapitano.png

Tutorial:
The link

Most of the time, with each instruction, make a new layer o.o;
 

YOOM-TAH

Piplup Fanatic
920
Posts
15
Years
Here's a Planet Lighting Tutorial I made.

Program Used: Adobe Photoshop CS2 (though any version past 6 or 7 should work)
Required: An already spherized planet that you want to add shadows/lighting/atmosphere to, and knowledge of the tools and terms mentioned.
Skill Level: Moderate, more skill needed for the actual planet itself, which this tutorial doesn't show how to make.
Outcome:
tutorialplanetresourceax3.png

(^^keep in mind the tutorial is just for the lighting on the planet, not the planet itself)

Tutorial: http://img150.imageshack.us/img150/1470/planetlightingtutorialua1.jpg
 

Loki

x
6,829
Posts
18
Years
  • Seen Apr 4, 2024
Used Shiranui's Mugen tutorial with the wrong image, but... tch. Oh well. :< It's Bonten, and it turned out alright, I guess. <3

bonten.png
 

THIRTY-SIX

Banned
8,174
Posts
19
Years
  • Age 36
  • Seen Nov 18, 2015
I actually prefer your outcome, no offence to Shiranui. I agree with you about the wrong render.
I might use that tut now. =D
 

joangaes

BANNER MAKER
32
Posts
16
Years
  • Seen Nov 27, 2013
Sora and Kari tut

Well some people PM me to make a tut of this.

It won't stand exactly as the one I made because it would had to be the exact position.

First open up a new canvas on Gimp on file new and then put the length that you need well I used 350 x 110
Sinnombre-1.png

Thenk download some brushes from deviantart.com and brush around a little
Sinnombre-2.png

Thenk put the image and paste it wherever you want:
Sinnombre-3.png


Now were going to put the color:
1:Change the colors of you're foreground and background to things that match you're render like to me will be blue and red.
2-Then make a new layer on layer-new layer.
3-Then open you're layer dialogue that can be found on dialogs the first option and the first option again that'll open you're layer dialogue.
Put the layer that you made down from the render layer and make a gradient with the gradient tool and set that layer to overlay:
Sinnombre-4.png

Now get some good fractual renders (2)be sure to paste them on top of the render layer
Paste them and set the first one to:Plus:
Sinnombre-5.png

And the second one to:Overlay:
Sinnombre-6.png

Then take out an C4D render that can be found on google and paste it 2 times puting it to show to the 2 sides like this:
Sinnombre-7.png

And set both to plus:
Sinnombre-8.png

Then add a border text and you're done.
 
597
Posts
16
Years
  • Seen Jan 5, 2023
Could anyone do a Clipping Mask Tutorial?
i find it hard to it and would like some help
Thanks
 
Back
Top