
You are using an out of date browser. It may not display this or other websites correctly.
You should upgrade or use an alternative browser.
You should upgrade or use an alternative browser.
Spriting Tutorials - Pokemon and Trainer
- Thread starter Chesu
- Start date
More options
Who Replied?
Conan Edogawa
One Truth Prevails
- 1,061
- Posts
- 15
- Years
- Massachusetts
- Seen Nov 29, 2015
Chesu how did you shrink the sprites for trace overs? I tried in ms paint and it didn't work out so I was wondering if there is a technique that I don't know.
Chesu
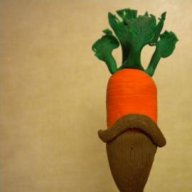
Boss Carrot
- 583
- Posts
- 15
- Years
- Where The Carrots Be
- Seen Apr 10, 2019
I do it in Paint... With the image selected, I go into the Stretch/Skew menu, and resize by percentage. It works best with a nice round number, like twenty-five, fifty, or seventy-five percent.
Last edited:
Conan Edogawa
One Truth Prevails
- 1,061
- Posts
- 15
- Years
- Massachusetts
- Seen Nov 29, 2015
Oh Ok I was just trying to do it in the wrong way. Thank you for the help.
Tunaboy88
Special Beam Cannon!!!!!!!!!!!
- 249
- Posts
- 15
- Years
- Planet Namek! What Don't Believe Me?
- Seen Dec 8, 2009
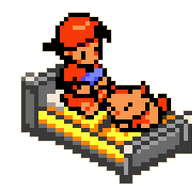
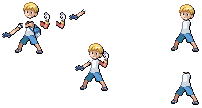
look at this Fakemom I made use the Shading and Pokemon Tutriol
View attachment 46585
I call it Shadowfist Ghost-Fighting
plese tell me where I can improve :D
View attachment 46585
I call it Shadowfist Ghost-Fighting
plese tell me where I can improve :D
Translator
I want a blog.
- 549
- Posts
- 15
- Years
- Age 28
- Philippines
- Seen Dec 3, 2015
This is a good tutorial for people who want to learn how to sprite. Keep it up.
Chesu
Boss Carrot
- 583
- Posts
- 15
- Years
- Where The Carrots Be
- Seen Apr 10, 2019
plese tell me where I can improve :D
You know how the shading on the ball in the shading tutorial is rounded? You might want to do that on the gray parts of your sprites. You should also try softer shades of gray, that are closer to each other. The outline is kind of stark and jaggy... you should use a shade of gray rather than black on the light-colored areas, and make sure that the outline is only one pixel thick.
Conan Edogawa
One Truth Prevails
- 1,061
- Posts
- 15
- Years
- Massachusetts
- Seen Nov 29, 2015
It isn't complete but it looks pretty good I think.

And so everyone knows it isn't a complete scratch.
And so everyone knows it isn't a complete scratch.
- 224
- Posts
- 16
- Years
- Seen Mar 8, 2016
Well... Here's my first trainer sprite ever. It looks pretty bad IMO, so please critique me and give me some advice because I spent like 3 hours on this =/ .
(I based it off a bunch of OW sprites from WAH so I included those for reference.)

(I based it off a bunch of OW sprites from WAH so I included those for reference.)

Tunaboy88
Special Beam Cannon!!!!!!!!!!!
- 249
- Posts
- 15
- Years
- Planet Namek! What Don't Believe Me?
- Seen Dec 8, 2009
thanks for the advice Chesu and now look atr Shadowfist although it still might need some work :D
View attachment 46618
View attachment 46618
Chesu
Boss Carrot
- 583
- Posts
- 15
- Years
- Where The Carrots Be
- Seen Apr 10, 2019
Looking good, everyone! Sorry that I haven't gotten any tutorials up lately, I've been sick for the last few days... NeoNemesis, you need to work a bit on structure and shading.
0m3GA ARS3NAL
Im comin' home...
- 1,816
- Posts
- 16
- Years
- Age 31
- Superjail Penitentiary
- Seen Oct 4, 2023
My goodness man! I gotta say, this is the clearest, easiest to follow tutorial I have ever seen!
+REP for you!
I simply can't wait to see the next parts!
+REP for you!
I simply can't wait to see the next parts!
- 1,775
- Posts
- 15
- Years
- Age 30
- Ireland
- Seen today
Nice! I recently discovered traceovers, but haven't tried it yet. The tutorial helps alot, well done!
(Just to let you know, that Meganium looks better than the legitimate one!). Also, thanks for the trainer tutorials, i used to only ever slice different trainers up, paste them together and recolour them. Not that it looked terrible, but i like being able to do my own. Again, great work!
(Just to let you know, that Meganium looks better than the legitimate one!). Also, thanks for the trainer tutorials, i used to only ever slice different trainers up, paste them together and recolour them. Not that it looked terrible, but i like being able to do my own. Again, great work!
Conan Edogawa
One Truth Prevails
- 1,061
- Posts
- 15
- Years
- Massachusetts
- Seen Nov 29, 2015

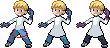
Here's my first trace over.
Chesu
Boss Carrot
- 583
- Posts
- 15
- Years
- Where The Carrots Be
- Seen Apr 10, 2019
I think it's a matter of perspective... I'm comparing myself to people who do pixel art for a living.
edit: I want to throw together the Perspective tutorial but... I can't really think of any important points to discuss. I have something with a square and a cube, an example using two different Pikachu sprites, and trainer sprites that show how perspective is subjective... but that's all I've been able to come up with. If you have any ideas, PM them to me!
edit: I want to throw together the Perspective tutorial but... I can't really think of any important points to discuss. I have something with a square and a cube, an example using two different Pikachu sprites, and trainer sprites that show how perspective is subjective... but that's all I've been able to come up with. If you have any ideas, PM them to me!
Last edited:
Chesu
Boss Carrot
- 583
- Posts
- 15
- Years
- Where The Carrots Be
- Seen Apr 10, 2019
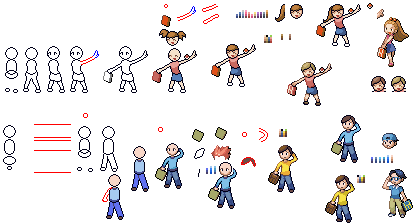
Trainer Amalgamation Tutorial
Trainer Amalgamation Tutorial
by Chesu

As this type of sprite is the one that will most often
make its way into ROM hacks and independent games, I
wanted to make sure that I made everything clear and easy to
understand. That's not to say that this is why I haven't created a
new tutorial in over two weeks; as I'm typing this, I haven't even
started on the resources for this tutorial. I guess what I'm trying
to say is, this is going to be a long, very image-heavy tutorial.

While using concept art helps immensely, and I
can't recommend it enough, it isn't necessary so long as
you have a clear mental image of what you want the sprite
to look like. While the only major deviations from the base sprites
in the image above are in the coloring, most people probably wouldn't
recognize the Lass' arms, because of context they're used in (aggressive,
rather than charming). The Cool Trainer's face, however, is slightly more
recognizable. While I don't like leaving faces unchanged, even small
changes are all that's needed for a complete makeover.

The only real change (color aside) in the face is above
the eyes, but the expression and perceived shape of the face
has definitely been altered. While I prefer to blank out faces and
draw in new ones, you can make big changes by altering just a
few pixels. Now that I've covered that, I think it's time to
start the tutorial proper! I don't actually know what I'll
be making, so let's see what I get on impulse.

Hmm, Sabrina's left arm seems like a good place to start.
For the right arm... well, a hand can easily become a glove, and
vice-versa, so I'm not even going to worry about that. I should
find an arm with sleeves about the same as Sabrina's...

Or, practically no sleeves at all. That works too. I
honestly just chose this on a whim; "Oh, an Aqua Grunt.
Okay, let's see if this pans out"... Now, to find a sleek,
attractive female body and a cute head.

...Or not. Again, I'm just choosing whatever catches
my eye, even if it doesn't make sense. I went with the Bug
Catcher's body, and the Tuber's head. His hair is just so goofy!
So, now I need to render the parts I'll be using from their bodies.
If you're spriting along with this tutorial, collect the parts
you'll be using before reading the next paragraph.

Well that's not hideous or scary at all. You may
be wondering, "How is this even going to work?"... well, I
couldn't tell you. What I can tell you, though, is that the
Bug Catcher's torso needs to be cleaned up a little.

There we go. It should be a lot easier to affix the
arms now. You don't necessarily have to remove the arms
to put the new ones on, as demonstrated by this sprite from
earlier, but in the Bug Catcher's case it's unavoidable. Since the
arms I've chosen are so much larger than you would expect to see
on a seven-year-old, I'm going to need to trim them a bit. Even if
the limbs you're using are around the same size as the originals
from the torso you're attaching them to, don't be afraid
to adjust them as necessary.

Yeah, yeah, I left the hands the same size...
The entire point of this is using existing assets, and
I'm not great with hands. I guess the kid will be wearing
large gloves for some reason. Anyway, it's time to assemble!
If you're worried about it not turning out right, work with a copy
of your progressing sprite. I'm almost certain that the majority
of spriters do it... I do, anyway. In fact, this is what
my work area looks like at the moment:
When cobbling sprites together like this, I like to keep
resources and palettes in the corners of my screen (this
image fills the screen in MS Paint with 6x zoom), and an open
area in the middle to work freely. Due to the differences in the
way they progress, my work area for sprites drawn from scratch
tend to become filled with long chains of sprites. Looking at
the following image closely is not for the weak of heart, as
it's the unedited fallout of my sprite-making process.
You clicked it, didn't you? Well, if you're able to read
this, you've clearly managed to recover. My point is, it's okay
to leave an "evolution of man"-esque trail of sprites that you can
revert back to or reference. Moving right along, I've affixed the
arms to the torso, so it's time to homogenize everything.

I don't think I need to say this, but I will anyway,
for the sake of thoroughness: make sure that one part
flows seamlessly into the next (unless there's supposed
to be a seam there, that is), and replace colors with a similar
shade in the hue that you've chosen. If you need to reshade
anything, you'll just have to rely on your own judgement.
If you're combining parts that show skin, make sure
that they're all shaded with the same tone; though my little
gloved kid may look like he has a continuous skin color, the Bug
Catcher, Tuber, and Aqua Grunt all use different palettes for
their skin. I'm not going to bother making the face and legs
the same color... he's wearing a long-sleeved shirt and
gloves, shorts and sandals with that would look silly.

Okay, so he's still wearing sandals... I'll worry about
that later. Now that I have the basic shape done, it's time
to get down to details. You should know what it is you're making
by now, if you didn't when you began... I still have no idea. He's
a kid... what do kids do? The way he's dressed, he doesn't seem
to be on the way home from school, and I'd bet my beard
that he isn't ready for a day on the beach...
Okay, why do people wear gloves? To protect their
hands... but from what? The cold.. he could be a sledder...
or hot water, maybe he's a dish washer at a restaurant that's
breaking child labor laws. Or, maybe... chemicals? You know, he
does look a bit like a mad scientist. I actually kind of like that.
Okay! My little gloved kid is hereafter a mad scientist!
Most people would depict a mad scientist as wearing
a lab coat without a second thought, but my mental image
is of Dr. Frankenstein in an old-fashioned surgeon's gown, so
that's what I'm going with. It's important to remember that
these are supposed to be real people, and that a lot of
them dress the way they do for a specific reason.
Yeah, I know, this tutorial is supposed to be about
using parts from existing sprites... but sometimes, you just
have to draw things yourself. I use bright red or blue, so that
my lines are easy to see and modify. I couldn't tell you why,
but I felt the urge to make the gloves and pants
purple and black, respectively. Hmm...

Ye Olde Surgeon's Gown™ folds over and usually
buttons from shoulder to hip, so in my sprite's stance
you should be able to see the underlying layer of the gown at
the bottom. Small details like that can make more of a difference
than you might think. The white palette used on the Bug Catcher's
shirt is only three shades, so to shade the sprite a bit more I replaced
it with the (four-toned) palette from a Lass' shirt. I also stole the
shoes of a Youngster that was in a similar pose, and recolored
my little scientist's hair. Why orange? Well, who can say. I
could alter the shoes, but I think I'll leave them as they
are. The sprite is more or less done now, but... I
think I'll add just one more small touch.

Oh come on, I had to.
Remember, if your sprite is for a ROM hack, you
have to limit it to sixteen colors, one of which must be a
background color used nowhere else on the sprite. I hope
you've learned something, and if you haven't... well,
maybe YOU should be writing tutorials!
---
If you have any questions or would like to give feedback
on the tutorials, click here to leave me a visitor message!
by Chesu
As this type of sprite is the one that will most often
make its way into ROM hacks and independent games, I
wanted to make sure that I made everything clear and easy to
understand. That's not to say that this is why I haven't created a
new tutorial in over two weeks; as I'm typing this, I haven't even
started on the resources for this tutorial. I guess what I'm trying
to say is, this is going to be a long, very image-heavy tutorial.
While using concept art helps immensely, and I
can't recommend it enough, it isn't necessary so long as
you have a clear mental image of what you want the sprite
to look like. While the only major deviations from the base sprites
in the image above are in the coloring, most people probably wouldn't
recognize the Lass' arms, because of context they're used in (aggressive,
rather than charming). The Cool Trainer's face, however, is slightly more
recognizable. While I don't like leaving faces unchanged, even small
changes are all that's needed for a complete makeover.
The only real change (color aside) in the face is above
the eyes, but the expression and perceived shape of the face
has definitely been altered. While I prefer to blank out faces and
draw in new ones, you can make big changes by altering just a
few pixels. Now that I've covered that, I think it's time to
start the tutorial proper! I don't actually know what I'll
be making, so let's see what I get on impulse.
Hmm, Sabrina's left arm seems like a good place to start.
For the right arm... well, a hand can easily become a glove, and
vice-versa, so I'm not even going to worry about that. I should
find an arm with sleeves about the same as Sabrina's...
Or, practically no sleeves at all. That works too. I
honestly just chose this on a whim; "Oh, an Aqua Grunt.
Okay, let's see if this pans out"... Now, to find a sleek,
attractive female body and a cute head.
...Or not. Again, I'm just choosing whatever catches
my eye, even if it doesn't make sense. I went with the Bug
Catcher's body, and the Tuber's head. His hair is just so goofy!
So, now I need to render the parts I'll be using from their bodies.
If you're spriting along with this tutorial, collect the parts
you'll be using before reading the next paragraph.
Well that's not hideous or scary at all. You may
be wondering, "How is this even going to work?"... well, I
couldn't tell you. What I can tell you, though, is that the
Bug Catcher's torso needs to be cleaned up a little.
There we go. It should be a lot easier to affix the
arms now. You don't necessarily have to remove the arms
to put the new ones on, as demonstrated by this sprite from
earlier, but in the Bug Catcher's case it's unavoidable. Since the
arms I've chosen are so much larger than you would expect to see
on a seven-year-old, I'm going to need to trim them a bit. Even if
the limbs you're using are around the same size as the originals
from the torso you're attaching them to, don't be afraid
to adjust them as necessary.
Yeah, yeah, I left the hands the same size...
The entire point of this is using existing assets, and
I'm not great with hands. I guess the kid will be wearing
large gloves for some reason. Anyway, it's time to assemble!
If you're worried about it not turning out right, work with a copy
of your progressing sprite. I'm almost certain that the majority
of spriters do it... I do, anyway. In fact, this is what
my work area looks like at the moment:
When cobbling sprites together like this, I like to keep
resources and palettes in the corners of my screen (this
image fills the screen in MS Paint with 6x zoom), and an open
area in the middle to work freely. Due to the differences in the
way they progress, my work area for sprites drawn from scratch
tend to become filled with long chains of sprites. Looking at
the following image closely is not for the weak of heart, as
it's the unedited fallout of my sprite-making process.
Spoiler:
You clicked it, didn't you? Well, if you're able to read
this, you've clearly managed to recover. My point is, it's okay
to leave an "evolution of man"-esque trail of sprites that you can
revert back to or reference. Moving right along, I've affixed the
arms to the torso, so it's time to homogenize everything.
I don't think I need to say this, but I will anyway,
for the sake of thoroughness: make sure that one part
flows seamlessly into the next (unless there's supposed
to be a seam there, that is), and replace colors with a similar
shade in the hue that you've chosen. If you need to reshade
anything, you'll just have to rely on your own judgement.
If you're combining parts that show skin, make sure
that they're all shaded with the same tone; though my little
gloved kid may look like he has a continuous skin color, the Bug
Catcher, Tuber, and Aqua Grunt all use different palettes for
their skin. I'm not going to bother making the face and legs
the same color... he's wearing a long-sleeved shirt and
gloves, shorts and sandals with that would look silly.
Okay, so he's still wearing sandals... I'll worry about
that later. Now that I have the basic shape done, it's time
to get down to details. You should know what it is you're making
by now, if you didn't when you began... I still have no idea. He's
a kid... what do kids do? The way he's dressed, he doesn't seem
to be on the way home from school, and I'd bet my beard
that he isn't ready for a day on the beach...
Okay, why do people wear gloves? To protect their
hands... but from what? The cold.. he could be a sledder...
or hot water, maybe he's a dish washer at a restaurant that's
breaking child labor laws. Or, maybe... chemicals? You know, he
does look a bit like a mad scientist. I actually kind of like that.
Okay! My little gloved kid is hereafter a mad scientist!
Most people would depict a mad scientist as wearing
a lab coat without a second thought, but my mental image
is of Dr. Frankenstein in an old-fashioned surgeon's gown, so
that's what I'm going with. It's important to remember that
these are supposed to be real people, and that a lot of
them dress the way they do for a specific reason.
Yeah, I know, this tutorial is supposed to be about
using parts from existing sprites... but sometimes, you just
have to draw things yourself. I use bright red or blue, so that
my lines are easy to see and modify. I couldn't tell you why,
but I felt the urge to make the gloves and pants
purple and black, respectively. Hmm...
Ye Olde Surgeon's Gown™ folds over and usually
buttons from shoulder to hip, so in my sprite's stance
you should be able to see the underlying layer of the gown at
the bottom. Small details like that can make more of a difference
than you might think. The white palette used on the Bug Catcher's
shirt is only three shades, so to shade the sprite a bit more I replaced
it with the (four-toned) palette from a Lass' shirt. I also stole the
shoes of a Youngster that was in a similar pose, and recolored
my little scientist's hair. Why orange? Well, who can say. I
could alter the shoes, but I think I'll leave them as they
are. The sprite is more or less done now, but... I
think I'll add just one more small touch.
Oh come on, I had to.
Remember, if your sprite is for a ROM hack, you
have to limit it to sixteen colors, one of which must be a
background color used nowhere else on the sprite. I hope
you've learned something, and if you haven't... well,
maybe YOU should be writing tutorials!
---
If you have any questions or would like to give feedback
on the tutorials, click here to leave me a visitor message!
Last edited: