• Our software update is now concluded. You will need to reset your password to log in. In order to do this, you will have to click "Log in" in the top right corner and then "Forgot your password?".
  • Welcome to PokéCommunity! Register now and join one of the best fan communities on the 'net to talk Pokémon and more! We are not affiliated with The Pokémon Company or Nintendo.

Help in Customizing Button Positions on PokeGear

302
Posts
13
Years
    • Seen Aug 25, 2014
    Well guys, it's me again! I'd like to get help on a topic that won't be as overblown as my last one. I appreciated the help I got back then and I'll appreciate it just the same now.

    I'm attempting to make a customized appearance for the Pokegear script, one that simply repositions the selectable buttons and adjusts the controls to allow left-right movement instead of up and down.

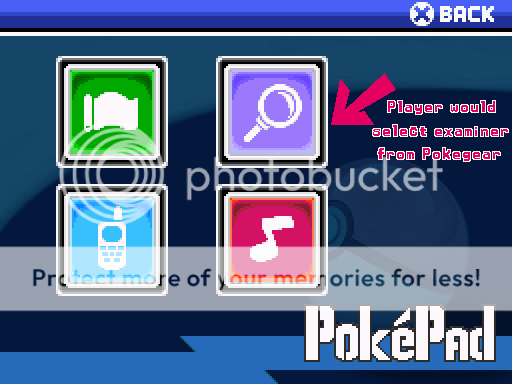
    Here is a mock-up I created that I'm trying to recreate:
    Help in Customizing Button Positions on PokeGear

    (ignore the red text/arrow part)
    Button graphics for the Map, PokeExaminer(A custom scene of mine), Cell Phone and Music Player are all aranged in this fashion, and the player would move in all 4 directions to access them. Make's sense?


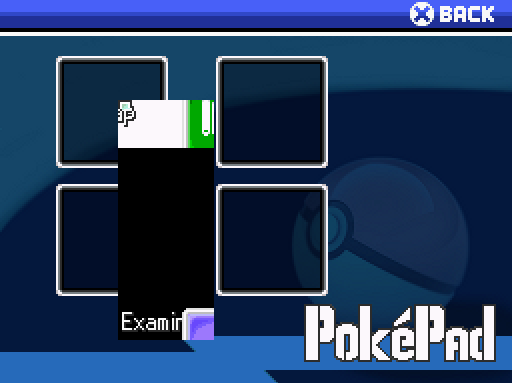
    Unfortunately, it currently looks like this when I pull it up in game:
    Help in Customizing Button Positions on PokeGear


    Also, the only line I see in the script PokemonPokegear that seems to allow customization for button positions is this:
    Code:
        for i in 0...commands.length
          x=118
          y=196 - (commands.length*24) + (i*48)
          @sprites["button#{i}"]=PokegearButton.new(x,y,commands[i],i,@viewport)
          @sprites["button#{i}"].selected=(i==@sprites["command_window"].index)
          @sprites["button#{i}"].update
        end
    I don't quite understand this. Does it determine the next position of the selectable button by multiplying the value for "y"?

    Any help is appreciated, and since I edited the code for this script a little, here is my version of PokemonPokegear to pick apart:
    Code:
    class PokegearButton < SpriteWrapper
      attr_reader :index
      attr_reader :name
      attr_accessor :selected
    
      def initialize(x,y,name="",index=0,viewport=nil)
        super(viewport)
        @index=index
        @name=name
        @selected=false
        fembutton=pbResolveBitmap(sprintf("Graphics/Pictures/pokegearButtonf"))
        if $Trainer.gender==1 && fembutton
          @button=AnimatedBitmap.new("Graphics/Pictures/pokegearButtonf")
        else
          @button=AnimatedBitmap.new("Graphics/Pictures/pokegearButton")
        end
        @contents=BitmapWrapper.new(@button.width,@button.height)
        self.bitmap=@contents
        self.x=x
        self.y=y
        update
      end
    
      def dispose
        @button.dispose
        @contents.dispose
        super
      end
    
      def refresh
        self.bitmap.clear
        self.bitmap.blt(0,0,@button.bitmap,Rect.new(0,0,@button.width,@button.height))
        pbSetSystemFont(self.bitmap)
        textpos=[          # Name is written on both unselected and selected buttons
           [@name,self.bitmap.width/349,93,2,Color.new(248,248,248),Color.new(40,40,40)],
           [@name,self.bitmap.width/2,62,2,Color.new(248,248,248),Color.new(40,40,40)]
        ]
        pbDrawTextPositions(self.bitmap,textpos)
        icon=sprintf("Graphics/Pictures/pokegear"+@name)
        imagepos=[         # Icon is put on both unselected and selected buttons
           [icon,64,64,0,0,-1,-1],
           [icon,64,192,0,0,-1,-1],
           [icon,224,192,0,0,-1,-1],
           [icon,224,192,0,0,-1,-1],
        ]
        pbDrawImagePositions(self.bitmap,imagepos)
      end
    
      def update
        if self.selected
          self.src_rect.set(0,self.bitmap.height/2,self.bitmap.width,self.bitmap.height/2)
        else
          self.src_rect.set(0,0,self.bitmap.width,self.bitmap.height/2)
        end
        refresh
        super
      end
    end


    #===============================================================================
    # - Scene_Pokegear
    #-------------------------------------------------------------------------------
    # Modified By Harshboy
    # Modified by Peter O.
    # Also Modified By OblivionMew
    # Overhauled by Maruno
    #===============================================================================
    class Scene_Pokegear
      #-----------------------------------------------------------------------------
      # initialize
      #-----------------------------------------------------------------------------
      def initialize(menu_index = 0)
        @menu_index = menu_index
      end
      #-----------------------------------------------------------------------------
      # main
      #-----------------------------------------------------------------------------
      def main
        commands=[]
    # OPTIONS - If you change these, you should also change update_command below.
        @cmdMap=-1
        @cmdPhone=-1
        @cmdJukebox=-1
        @cmdExaminer=-1
        commands[@cmdMap=commands.length]=_INTL("Map")
        commands[@cmdPhone=commands.length]=_INTL("Phone") if $PokemonGlobal.phoneNumbers &&
                                                              $PokemonGlobal.phoneNumbers.length>0
        commands[@cmdJukebox=commands.length]=_INTL("Jukebox")
        commands[@cmdExaminer=commands.length]=_INTL("Examiner")
    
        @viewport=Viewport.new(0,0,Graphics.width,Graphics.height)
        @viewport.z=99999
        @button=AnimatedBitmap.new("Graphics/Pictures/pokegearButton")
        @sprites={}
        @sprites["background"] = IconSprite.new(0,0)
        femback=pbResolveBitmap(sprintf("Graphics/Pictures/pokegearbgf"))
        if $Trainer.gender==1 && femback
          @sprites["background"].setBitmap("Graphics/Pictures/pokegearbgf")
        else
          @sprites["background"].setBitmap("Graphics/Pictures/pokegearbg")
        end
        @sprites["command_window"] = Window_CommandPokemon.new(commands,160)
        @sprites["command_window"].index = @menu_index
        @sprites["command_window"].x = Graphics.width
        @sprites["command_window"].y = 0
        for i in 0...commands.length
          x=118
          y=196 - (commands.length*24) + (i*48)
          @sprites["button#{i}"]=PokegearButton.new(x,y,commands[i],i,@viewport)
          @sprites["button#{i}"].selected=(i==@sprites["command_window"].index)
          @sprites["button#{i}"].update
        end
        Graphics.transition
        loop do
          Graphics.update
          Input.update
          update
          if $scene != self
            break
          end
        end
        Graphics.freeze
        pbDisposeSpriteHash(@sprites)
      end
      #-----------------------------------------------------------------------------
      # update the scene
      #-----------------------------------------------------------------------------
      def update
        pbUpdateSpriteHash(@sprites)
        for i in 0...@sprites["command_window"].commands.length
          sprite=@sprites["button#{i}"]
          sprite.selected=(i==@sprites["command_window"].index) ? true : false
        end
        #update command window and the info if it's active
        if @sprites["command_window"].active
          update_command
          return
        end
      end
      #-----------------------------------------------------------------------------
      # update the command window
      #-----------------------------------------------------------------------------
      def update_command
        if Input.trigger?(Input::B)
          pbPlayCancelSE()
          $scene = Scene_Map.new
          return
        end
        if Input.trigger?(Input::C)
          if @cmdMap>=0 && @sprites["command_window"].index==@cmdMap
            pbPlayDecisionSE()
            pbShowMap(-1,false)
          end
          if @cmdPhone>=0 && @sprites["command_window"].index==@cmdPhone
            pbPlayDecisionSE()
            pbFadeOutIn(99999) {
               PokemonPhoneScene.new.start
            }
          end
          if @cmdJukebox>=0 && @sprites["command_window"].index==@cmdJukebox
            pbPlayDecisionSE()
            $scene = Scene_Jukebox.new
          end
          if @cmdExaminer>=0 && @sprites["command_window"].index==@cmdExaminer
            pbPlayDecisionSE()
            pbFadeOutIn(99999) {
                scene=Scene_Examiner.new
                screen=PokemonExaminer.new(scene)
                screen.pbStartScreen($Trainer.party,0)
            }
          end
          return
        end
      end
    end
     

    Maruno

    Lead Dev of Pokémon Essentials
    5,286
    Posts
    16
    Years
    • Seen May 3, 2024
    The actual selection of the options is done by a regular options list (@sprites["command_window"]) which is placed off-screen. The graphics are then updated depending on which option in the command window is currently selected.

    From your design, you'd manage just fine with a 2 column wide list rather than the 1 column wide it currently uses. Just add this line where the command window is defined:

    Code:
    @sprites["command_window"].columns=2
    That lets you go left/right as well as up/down. The second part is drawing the buttons in the correct places, which is simply a matter of changing the x and y values in the snippet of code you mentioned. Here the options are in the order: top left, top right, bottom left, bottom right. Note the use of i (which will be 0, 1, 2 or 3 respectively).

    I'll leave it as an exercise to you to figure out some calculations (or just to write down each set of coordinates separately).
     
    302
    Posts
    13
    Years
    • Seen Aug 25, 2014
    Thanks, Maruno! Both the control function and the button positions work perfectly now.

    My approach to the coordinates for the button graphics kind of feels... impractical to me, though. I motified the "for i in 0...commands.length" statement to look like this:

    Code:
        for i in 0...commands.length
          if (i == 0)
            x=64
            y=64
          end
          if (i == 1)
            x=224
            y=64
          end
          if (i == 2)
            x=64
            y=192
          end
          if (i == 3)
            x=224
            y=192
          end
          @sprites["button#{i}"]=PokegearButton.new(x,y,commands[i],i,@viewport)
          @sprites["button#{i}"].selected=(i==@sprites["command_window"].index)
          @sprites["button#{i}"].update
        end
    It doesn't cause any problems that I've noticed so far and it gets each button positioned properly on the screen, but I felt like I could have handled this in a more condensed way somehow. What are your thoughts?
     

    Maruno

    Lead Dev of Pokémon Essentials
    5,286
    Posts
    16
    Years
    • Seen May 3, 2024
    That works perfectly fine, and it's easy enough to read. Since the value i can only be one number, which means only one of the four if clauses can ever happen, you could merge them by using elsif rather than end followed by another if.

    What you could then do to save more space is use arrays. Let's try this:

    Code:
    xarray=[64,224,64,224]
    yarray=[64,64,192,192]
    x=xarray[i]
    y=yarray[i]
    Given that i goes 0,1,2,3 this code will take the first number from each array for the first button, the second number from each array for the second button, and so on. You could compact this code a bit further, like so:

    Code:
    x=[64,224,64,224][i]
    y=[64,64,192,192][i]
    You won't need xarray and yarray for any other purpose, so you can define them solely for use in the calculations of x and y (and taking a number from them immediately). This still gives you a bunch of coordinates to look after, though (8 in total), which could be a bit tricky to work with, particularly if you add to them or want to change some - remember to change all the numbers accordingly so that things still line up and are evenly spaced!

    That leads us to the next step, which helps with dealing with masses of numbers. This step is about spotting patterns. x=64 if i is even, and 224 if it is odd. y=64 if i is less than 2, and 192 if it's 2 or greater.

    If a number is even, its remainder when divided by 2 will be 0. Programming calls the calculation where you divide one number by another and get the remainder "modulus", which is usually the % operator (just like +, -, * and / are operators). So i%2 will produce the remainder of i when divided by 2. You can then compare this number to 0, like so: (i%2)==0. If this is true, there is no remainder and i is an even number. If it's false, it's an odd number. So this is a single calculation that can be used to determine what x should be in all cases.

    The calculation for y looks to be trivial. i<2, right? Correct. You could also say (i/2)==0, where this division will be an integer because i and 2 are integers - for i=0,1,2,3 this will result in the values 0,0,1,1 (no halves in there!). This form of the calculation is more useful if you have more than two rows, since the number (0 or 1, or 2...) tells you which row the button is on (first or second, or third...).

    How does one work all this into actual code?

    Code:
    if (i%2)==0
      x=64
    else
      x=224
    end
    
    if i<2
      y=64
    else
      y=192
    end
    There's a shorthand way of writing these two chunks of code:
    Code:
    x = ((i%2)==0) ? 64 : 224
    y = (i<2) ? 64 : 192
    Statement, ? (if true), first value, : (else), second value. It's quite legible if you know what the symbols mean.

    This is good for just two options, because a statement can only be true or false (two outcomes). What if the buttons were arranged in a 3x3 grid instead?

    In that case you'd have to start using i as a number in the actual definition of x and y, rather than just in a statement which decides which definitions to use.

    Code:
    x = 64 + (i%3) * 160
    y = 64 + (i/3) * 128
    Firstly, note that we're now dividing and modulussing by 3 rather than 2. This number (for both the x and y calculations) will be the number of columns in the grid (3 across). The number of rows doesn't matter - it can go on for as long as it likes. The buttons are numbered from left to right, then from top to bottom (the same way you read English).

    (i%3) will result in the number sequence 0,1,2,0,1,2,0,1,2... The leftmost column is column 0, the middle is column 1, and the rightmost is column 2. Starting from column 0, you want to add a certain amount of spacing depending on which column you're in (where "spacing" means the width of a button plus the distance between the edges of two adjacent buttons, i.e. from the left side of one button to the left side of the next button). Column 2 is twice as far from column 0 as column 1 is, and the column numbers reflect this (2 is twice as big as 1). The spacing between two columns is 160, so add that amount multiplied by the column number to the position of column 0 and you'll get where you want to be. For the first column, you're adding the spacing amount multiplied by 0 (column 0), which is 0.

    The same goes for the y calculation, except that (i/3) results in the sequence 0,0,0,1,1,1,2,2,2... instead. The top row is row 0, the second row is row 1, and so on.

    This approach is extremely simple to write, and very useful. Of course, it only applies if you're plotting things out in a fixed grid - if they were positioned irregularly and/or haphazardly, you'd either want to try to spot new patterns in the irregularity and code them in, or just do what you originally did here and define each button's coordinates separately.


    I'm sure I went into much more detail and became much more teachery than I needed to. To be honest, at the casual coding level which this is, you don't need to worry about efficiency or elegance in your code. As long as it works, it's fine, and your original code certainly works.

    A lot of decent code is about recognising and utilising patterns, as well as making it easier to edit. The final version of this code used patterns, and because of this, only contained four numbers: the x and y coordinates of the top left button, and the horizontal and vertical spacing between two adjacent buttons in those directions. A 3x3 grid, or even a 100x100 grid, can be defined using these same four numbers (although maybe you'd have to make the numbers smaller so all the buttons would fit on screen!). That sounds a lot simpler to deal with than 8 separate coordinates (or 18 for a 3x3 grid, or 20,000 for a 100x100 grid), doesn't it?
     

    FL

    Pokémon Island Creator
    2,454
    Posts
    13
    Years
    • Seen today
    The actual selection of the options is done by a regular options list (@sprites["command_window"]) which is placed off-screen. The graphics are then updated depending on which option in the command window is currently selected.
    And this window is one of few outscreen things that player can see pressing Alt+Enter.
     
    Back
    Top