Pokemon Scratch Tutorial #1
by Chesu
In this tutorial, I'll be teaching you what I call the circle method,
or spriting by geometry. First thing's first, open up your favorite image
editor. I don't care if you just want to read the tutorial, do it. I prefer MS
Paint, as it presentes a single large environment, but you should use
whatever you're most comfortable with. The first thing you need
to do is decide the size of your sprite.
This red box represents how big GBA Pokemon battle sprites can be
with no problem. So long as the sprite fits within the red box without
overlapping the edges, everything should work just fine... I think I'll go
with a Pokemon of medium/small size. Before you even start on the sprite,
you should have a mental image of what you'll be making. I'm actually
going to be winging it, making it up as I go along.
The first step in the circle method is to draw some circles with the
circle tool. Sure, you could freehand them, but the circle tool is faster
and more accurate. The number and size of the circles depends on what
you're making... for Geodude, you'd start with a medium circle for the body,
and two small ones for the hands. If you wanted to make a Nuzleaf, you
would make a medium circle for the head, two small ones for the hips,
and maybe an oval or rectangle for the shoulders. I'm going keep it
simple and make two circles, for a head and body.
How many circles did you make? Now, you should consider the pose
your sprite will be in, and move your circles to reflect that. I want mine
to be facing the opponent head-on, so the smaller head circle should stay
on the left side of the body circle. I think I'm going to try for something
like a cat or a dog, sitting down, so the head circle will go on top.
Once you've got your circles situated, you can reshape them.
I smoothed out the body a bit, and made the head slightly more...
well, head-shaped. Most quadrupedal mammals have a head that gets
more narrow under the eyes, so take the jaw line and other facial
structures into consideration while doing this. I still don't know what
I'm making, but it has a fairly rounded body. From here on out, you'll be
experimenting a bit, so you should always make a copy of the most recent
revision to the sprite, and work on that. To give it some contrast against
the white background, I'm going to color it a little. To ensure that my
sprites will blend with everything else in the game, I prefer to use
the color palettes of existing Pokemon.
While looking through Pokemon sprites, Noctowl caught my eye, so I
grabbed its palette. I also started to draw some limbs. My original idea was
to draw the leg similar to how a cat or dog's leg looks when they're sitting
down... there's really no trick to it, just draw how you think it should look.
Due to how long I made the foot, it turned out looking more like a rabbit's
leg, so I decided that's what I would be making: a rabbity thing. For the
forepaws, I just drew some paw shapes, then added little arms. If you
are having trouble drawing what you have in mind, look closely at a
reference image. I think I'll color the arms and legs now...
what kind of limbs did you decide to draw?
You probably can't see what the problem is, and I'm not exactly
sure that I know either, but I just didn't like how the paws looked. I
tried moving them around, but none of my attempts were satisfactory...
so, I decided to amputate. What? Don't worry, it'll be fine. If you ever feel
like something isn't working out, there's nothing wrong with trying something
else. It's been used before (see Klonoa, Terriermon, and Pokota to name a
few), but I think I'm going to have my rabbity thing attack with its ears.
Don't worry, I'll find a way to sneak a lesson about spriting into it.
As you can see, the ear on the left is a basic arch shape, while the one
on the right looks.. well, better. The ear on the right started out looking
about the same as the one on the left, but I added a few little touches
to make it look more organic. Let's take a closer look.
Upon closer inspection, you can see that one of the major differences
is that the ear on the right doesn't look as rounded. The ends are very
different, of course, but you probably haven't even noticed the most
important thing in the image. Actually, that's because I didn't include
the "wrong" thing to do it, because I'm so used to doing it the "right"
way. So, what am I talking about? Well, let's have another look at
the two circles I started with.
So, which circle looks more round to you. The one on the left?
Well, why? The answer is pretty weird; because the circle on the right
has a straight line three pixels long connected to diagonal lines. It sounds
crazy, I know, but that's really what it is. If you want something to look
natural, you should make sure that the ends of diagonal lines are connected
to straight lines by smaller straight lines, two pixels long. I don't question it,
I just know that it works. You also wants to avoid right angles, unless
you're spriting a Pokemon made of minerals or ice. Yes, there are right
angles in my sprite's face... I intend to build the nose and whiskers/hair
tufts around them. Anyway, lesson learned, right? Right. Onward!
The sprite's backside was looking a little flat, so I decided to give
it a tail. Rather than a boring old rabbit tail, I gave it something you'd
see on a primate or marsupial, with a tuft on the end similar to the ears.
There is no universal truth about tails (aside from the fact that no matter
what kind of animal it is, there IS bone somewhere in there, so keep that
in mind), so it's time to move on to the finer details! Since I don't plan
on adding anything else to the outside of the sprite, I'm going to be
working on things on the inside. If you're still working on limbs or
anything like that, finish up before you continue reading!
You already know that I started on the face, so let's talk about
the eyes. I like to start by drawing a ridge where the top of the eyes
will be, to make it easier easier to shape them. The eye ridge should be
based on the shape of the rest of the head, but you'll have to use your
own judgment to determine how it should look. Only part of the eye on the
left is visible; there are probably a lot of Pokemon that look like this, due to
their heads being oriented on the opponent. You want the sprite look like
it's focusing on something about ten feet away. Also, remember that eyes
are generally wet-looking, and therefore reflective, which is why you will
often see a white pixel or two on the colored part of the eye. I actually
intended for the nose to be at the very bottom of the face when I shaped
the head, and I may end up changing the sprite's face completely before
I'm done. When making the nose and mouth, keep the facial structures
you've established so far in mind. Once you've finished the basic
layout of your face, we'll move on to shading.
Most GBA Pokemon and trainer sprites seem to be illuminated by
a light source somewhere to the left and above them, so when shading
your sprite, make it darker on the right and bottom. If you look closely at
the sprite on the right, you'll see that I used lighter colors in some places
on the outline. It may seem like a small thing, but you'd be surprised at how
big of difference it can make in the overall look of the sprite. The shading
has made me realize just how fat the little guy is, so while you're shading
your sprite, I'm going to slim it down, maybe add a few finishing touches.
Lookin' good, bunny-man! When you want to use multiple colors as I
did here, just replace the original shades with the new ones in the chosen
area. Resist the temptation to draw a dark-colored line between the two
different hues! I'm going to do some last minute shading, and add a few
more small details. Maybe, with a more slender frame and better
shading, I'll be able to get the forelegs to look right.
Well! I'm surprised, I quite like that. The less noticeable changes I
made were to alter the shading a bit, mostly along the back and on the
ears, and to add ear canals. I actually planned on adding the ear canals
earlier, but forgot until now. If you look closely, you'll see that aside from
making it more believable as an animal, they also add a dimension to the
ears that wasn't there before, showing the point at which the back side of
the ears becomes visible from the front. With that, I think I'm done!
Not bad, for two circles put together in MS Paint. It doesn't look
a whole lot like a Pokemon, but that's just because I didn't give it the
large head and distinctive face normally associated with the creatures. It
could also use some markings or tufts of hair on its body, but I'm happy
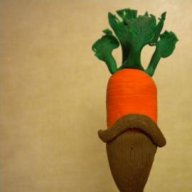
with it as it is. I think I'll call it... Marchare, a Normal/Fighting type. A
little bit rabbit, a little bit cat, a little bit kangaroo, and a little bit
crazy! So, how did everyone else's turn out? Please, post
your own made-from-scratch sprites below!
---
If you have any questions or would like to give feedback
on the tutorials,
click here to leave me a visitor message!

![[PokeCommunity.com] Spriting Tutorials - Pokemon and Trainer](https://i11.photobucket.com/albums/a191/Chesu/Tutorials/button7.png "[PokeCommunity.com] Spriting Tutorials - Pokemon and Trainer")
![[PokeCommunity.com] Spriting Tutorials - Pokemon and Trainer](https://i11.photobucket.com/albums/a191/Chesu/Tutorials/new1.gif "[PokeCommunity.com] Spriting Tutorials - Pokemon and Trainer")
![[PokeCommunity.com] Spriting Tutorials - Pokemon and Trainer](https://i11.photobucket.com/albums/a191/Chesu/Tutorials/button8.png "[PokeCommunity.com] Spriting Tutorials - Pokemon and Trainer")
![[PokeCommunity.com] Spriting Tutorials - Pokemon and Trainer](https://i11.photobucket.com/albums/a191/Chesu/Tutorials/new2.gif "[PokeCommunity.com] Spriting Tutorials - Pokemon and Trainer")
![[PokeCommunity.com] Spriting Tutorials - Pokemon and Trainer](https://i11.photobucket.com/albums/a191/Chesu/Tutorials/button1.png "[PokeCommunity.com] Spriting Tutorials - Pokemon and Trainer")
![[PokeCommunity.com] Spriting Tutorials - Pokemon and Trainer](https://i11.photobucket.com/albums/a191/Chesu/Tutorials/button3.png "[PokeCommunity.com] Spriting Tutorials - Pokemon and Trainer")
![[PokeCommunity.com] Spriting Tutorials - Pokemon and Trainer](https://i11.photobucket.com/albums/a191/Chesu/Tutorials/button5.png "[PokeCommunity.com] Spriting Tutorials - Pokemon and Trainer")
![[PokeCommunity.com] Spriting Tutorials - Pokemon and Trainer](https://i11.photobucket.com/albums/a191/Chesu/Tutorials/button9.png "[PokeCommunity.com] Spriting Tutorials - Pokemon and Trainer")
![[PokeCommunity.com] Spriting Tutorials - Pokemon and Trainer](https://i11.photobucket.com/albums/a191/Chesu/Tutorials/button2.png "[PokeCommunity.com] Spriting Tutorials - Pokemon and Trainer")
![[PokeCommunity.com] Spriting Tutorials - Pokemon and Trainer](https://i11.photobucket.com/albums/a191/Chesu/Tutorials/button4.png "[PokeCommunity.com] Spriting Tutorials - Pokemon and Trainer")
![[PokeCommunity.com] Spriting Tutorials - Pokemon and Trainer](https://i11.photobucket.com/albums/a191/Chesu/Tutorials/button6.png "[PokeCommunity.com] Spriting Tutorials - Pokemon and Trainer")


![[PokeCommunity.com] Spriting Tutorials - Pokemon and Trainer](https://i11.photobucket.com/albums/a191/Chesu/Tutorials/tut1.png "[PokeCommunity.com] Spriting Tutorials - Pokemon and Trainer")
![[PokeCommunity.com] Spriting Tutorials - Pokemon and Trainer](https://i11.photobucket.com/albums/a191/Chesu/Tutorials/tut2.png "[PokeCommunity.com] Spriting Tutorials - Pokemon and Trainer")
![[PokeCommunity.com] Spriting Tutorials - Pokemon and Trainer](https://i11.photobucket.com/albums/a191/Chesu/Tutorials/tut3.png "[PokeCommunity.com] Spriting Tutorials - Pokemon and Trainer")
![[PokeCommunity.com] Spriting Tutorials - Pokemon and Trainer](https://i11.photobucket.com/albums/a191/Chesu/Tutorials/tut4.png "[PokeCommunity.com] Spriting Tutorials - Pokemon and Trainer")
![[PokeCommunity.com] Spriting Tutorials - Pokemon and Trainer](https://i11.photobucket.com/albums/a191/Chesu/Tutorials/tut5.png "[PokeCommunity.com] Spriting Tutorials - Pokemon and Trainer")
![[PokeCommunity.com] Spriting Tutorials - Pokemon and Trainer](https://i11.photobucket.com/albums/a191/Chesu/Tutorials/tut6.png "[PokeCommunity.com] Spriting Tutorials - Pokemon and Trainer")
![[PokeCommunity.com] Spriting Tutorials - Pokemon and Trainer](https://i11.photobucket.com/albums/a191/Chesu/Tutorials/tut7.png "[PokeCommunity.com] Spriting Tutorials - Pokemon and Trainer")
![[PokeCommunity.com] Spriting Tutorials - Pokemon and Trainer](https://i11.photobucket.com/albums/a191/Chesu/Tutorials/tut8.png "[PokeCommunity.com] Spriting Tutorials - Pokemon and Trainer")
![[PokeCommunity.com] Spriting Tutorials - Pokemon and Trainer](https://i11.photobucket.com/albums/a191/Chesu/Tutorials/tut9.png "[PokeCommunity.com] Spriting Tutorials - Pokemon and Trainer")
![[PokeCommunity.com] Spriting Tutorials - Pokemon and Trainer](https://i11.photobucket.com/albums/a191/Chesu/Tutorials/tut10.png "[PokeCommunity.com] Spriting Tutorials - Pokemon and Trainer")
![[PokeCommunity.com] Spriting Tutorials - Pokemon and Trainer](https://i11.photobucket.com/albums/a191/Chesu/Tutorials/tut11.png "[PokeCommunity.com] Spriting Tutorials - Pokemon and Trainer")
![[PokeCommunity.com] Spriting Tutorials - Pokemon and Trainer](https://i11.photobucket.com/albums/a191/Chesu/Tutorials/tut12.png "[PokeCommunity.com] Spriting Tutorials - Pokemon and Trainer")
![[PokeCommunity.com] Spriting Tutorials - Pokemon and Trainer](https://i11.photobucket.com/albums/a191/Chesu/Tutorials/tut13.png "[PokeCommunity.com] Spriting Tutorials - Pokemon and Trainer")
![[PokeCommunity.com] Spriting Tutorials - Pokemon and Trainer](https://i11.photobucket.com/albums/a191/Chesu/Tutorials/tut14.png "[PokeCommunity.com] Spriting Tutorials - Pokemon and Trainer")
![[PokeCommunity.com] Spriting Tutorials - Pokemon and Trainer](https://i11.photobucket.com/albums/a191/Chesu/Tutorials/tut25.png "[PokeCommunity.com] Spriting Tutorials - Pokemon and Trainer")
![[PokeCommunity.com] Spriting Tutorials - Pokemon and Trainer](https://i11.photobucket.com/albums/a191/Chesu/Tutorials/tut29.png "[PokeCommunity.com] Spriting Tutorials - Pokemon and Trainer")
![[PokeCommunity.com] Spriting Tutorials - Pokemon and Trainer](https://i11.photobucket.com/albums/a191/Chesu/Tutorials/tut26.png "[PokeCommunity.com] Spriting Tutorials - Pokemon and Trainer")
![[PokeCommunity.com] Spriting Tutorials - Pokemon and Trainer](https://i11.photobucket.com/albums/a191/Chesu/Tutorials/tut27.png "[PokeCommunity.com] Spriting Tutorials - Pokemon and Trainer")
![[PokeCommunity.com] Spriting Tutorials - Pokemon and Trainer](https://i11.photobucket.com/albums/a191/Chesu/Tutorials/tut28.png "[PokeCommunity.com] Spriting Tutorials - Pokemon and Trainer")
![[PokeCommunity.com] Spriting Tutorials - Pokemon and Trainer](https://i11.photobucket.com/albums/a191/Chesu/Tutorials/tut15.png "[PokeCommunity.com] Spriting Tutorials - Pokemon and Trainer")
![[PokeCommunity.com] Spriting Tutorials - Pokemon and Trainer](https://i11.photobucket.com/albums/a191/Chesu/Tutorials/tut16.png "[PokeCommunity.com] Spriting Tutorials - Pokemon and Trainer")
![[PokeCommunity.com] Spriting Tutorials - Pokemon and Trainer](https://i11.photobucket.com/albums/a191/Chesu/Tutorials/tut17.png "[PokeCommunity.com] Spriting Tutorials - Pokemon and Trainer")
![[PokeCommunity.com] Spriting Tutorials - Pokemon and Trainer](https://i11.photobucket.com/albums/a191/Chesu/Tutorials/tut18.png "[PokeCommunity.com] Spriting Tutorials - Pokemon and Trainer")
![[PokeCommunity.com] Spriting Tutorials - Pokemon and Trainer](https://i11.photobucket.com/albums/a191/Chesu/Tutorials/tut19.png "[PokeCommunity.com] Spriting Tutorials - Pokemon and Trainer")
![[PokeCommunity.com] Spriting Tutorials - Pokemon and Trainer](https://i11.photobucket.com/albums/a191/Chesu/Tutorials/tut20.png "[PokeCommunity.com] Spriting Tutorials - Pokemon and Trainer")
![[PokeCommunity.com] Spriting Tutorials - Pokemon and Trainer](https://i11.photobucket.com/albums/a191/Chesu/Tutorials/tut21.png "[PokeCommunity.com] Spriting Tutorials - Pokemon and Trainer")
![[PokeCommunity.com] Spriting Tutorials - Pokemon and Trainer](https://i11.photobucket.com/albums/a191/Chesu/Tutorials/tut22.png "[PokeCommunity.com] Spriting Tutorials - Pokemon and Trainer")
![[PokeCommunity.com] Spriting Tutorials - Pokemon and Trainer](https://i11.photobucket.com/albums/a191/Chesu/Tutorials/tut23.png "[PokeCommunity.com] Spriting Tutorials - Pokemon and Trainer")
![[PokeCommunity.com] Spriting Tutorials - Pokemon and Trainer](https://i11.photobucket.com/albums/a191/Chesu/Tutorials/tut24.png "[PokeCommunity.com] Spriting Tutorials - Pokemon and Trainer")
![[PokeCommunity.com] Spriting Tutorials - Pokemon and Trainer](https://i11.photobucket.com/albums/a191/Chesu/Tutorials/tut30.png "[PokeCommunity.com] Spriting Tutorials - Pokemon and Trainer")
![[PokeCommunity.com] Spriting Tutorials - Pokemon and Trainer](https://i11.photobucket.com/albums/a191/Chesu/Tutorials/tut31.png "[PokeCommunity.com] Spriting Tutorials - Pokemon and Trainer")
![[PokeCommunity.com] Spriting Tutorials - Pokemon and Trainer](https://i11.photobucket.com/albums/a191/Chesu/Tutorials/tut32.png "[PokeCommunity.com] Spriting Tutorials - Pokemon and Trainer")
![[PokeCommunity.com] Spriting Tutorials - Pokemon and Trainer](https://i11.photobucket.com/albums/a191/Chesu/Tutorials/tut33.png "[PokeCommunity.com] Spriting Tutorials - Pokemon and Trainer")
![[PokeCommunity.com] Spriting Tutorials - Pokemon and Trainer](https://i11.photobucket.com/albums/a191/Chesu/Tutorials/tut34.png "[PokeCommunity.com] Spriting Tutorials - Pokemon and Trainer")
![[PokeCommunity.com] Spriting Tutorials - Pokemon and Trainer](https://i11.photobucket.com/albums/a191/Chesu/Tutorials/tut35.png "[PokeCommunity.com] Spriting Tutorials - Pokemon and Trainer")
![[PokeCommunity.com] Spriting Tutorials - Pokemon and Trainer](https://i11.photobucket.com/albums/a191/Chesu/Tutorials/tut36.png "[PokeCommunity.com] Spriting Tutorials - Pokemon and Trainer")
![[PokeCommunity.com] Spriting Tutorials - Pokemon and Trainer](https://i11.photobucket.com/albums/a191/Chesu/Tutorials/tut37.png "[PokeCommunity.com] Spriting Tutorials - Pokemon and Trainer")