Akiba
[img]http://i.imgur.com/o3RYT4v.png[/img]
- 4,262
- Posts
- 13
- Years
- Age 24
- in a gap
- Seen Apr 10, 2017
Introduction
Hello all. Darthatron made a tutorial several years back on creating a Hex Editor and related hacking tools in VB6. The thread can be found here. As you all know, VB6 is run in Win16, which means that it can only be run on Win16 or Win32 machines. A very small amount of people use Win16 machines anymore, and this leaves Win64 developers at a loss. So my purpose is to create a tutorial usingthe new VB.NET, which is standardized and maintains support from Microsoft. The source code can be found at the bottom of the page.
Resources
All you need is an IDE (Integrated Development Environment) that can work with VB.NET.
If you already have Microsoft Visual Studio, that's wonderful.
Otherwise, for a much more lightweight yet almost equally effective IDE, you can get Sharpdevelop, which has a virtually identical layout. It can be found in my signature, or here.
I will be demonstrating in Microsoft Visual Studio.
Step 1: Create and Prepare Your Project.
In your IDE, go to File->New->Project in MSVS or File->New->Solution in #Dev.
Select the settings in the following pictures.
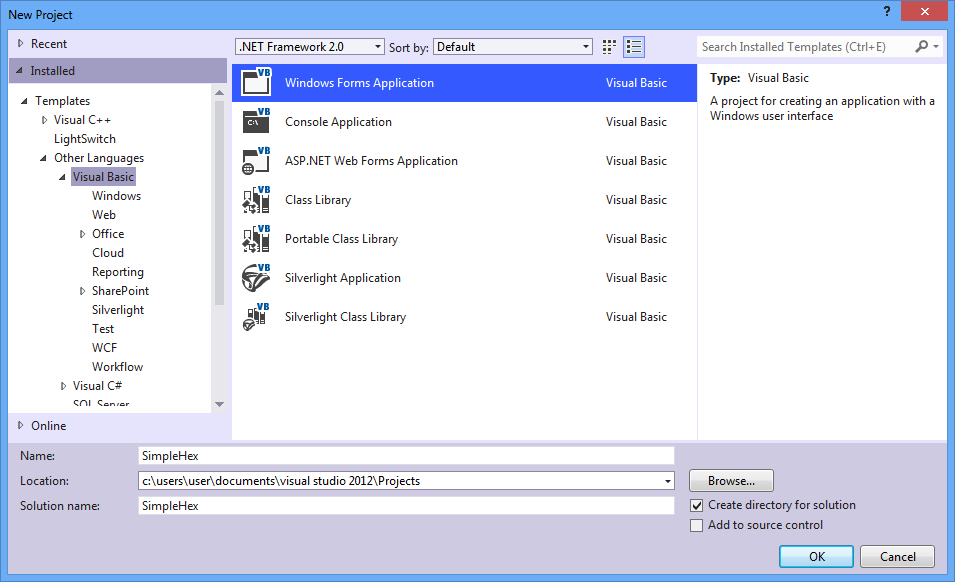
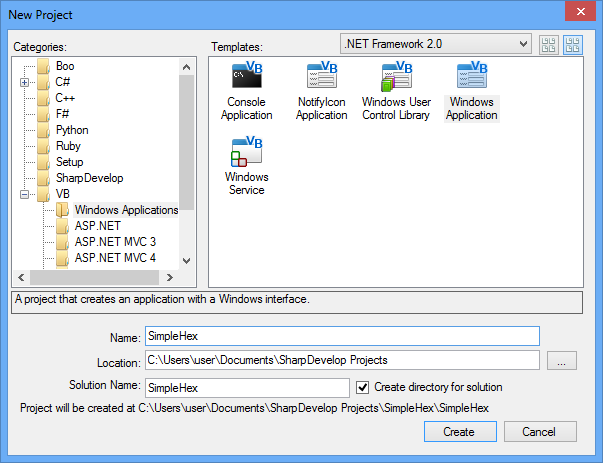
Rename your form and application text to Main.vb and Main, respectively. I do this just because using Form1 is a bad programming habit. Naming in the project will be optional.
Create a Button, name it 'open_button', change the text property to 'Open File...', and create a Rich Text Box, and name it 'hex_richtextbox'.
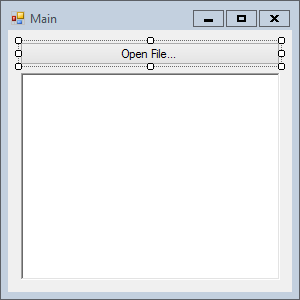
Double-click on 'open_button' in the designer to create an event. We will use this in the next step.
Create an Open File Dialog, and name it 'open_openfiledialog'. This is the dialog that we will use to browse for a file.
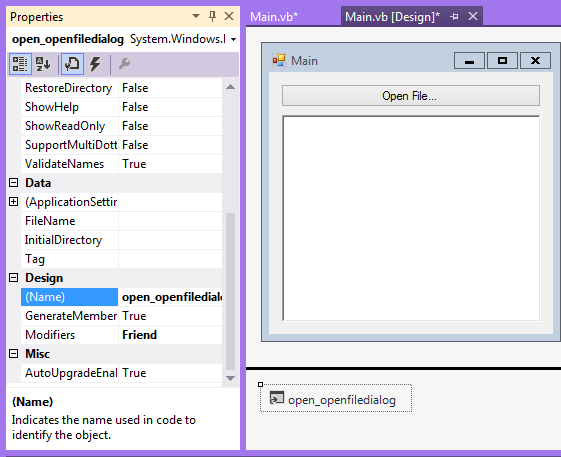
Go into Main.vb where your event was created.
At the very top, type 'Imports System.IO'. This will make our code easier to understand by reducing text needed to type.
Under Public Class Main, type 'Dim hexString as String'. This will declare the string that we are going to use to display our hex values.
Now your preparations are ready.
Step 2: Programming the Application
Your Main.vb should now look like this.

Under the Click Event, type this.
Explanation:
This code reads the Hex from the selected file, and displays it in the textbox.
Your code should now look like this.
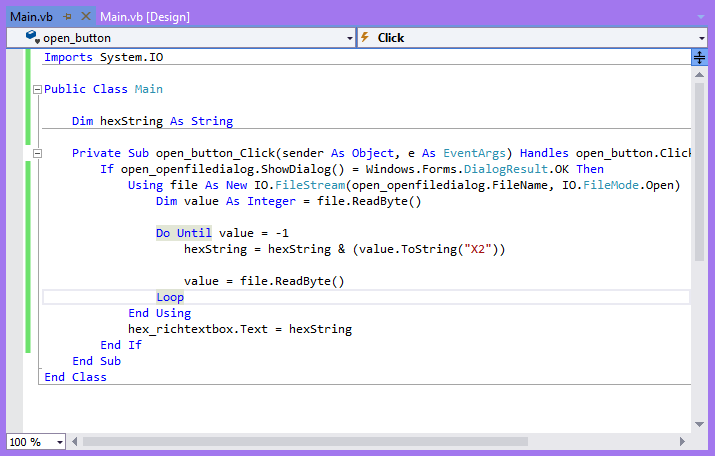
Now, your program can read the hex from a file!
Click on the green arrow to compile your program.

Part 3: Allowing only Hex Values to be Entered
This step is short and sweet.
Go to the designer, and click on the Rich Text Box once.
Click on the Lightning button; this is where all possible events for that control are found.
Double-click on the KeyPress event.
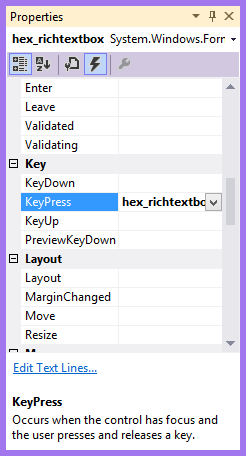
Under the event sub, type this.
Explanation:
Your code should look like this.

Now your textbox only accepts Hex characters.
Part 4: Saving your File
Now increase the size of your form to accommodate a Save button.
Create a Button called 'save_button' and change the text property to 'Save File...'.
Create a Save File Dialog and name it 'save_savefiledialog'.
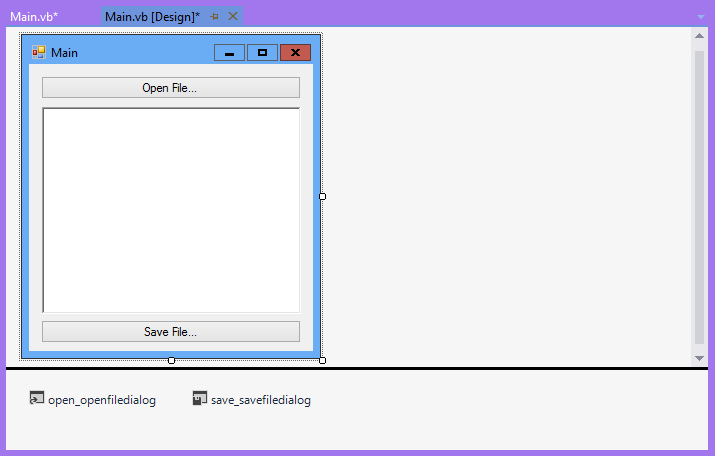
Create an event for 'save_button' the same way you did for 'open_button'.
Under the Save event, type this.
Explanation:
This will save the file, and do nothing if it fails.
Your code should look like this.
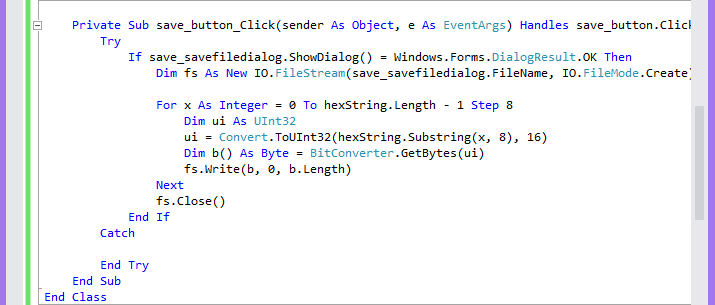
Go back up to your open_button event, and wrap it in a [Try, Catch, End Try], so that the program doesn't crash if another program is using it.
Your program is now done.
Hope this helps to start the foundation for one of the next revolutionary hacking tools.
If you could not follow the tutorial, the source code can be found in the attachments.
Regards,
~Tosaka
Hello all. Darthatron made a tutorial several years back on creating a Hex Editor and related hacking tools in VB6. The thread can be found here. As you all know, VB6 is run in Win16, which means that it can only be run on Win16 or Win32 machines. A very small amount of people use Win16 machines anymore, and this leaves Win64 developers at a loss. So my purpose is to create a tutorial using
Resources
All you need is an IDE (Integrated Development Environment) that can work with VB.NET.
If you already have Microsoft Visual Studio, that's wonderful.
Otherwise, for a much more lightweight yet almost equally effective IDE, you can get Sharpdevelop, which has a virtually identical layout. It can be found in my signature, or here.
I will be demonstrating in Microsoft Visual Studio.
Step 1: Create and Prepare Your Project.
In your IDE, go to File->New->Project in MSVS or File->New->Solution in #Dev.
Select the settings in the following pictures.
Spoiler:

Spoiler:

Rename your form and application text to Main.vb and Main, respectively. I do this just because using Form1 is a bad programming habit. Naming in the project will be optional.
Create a Button, name it 'open_button', change the text property to 'Open File...', and create a Rich Text Box, and name it 'hex_richtextbox'.
Spoiler:

Double-click on 'open_button' in the designer to create an event. We will use this in the next step.
Create an Open File Dialog, and name it 'open_openfiledialog'. This is the dialog that we will use to browse for a file.
Spoiler:

Go into Main.vb where your event was created.
At the very top, type 'Imports System.IO'. This will make our code easier to understand by reducing text needed to type.
Under Public Class Main, type 'Dim hexString as String'. This will declare the string that we are going to use to display our hex values.
Now your preparations are ready.
Step 2: Programming the Application
Your Main.vb should now look like this.
Spoiler:

Under the Click Event, type this.
Spoiler:
If open_openfiledialog.ShowDialog() = Windows.Forms.DialogResult.OK Then
Using file As New IO.FileStream(open_openfiledialog.FileName, IO.FileMode.Open)
Dim value As Integer = file.ReadByte()
Do Until value = -1
hexString = hexString & (value.ToString("X2"))
value = file.ReadByte()
Loop
End Using
hex_richtextbox.Text = hexString
End If
Using file As New IO.FileStream(open_openfiledialog.FileName, IO.FileMode.Open)
Dim value As Integer = file.ReadByte()
Do Until value = -1
hexString = hexString & (value.ToString("X2"))
value = file.ReadByte()
Loop
End Using
hex_richtextbox.Text = hexString
End If
Explanation:
Spoiler:
If open_openfiledialog.ShowDialog() = Windows.Forms.DialogResult.OK Then
This combines several things into one line. First, it creates an instance of our dialog that browses for a file. Then, it checks to see whether the OK button was clicked or not.
Using file As New IO.FileStream(open_openfiledialog.FileName, IO.FileMode.Open)
This is a using statement. It creates a little space to work in, and defines 'file' as something that the program can open and access. All variables used inside are disposed afterwards, so it's less memory-intensive.
Dim value As Integer = file.ReadByte()
This defines 'value' as a datum that can contain bytes that are read.
Do Until value = -1
hexString = hexString & (value.ToString("X2"))
value = file.ReadByte()
Loop
This whole loop reads a byte, concatenates (adds) its value onto the string that will be displayed, and loops until it reaches the end of the file.
End Using
This disposes our little virtual workspace.
hex_richtextbox.Text = hexString
This assigns the text property of our 'hex_richtextbox' to the value of 'hexString'. In other words, it shows 'hexString' in it.
End If
This ends our if statement, so that we can proceed onto the next segment of code.
This code reads the Hex from the selected file, and displays it in the textbox.
Your code should now look like this.
Spoiler:

Now, your program can read the hex from a file!
Click on the green arrow to compile your program.
Spoiler:

Part 3: Allowing only Hex Values to be Entered
This step is short and sweet.
Go to the designer, and click on the Rich Text Box once.
Click on the Lightning button; this is where all possible events for that control are found.
Double-click on the KeyPress event.
Spoiler:

Under the event sub, type this.
Spoiler:
If (Asc(e.KeyChar) >= 48 And Asc(e.KeyChar) <= 57) Or (Asc(e.KeyChar) >= 65 And Asc(e.KeyChar) <= 70) Or (Asc(e.KeyChar) >= 97 And Asc(e.KeyChar) <= 102) Or (Asc(e.KeyChar) = 8 Or Asc(e.KeyChar) = 16) Then
e.Handled = False
Else
e.Handled = True
End If
e.Handled = False
Else
e.Handled = True
End If
Explanation:
Spoiler:
If (Asc(e.KeyChar) >= 48 And Asc(e.KeyChar) <= 57) Or (Asc(e.KeyChar) >= 65 And Asc(e.KeyChar) <= 70) Or (Asc(e.KeyChar) >= 97 And Asc(e.KeyChar) <= 102) Or (Asc(e.KeyChar) = 8 Or Asc(e.KeyChar) = 16) Then
This executes whatever is in the conditional block if the condition is true, in this case, where the key pressed is equivalent to hex values that would be entered. Each key on the keyboard has an ASCII value that is in turn, processed by the computer, save for the arrow keys and some others. Those keys have their own detection methods.
e.Handled = False
This means that whatever key is pressed, it is ignored.
Else
This will execute the next block of code if the conditional is not met, nor any subconditionals (which in this case we d not have).
e.Handled = True
This will accept the key that is pressed.
End If
This will end our if statement, allowing the next block of code to be executed.
Your code should look like this.
Spoiler:

Now your textbox only accepts Hex characters.
Part 4: Saving your File
Now increase the size of your form to accommodate a Save button.
Create a Button called 'save_button' and change the text property to 'Save File...'.
Create a Save File Dialog and name it 'save_savefiledialog'.
Spoiler:

Create an event for 'save_button' the same way you did for 'open_button'.
Under the Save event, type this.
Spoiler:
Try
If save_savefiledialog.ShowDialog() = Windows.Forms.DialogResult.OK Then
Dim fs As New IO.FileStream(save_savefiledialog.FileName, IO.FileMode.Create)
For x As Integer = 0 To hexString.Length - 1 Step 8
Dim ui As UInt32
ui = Convert.ToUInt32(hexString.Substring(x, 8), 16)
Dim b() As Byte = BitConverter.GetBytes(ui)
fs.Write(b, 0, b.Length)
Next
fs.Close()
End If
Catch
End Try
Explanation:
Spoiler:
Try
This will try to execute the next block of code, and return an error if something happens. If an exception is created, the program will not crash.
If save_savefiledialog.ShowDialog() = Windows.Forms.DialogResult.OK Then
This is very similar to the dialog for opening files, showing it first, and proceeding if the OK button was pressed.
Dim fs As New IO.FileStream(save_savefiledialog.FileName, IO.FileMode.Create)
This will create a filestream to save the bytes to. It is set on creation mode, which is used in other programs equivalent to the 'Save As' function.
For x As Integer = 0 To hexString.Length - 1 Step 8
This will increment the variable 'x' by eight each time the loop goes through. I will explain why in the next line of code.
Dim ui As UInt32
UInt32 is a variable type for 32-bit integers. The maximum number of characters it can store is eight, which is why we use them to our maximum advantage, and increment our index 'x' by eight each time. We have defined 'ui' as a UInt32 data value.
ui = Convert.ToUInt32(hexString.Substring(x, 8), 16)
This converts the variable to a hex value that is ready to be converted to a byte.
Dim b() As Byte = BitConverter.GetBytes(ui)
This converts ui into a series of bytes, and assigns it to the array of b().
fs.Write(b, 0, b.Length)
This concatenates 'b' onto the file.
Next
This is the loop footer.
fs.Close()
This closes the filestream. If this statement is not included, then nothing else will be able to access it until it is closed, which can only be done forcefully.
End If
This ends our if statement to move on the the next instructions.
Catch
This will execute the block of code that it contains only if the above code within the try region failed. If it failed, then it would do nothing, as we did not add any instructions within the catch region. Usually, an error message would be put here.
End Try
This ends our try statement, as an if statement is ended.
This will save the file, and do nothing if it fails.
Your code should look like this.
Spoiler:

Go back up to your open_button event, and wrap it in a [Try, Catch, End Try], so that the program doesn't crash if another program is using it.
Your program is now done.
Hope this helps to start the foundation for one of the next revolutionary hacking tools.
If you could not follow the tutorial, the source code can be found in the attachments.
Regards,
~Tosaka
Last edited:

